Getting Started - Creating Your Account
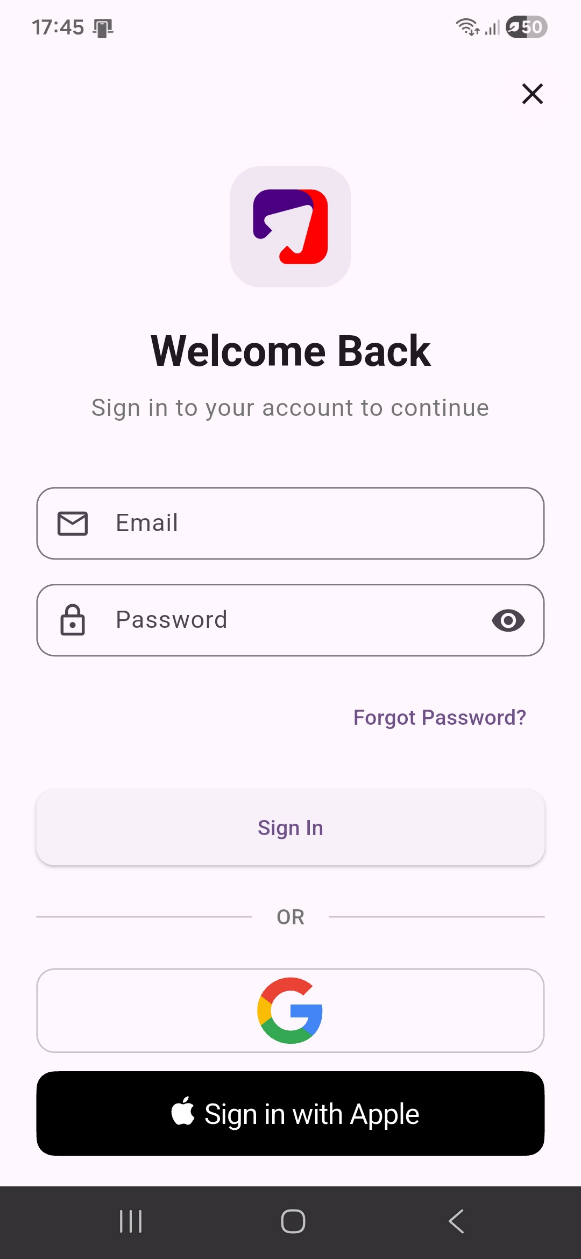
KeepMyBooking is a free app available on both iOS (App Store) and Android (Google Play). Download the app and follow the steps below to create your account, or create your account in your browser.
Creating a New Account
- Open the KeepMyBooking app - tap the icon on your home screen.
- Tap Create Account - you will be taken to the registration screen.
- Enter your email address in the Email field.
- Set a secure password, then confirm it in the Confirm Password field. Tap the eye icon to show or hide.
- Tick the checkbox to agree to the Terms of Service and Privacy Policy.
- Tap Sign Up - your account will be created. Alternatively tap the Google button to sign up with your Google account in one step.
Tip
Use a strong password with a mix of letters, numbers and symbols. Sign in with Google is faster if you have a Google account.
The Home Screen
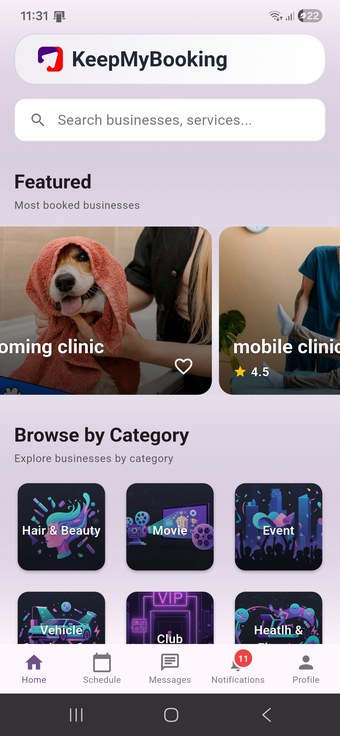
After signing in you will land on the Home screen - your central hub for discovering businesses and accessing all parts of the app.
What’s on the Home Screen
- Search bar - Tap “Search businesses, services...” to find any business or service by name.
- Featured - Shows the most-booked businesses on the platform. Swipe horizontally to browse. Tap the heart icon to save a business to your Favourites.
- Browse by Category - Scroll down to explore businesses by category: Hair & Beauty, Event & Studios, Vehicle Services, Clubs & Sport, Health & Fitness, and Professional Services.
Bottom Navigation Bar
- Home - Return to the main discovery screen.
- Schedule - View all your upcoming and past bookings.
- Messages - Chat with businesses you have booked with or with new businesses.
- Notifications - View booking reminders and alerts. The red badge shows unread count.
- Profile - Manage your personal details, payment methods, and business pages.
Searching for Businesses & Using Filters
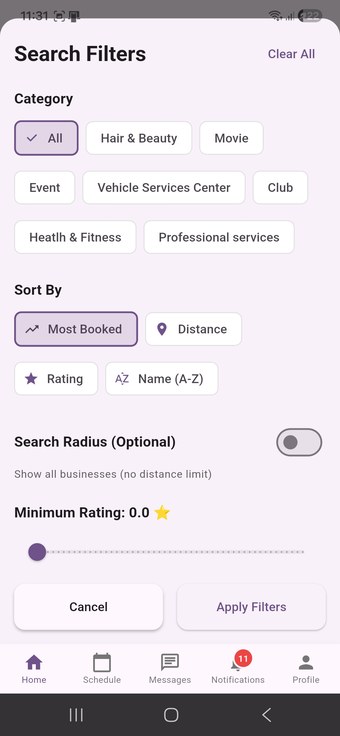
You can find businesses by name, service type, or category. The Search Filters screen gives you full control over how results are sorted and displayed.
How to Search
- Tap the Search bar at the top of the Home screen.
- Type a business or service name - results appear as you type.
- Tap the filter icon to open the Search Filters panel and refine results.
Search Filter Options
- Category - Filter by: All, Hair & Beauty, Event & Studios, Vehicle Services, Clubs & Sport, Health & Fitness, or Professional Services.
- Sort By - Choose from: Most Booked, Distance, Rating, or Name (A–Z).
- Search Radius - Toggle on to limit results to businesses within a set distance from your location.
- Minimum Rating - Drag the slider to set a minimum star rating for businesses shown.
Tip
Select ‘Most Booked’ to find the most popular businesses. Toggle on Search Radius if you want results near a specific location.
Managing Your Profile
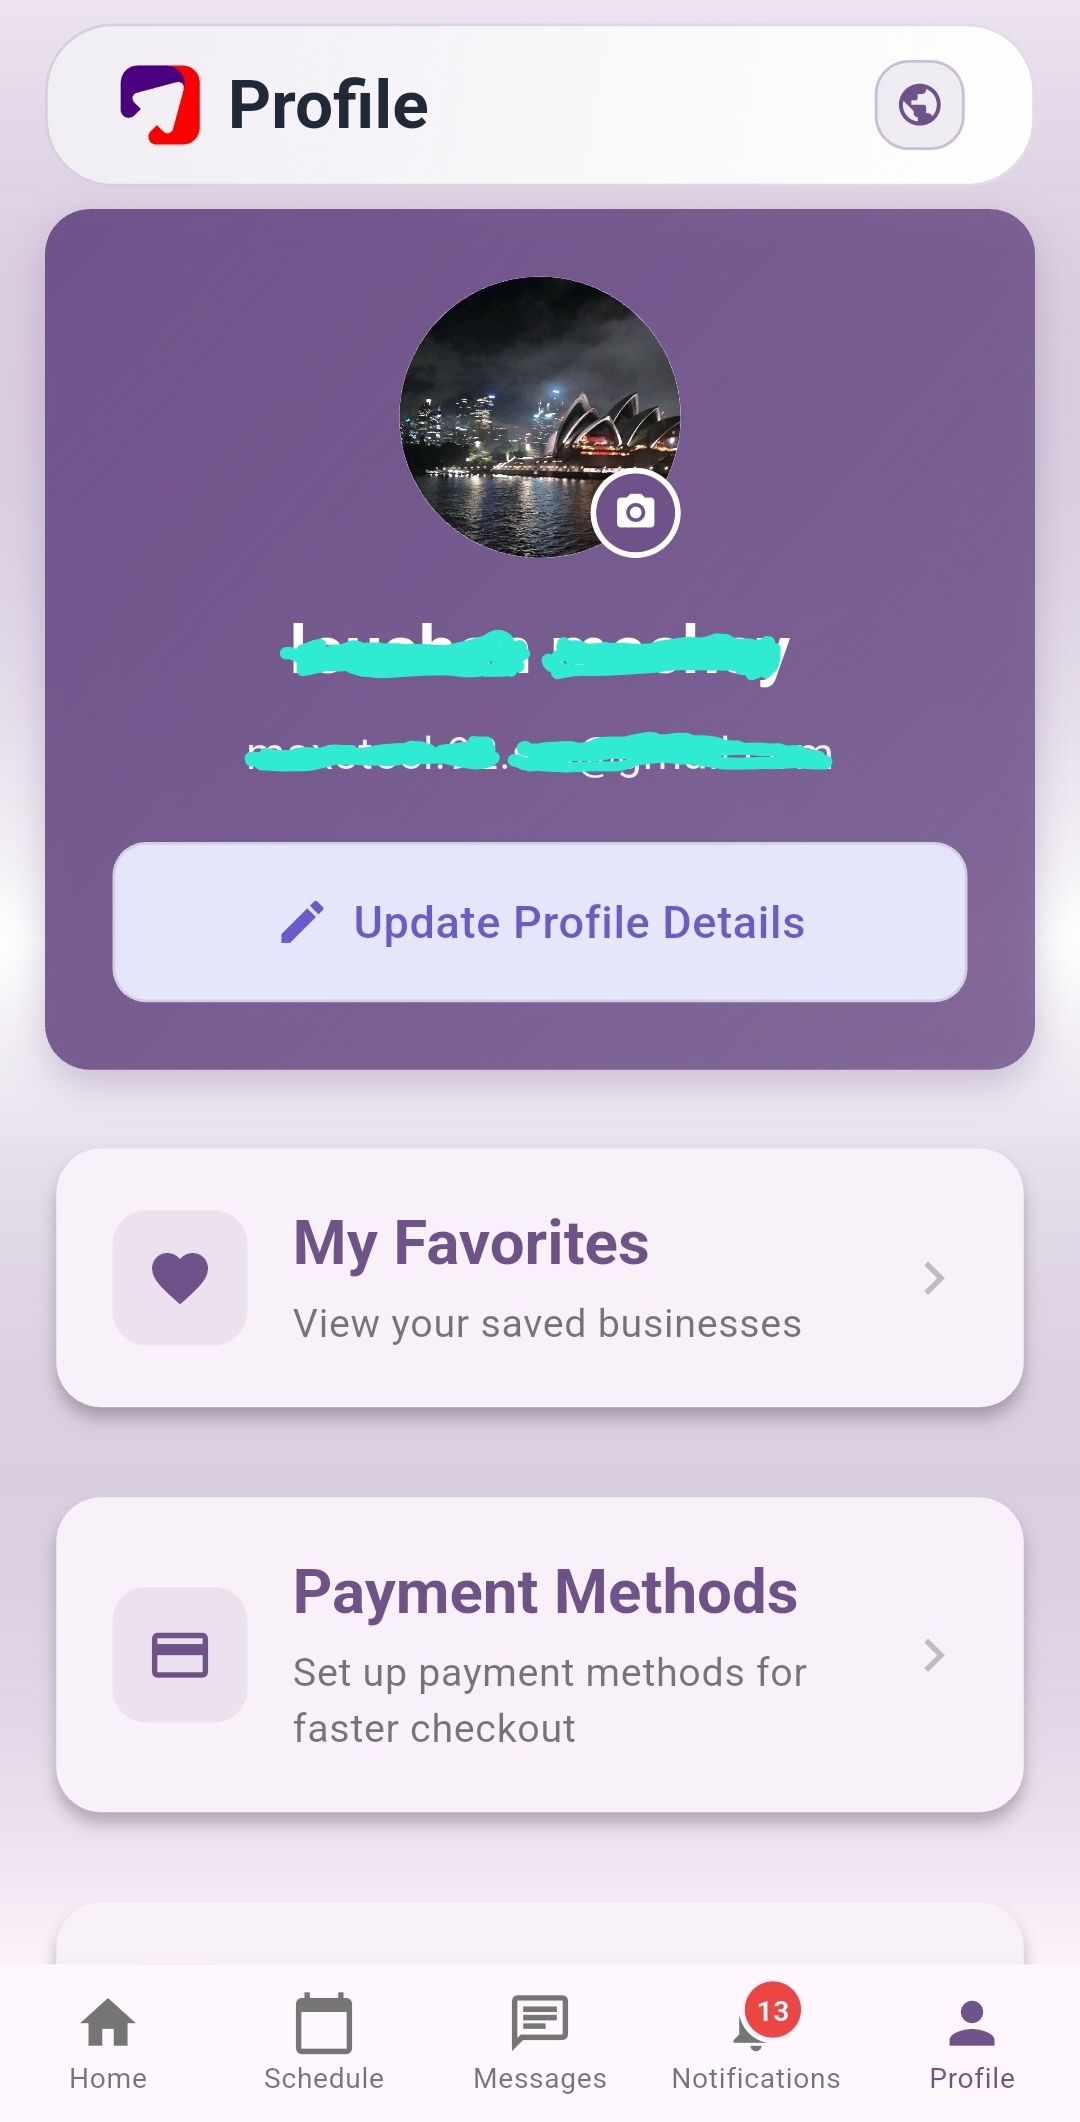
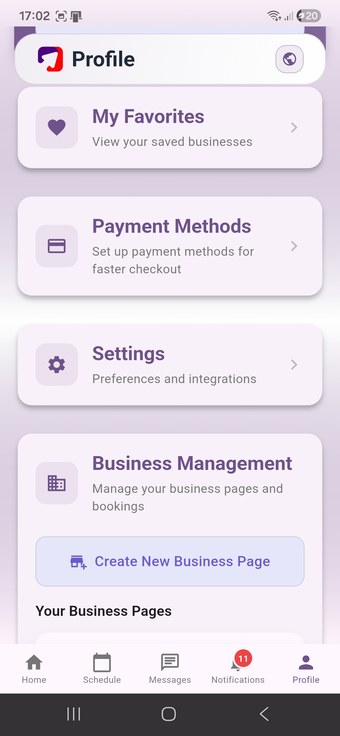
Your Profile screen contains your personal information, saved businesses, payment methods, settings, and business management tools.
Profile Screen Overview
- Profile card - Displays your name, email, and profile photo. Tap the camera icon to update your photo.
- Update Profile Details - Tap this button to edit your personal information.
- My Favorites - View all businesses you have saved with the heart icon.
- Payment Methods - Add, remove, or manage credit/debit cards for faster checkout.
- Settings - Manage preferences and integrations.
- Business Management - If you are also a merchant, manage your business pages here. Tap ‘Create New Business Page’ to list a new business.
Editing Your Profile Details
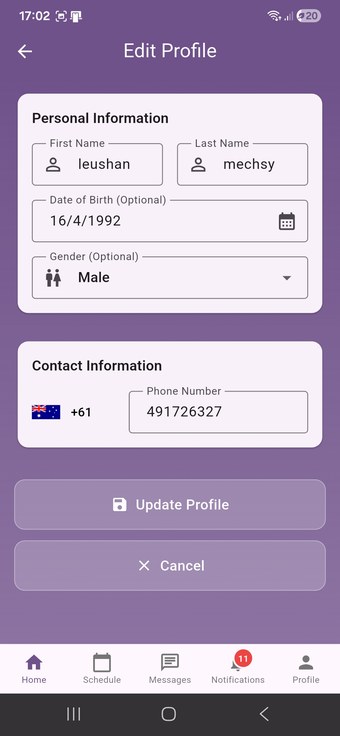
- Tap Update Profile Details on the Profile screen.
- Update your First Name, Last Name, Date of Birth (optional), and Gender (optional).
- Your phone number is shown with country code (+61 for Australia) - edit as needed.
- Tap Update Profile to save. Tap Cancel to discard.
Setting Your Region
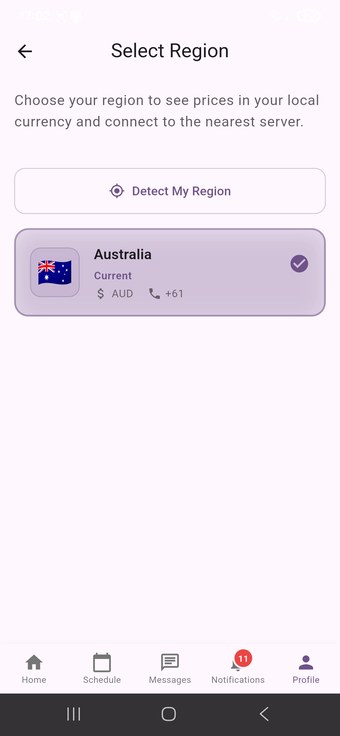
KeepMyBooking uses your region to show prices in local currency and connect you to the nearest server.
- Tap the globe icon in the top-right of the Profile screen.
- Tap Detect My Region - the app will automatically identify your region, or select manually from the list.
- Your current region (e.g. Australia - AUD, +61) will show with a tick.
Making a Booking
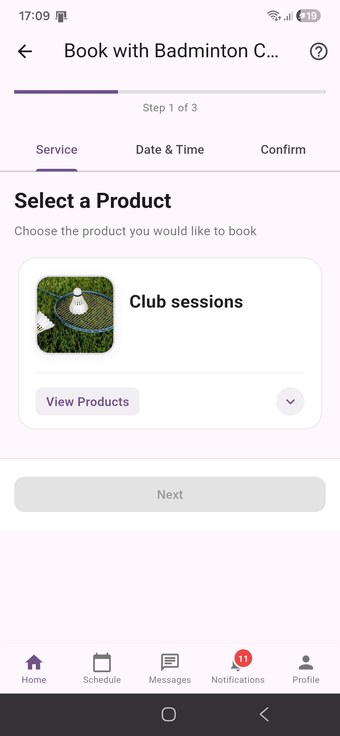
Booking a service on KeepMyBooking is a simple 3-step process: select a service, choose a date and time, then confirm your booking.
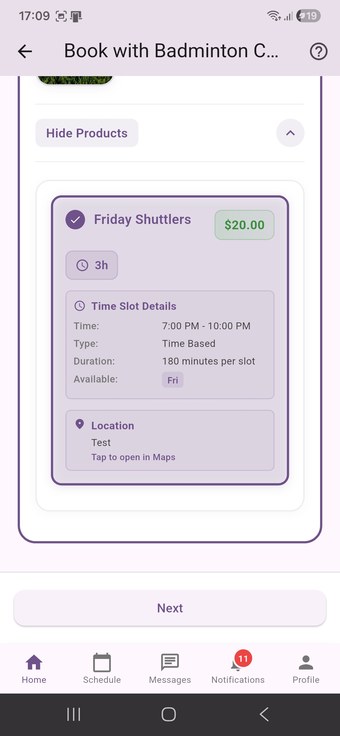
- Browse available services - tap View Products to expand a service category and see individual products.
- Tap the product you want - a tick will appear and the card will highlight in purple, showing name, price, duration, time slot details, available days, and location.
- Tap Next - the button activates once you have selected a product.
Tip
Each product shows its duration, price, available days, and time window at a glance before you commit.
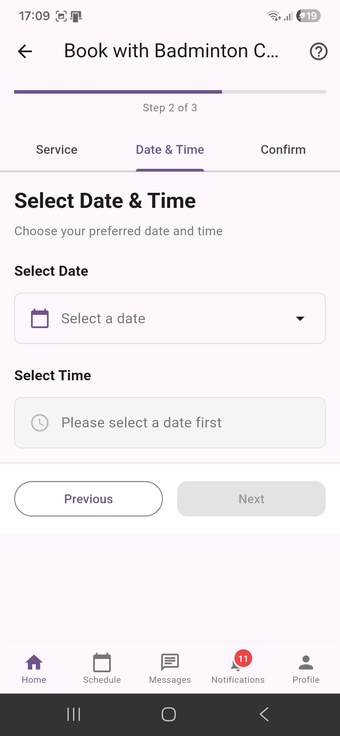
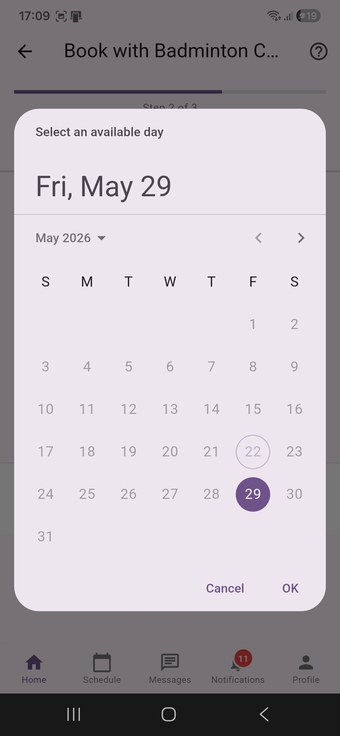
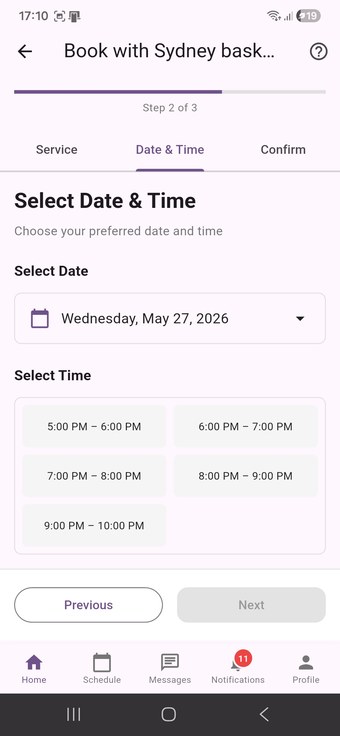
- Tap Select a date - a calendar picker will open.
- Select an available date - available dates appear in bold. Greyed-out dates are not available. Today is circled; your selected date is highlighted in purple.
- Tap OK - closes the calendar and loads available time slots for that date.
- Select a time slot - available times are shown as tiles (e.g. 5:00 PM–6:00 PM). Tap the slot that suits you.
- Tap Next - proceeds to Step 3.
Tip
If no time slots appear after selecting a date, that date may be fully booked. Try selecting a different date.
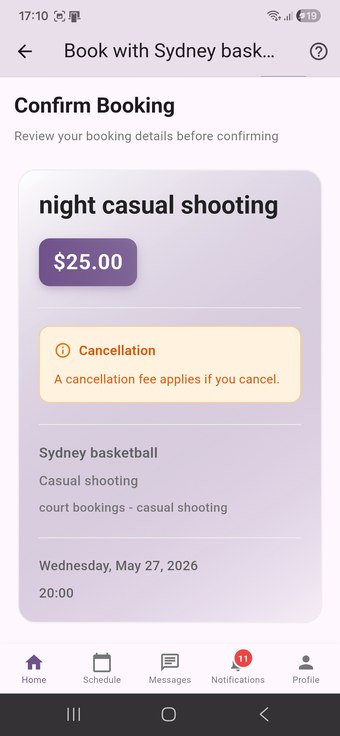
- Review the booking summary - check the service, price, business name, date and time are all correct.
- Note the cancellation policy - if a fee applies it will be shown in the orange Cancellation box. Read this carefully before confirming.
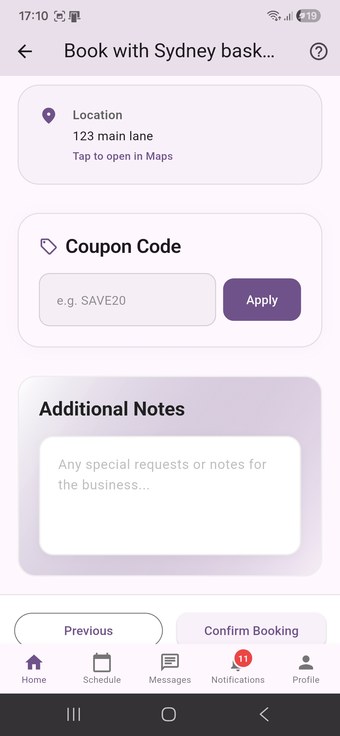
- Add a coupon code (optional) - scroll down to the Coupon Code field. Enter your code and tap Apply.
- Add notes (optional) - use the Additional Notes field to add any special requests for the business.
- Tap Confirm Booking - your booking is submitted and will appear in your Schedule.
Managing Your Schedule
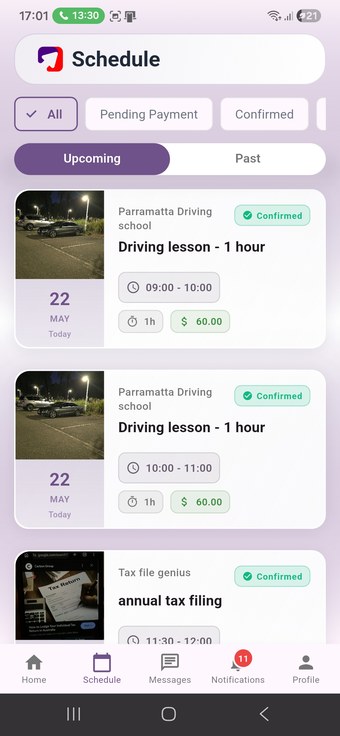
The Schedule screen is your booking diary. It shows all your appointments - upcoming and past - with status, service, time, duration, and cost.
Upcoming vs Past Bookings
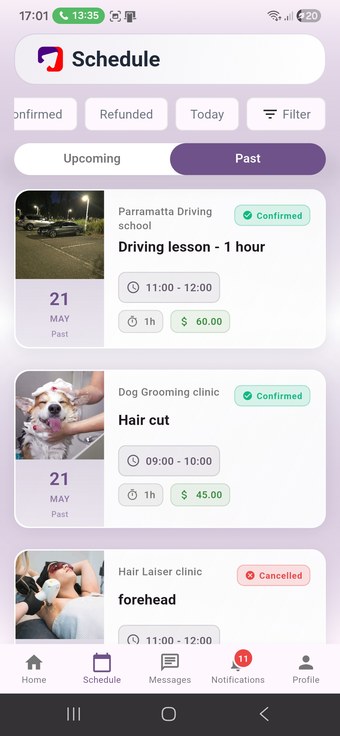
Toggle between Upcoming and Past using the tab selector at the top of the Schedule screen.
- Upcoming - Shows confirmed bookings that have not occurred yet.
- Past - Shows completed and cancelled bookings.
Filtering Your Schedule
Use the filter chips at the top to narrow down bookings: All, Pending Payment, Confirmed, Refunded, Today, or Filter for advanced options.
Booking Status Badges
| Status | Meaning |
|---|---|
| Confirmed | Booking has been accepted by the business. |
| Cancelled | Booking was cancelled by you or the business. |
| Pending Payment | Awaiting payment to confirm the booking. |
| Refunded | A refund has been issued for this booking. |
Notifications
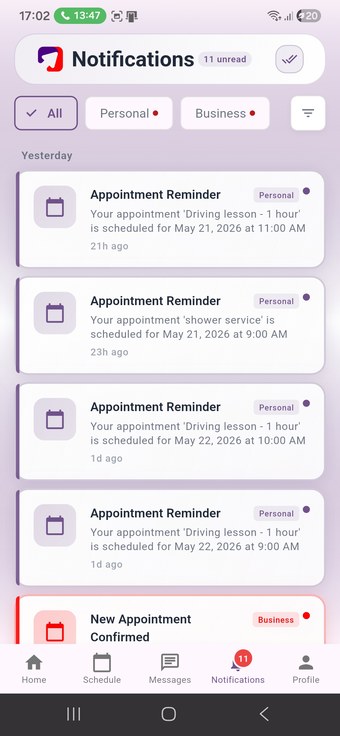
Notifications keep you informed about your bookings and account activity. The red badge on the Notifications icon shows how many unread notifications you have.
Notification Types
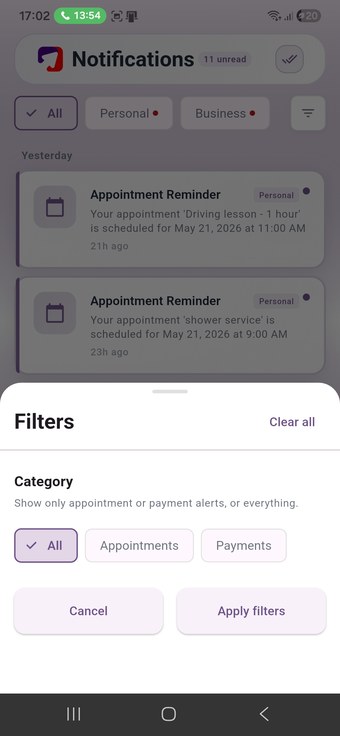
- Appointment Reminder (Personal) - Sent before an upcoming booking. Shown with a calendar icon and purple badge.
- New Appointment Confirmed (Business) - Sent when a business confirms a booking you have requested. Shown with a red badge.
Filtering Notifications
Tap the filter tabs: All / Personal / Business. Tap the filter icon for additional options - choose between Appointments and Payments categories. Tap the double-tick icon to mark all as read.
Messages
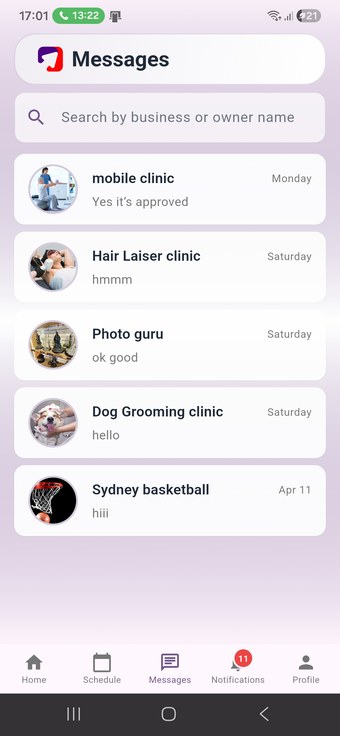
The Messages screen lets you communicate directly with businesses you have booked or enquired with. Each conversation shows the business name, profile photo, and a preview of the last message.
How to Use Messages
- Tap Messages in the bottom navigation bar.
- Use the search bar to find a specific business or owner name.
- Tap a conversation to open the chat thread with that business.
- Type in the message field and send - use this to ask questions, request changes, or communicate special needs before your appointment.
Tip
Use Messages to let a business know about special requirements before your appointment - for example an allergy, mobility need, or specific request.
Quick Reference - App Navigation
Use this table as a quick reference for finding key features in the app.
| I want to… | Where to go | How to get there |
|---|---|---|
| Create an account | Create Account screen | Open app → tap Sign Up |
| Sign in with Google | Create Account screen | Open app → tap Google button |
| Find a business | Home screen | Home → search bar or Browse by Category |
| Filter businesses | Search Filters | Home → search → filter icon |
| Make a booking | Booking flow (3 steps) | Tap a business → Book → follow 3 steps |
| View upcoming bookings | Schedule → Upcoming | Bottom nav → Schedule → Upcoming tab |
| View past bookings | Schedule → Past | Bottom nav → Schedule → Past tab |
| Edit my profile | Edit Profile screen | Profile → Update Profile Details |
| Change my region / currency | Select Region screen | Profile → globe icon (top right) |
| Save a favourite business | Home screen | Home → Featured → tap heart icon |
| View my favourites | My Favorites | Profile → My Favorites |
| Add a payment method | Payment Methods | Profile → Payment Methods |
| Message a business | Messages screen | Bottom nav → Messages → tap conversation |
| View notifications | Notifications screen | Bottom nav → Notifications |
| Mark all notifications read | Notifications screen | Notifications → double-tick icon |
| Manage my business page | Business Management | Profile → Business Management |
| Create a business page | Business Management | Profile → Create New Business Page |
| Apply a coupon code | Confirm Booking (Step 3) | Booking → Step 3 → Coupon Code field |
| Add notes to a booking | Confirm Booking (Step 3) | Booking → Step 3 → Additional Notes |
Support & Contact
If you need help with the app, have a question about a booking, or want to report an issue, our team is here to help.
Creating Your Business Page
This guide walks you through the complete four-step process of creating your business profile on the KeepMyBooking platform. Follow each step carefully to ensure your business page is set up correctly before it is submitted for review by the KeepMyBooking administration team.
Once submitted, you then need to update your business page to get it to a state that is ready for publication. Once you have completed all the requirements your profile will undergo a manual verification process. You will be notified when your page is approved and live on the platform.
Before you begin
Make sure you have the following information ready: your business name and description, business category, owner name, business phone number and email address, ABN or registration number, and your business address.
You can create your business page in the mobile app or in your browser. Start your business page in the web app.
Overview of the setup process
| Step | Name | What you'll enter | Progress |
|---|---|---|---|
| 1 | Basic Info | Business name, description, and category | 25% |
| 2 | Contact | Owner name, phone number, email, registration number | 50% |
| 3 | Location | Business address, country, and GPS coordinates | 75% |
| 4 | Review | Review all details and submit for approval | 100% |
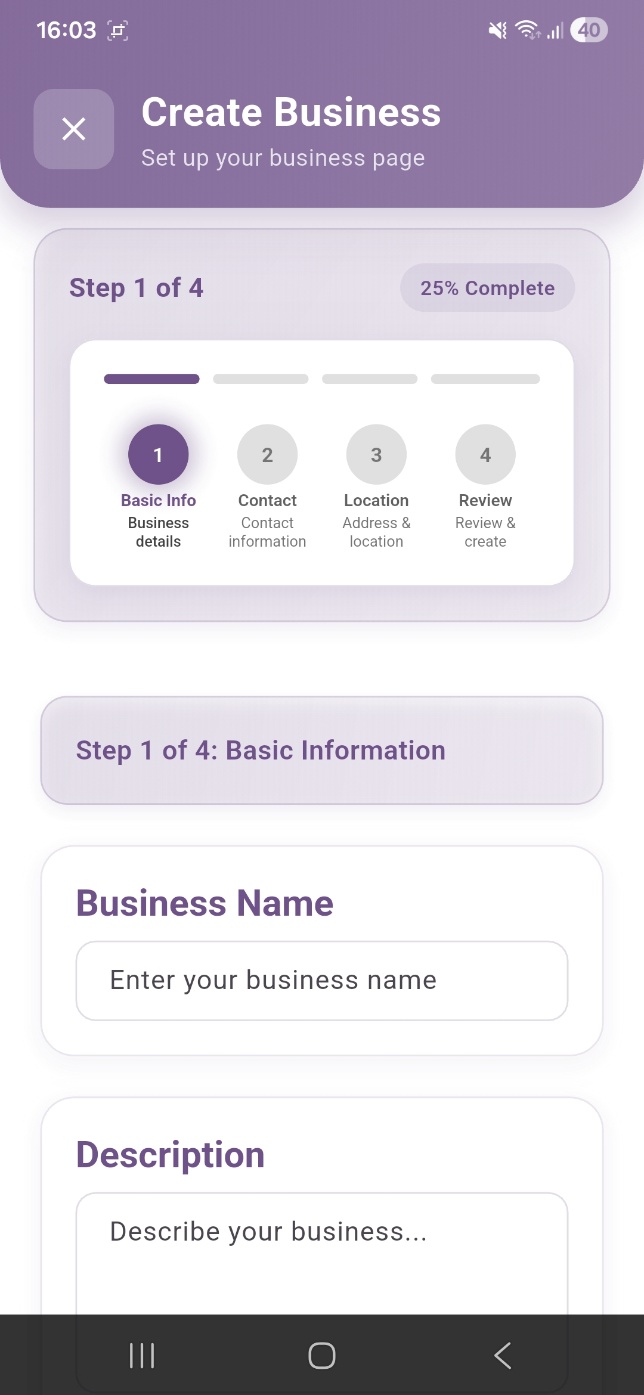
The first step collects the core identity information for your business. This information will be displayed on your public KeepMyBooking profile and is what customers will see when they find your business through the app.
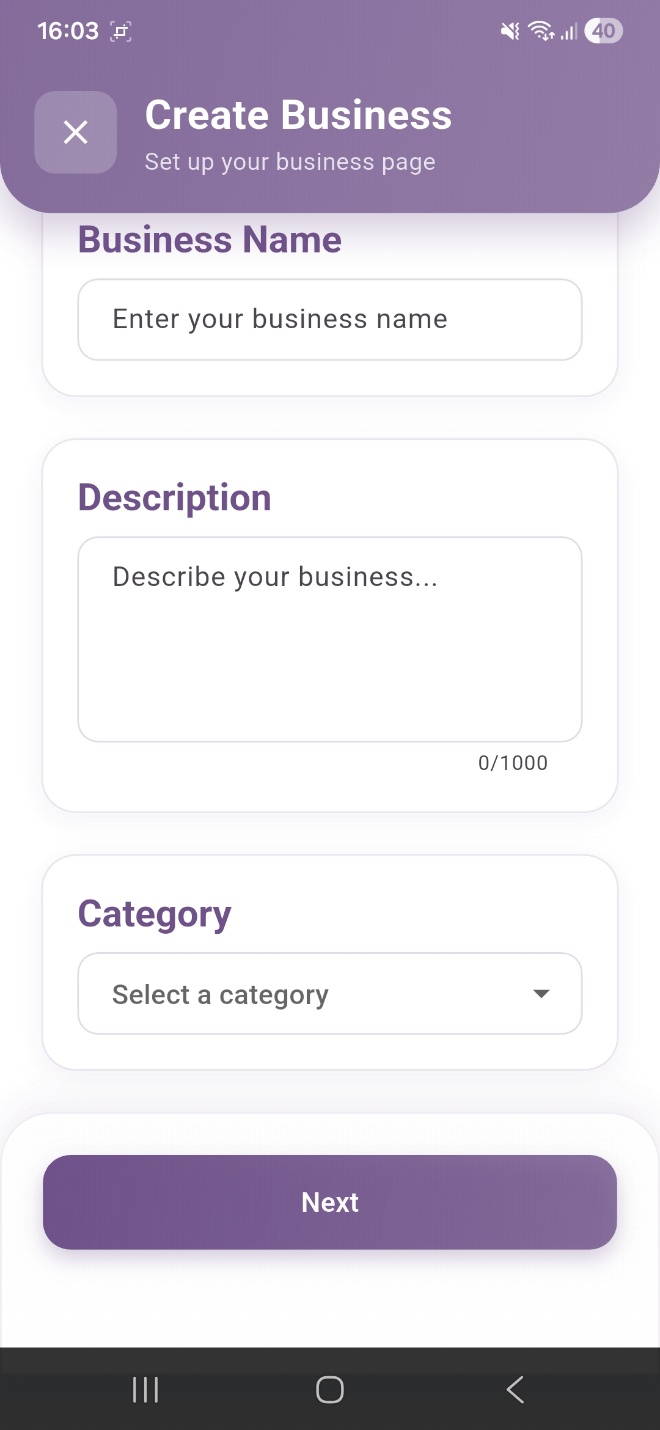
Fields on this screen
| Field | Required | What to enter |
|---|---|---|
| Business Name | Yes | Your official trading name as you want it displayed to customers on the platform. |
| Description | Yes | A clear description of your business and the services you offer. Maximum 1,000 characters. Write this as if introducing your business to a new customer. |
| Category | Yes | Select the most appropriate category for your business from the dropdown list (e.g., Professional Services, Beauty, Health & Wellness). |
How to complete this step
- Tap the Business Name field and type your trading name exactly as you want it to appear publicly.
- Tap the Description field and write a clear, professional summary of your business and what services you offer. You have up to 1,000 characters. The character counter at the bottom right shows how many you have used.
- Tap the Category dropdown and select the category that best describes your primary service offering.
- Once all three fields are completed, tap the purple Next button at the bottom of the screen to proceed to Step 2.
Writing a great description
Your description is one of the first things customers read. Mention what makes your business unique, the types of services you offer, and any relevant qualifications or experience. Avoid vague phrases - be specific about what you do.
Important
Your business description will be reviewed by the KeepMyBooking administration team before your profile is published. Descriptions that are vague, promotional only, or do not accurately describe the services offered may cause your approval to be delayed.
Step 2 collects your business contact details. These details are used by KeepMyBooking to verify your identity and communicate with you about your account. Some details may also be displayed to customers on your public profile.
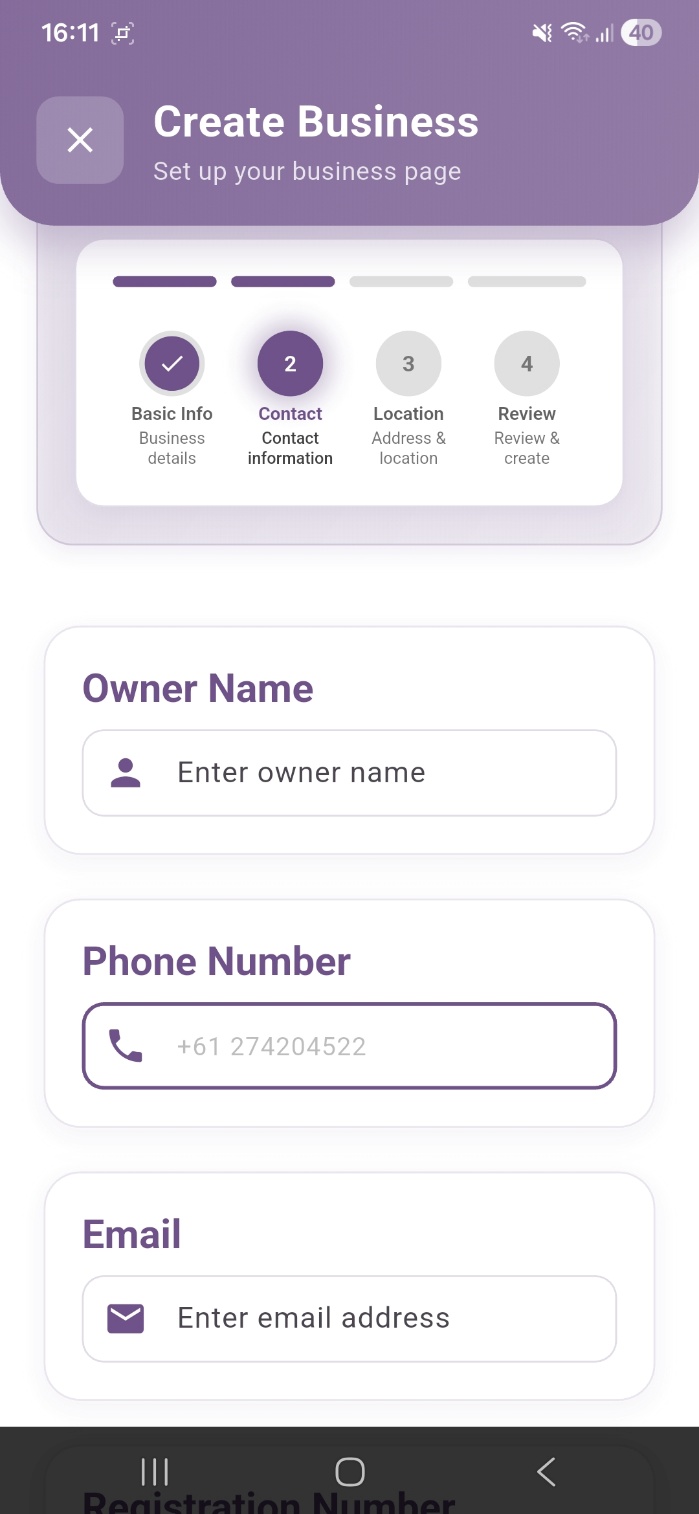
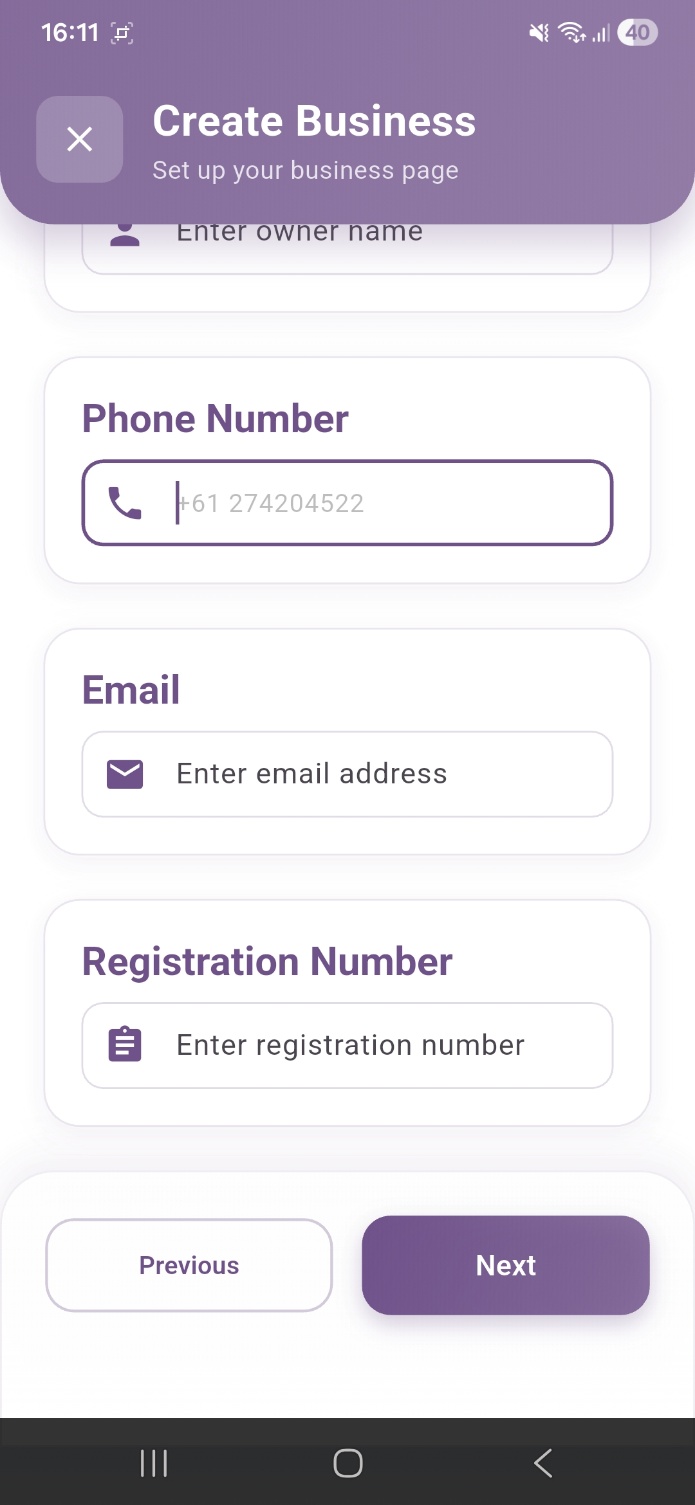
Fields on this screen
| Field | Required | What to enter |
|---|---|---|
| Owner Name | Yes | The full legal name of the business owner or primary account holder. Used for identity verification - not displayed publicly. |
| Phone Number | Yes | Your business phone number including country code. For Australian numbers, the country code +61 is pre-filled. Enter your number after the country code (e.g., 412 345 678, not 0412 345 678). |
| Email Address | Yes | Your business email address. Used for booking notifications, account communications, and customer contact where enabled. |
| Registration Number | Yes | Your Australian Business Number (ABN) for Australian businesses, or equivalent registration number for New Zealand businesses. Used to verify that your business is a legitimate, registered entity. |
How to complete this step
- Tap the Owner Name field and enter the full name of the business owner.
- Tap the Phone Number field. The Australian country code (+61) is pre-filled. Enter your number without a leading zero.
- Tap the Email field and enter your business email address.
- Tap the Registration Number field and enter your ABN (11 digits, no spaces) or equivalent registration number.
- Tap Next to proceed to Step 3, or Previous to return to Step 1 to make changes.
Phone number format
The phone number field has the Australian country code (+61) pre-filled as a placeholder. Enter your number without the leading zero - for example, for mobile 0412 345 678, enter 412345678.
ABN verification
Your ABN will be verified against the Australian Business Register (ABR) as part of the KeepMyBooking merchant verification process. Ensure that the ABN you enter matches the business name and details you have provided in Step 1.
Step 3 collects your business location. Your address is displayed to customers on your profile and is used to power the geolocation-based discovery features of the KeepMyBooking platform. GPS coordinates are required to enable Google Maps directions from your profile.
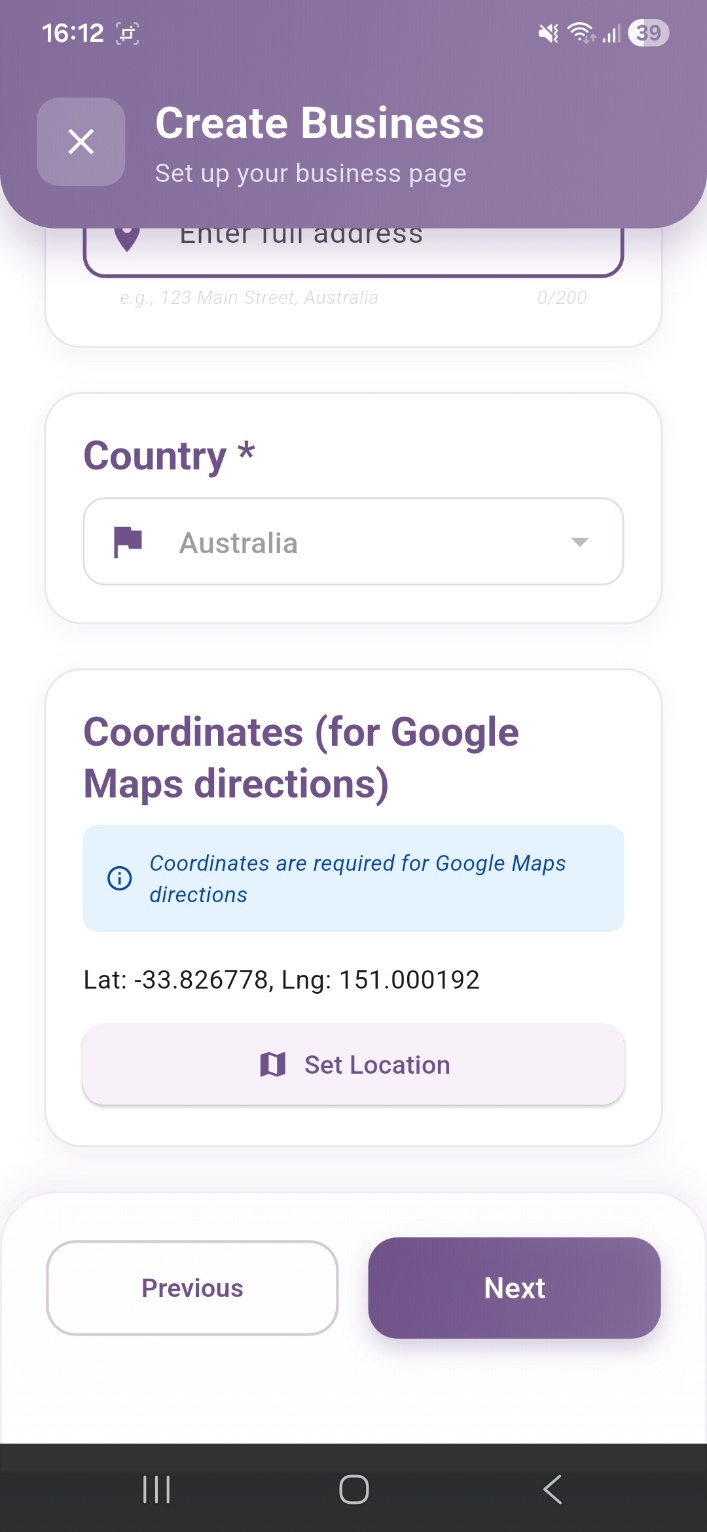
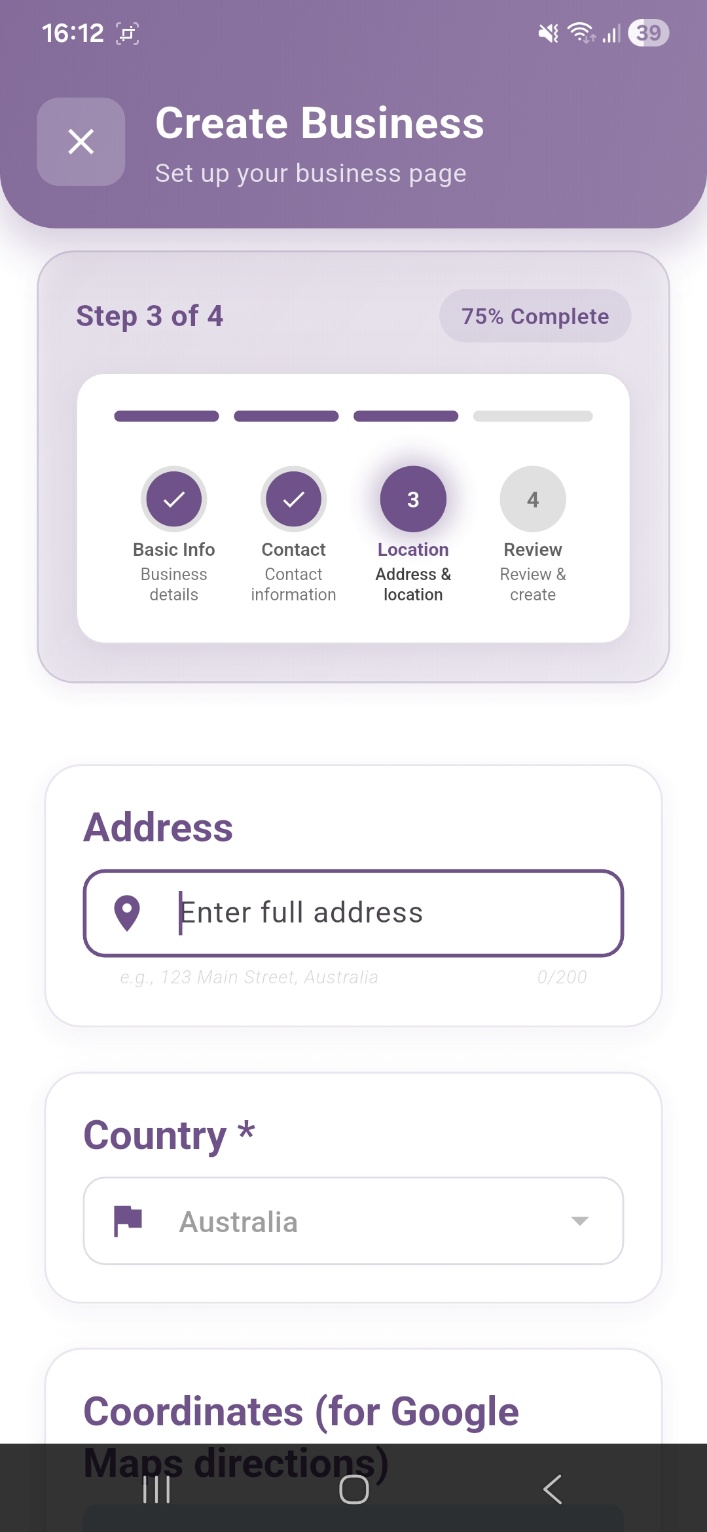
Fields on this screen
| Field | Required | What to enter |
|---|---|---|
| Address | Yes | Your full business street address, including street number, street name, suburb, state, and postcode. Example: 123 King Street, Sydney NSW 2000. Maximum 200 characters. |
| Country | Yes | Select your country from the dropdown. Australia is pre-selected. Change to New Zealand if your business is based in New Zealand. |
| Coordinates (Lat / Lng) | Yes | The GPS latitude and longitude coordinates of your business location. Required for Google Maps directions to work correctly on your profile. |
How to enter your address
- Tap the Address field and type your full business address. The field accepts up to 200 characters.
- Check that the Country dropdown shows the correct country. Tap it to change if needed.
- Proceed to setting your GPS coordinates as described below.
How to set your GPS coordinates
GPS coordinates are required for the platform's mapping and directions features. Tap the Set Location button to open the location picker. You have three options:
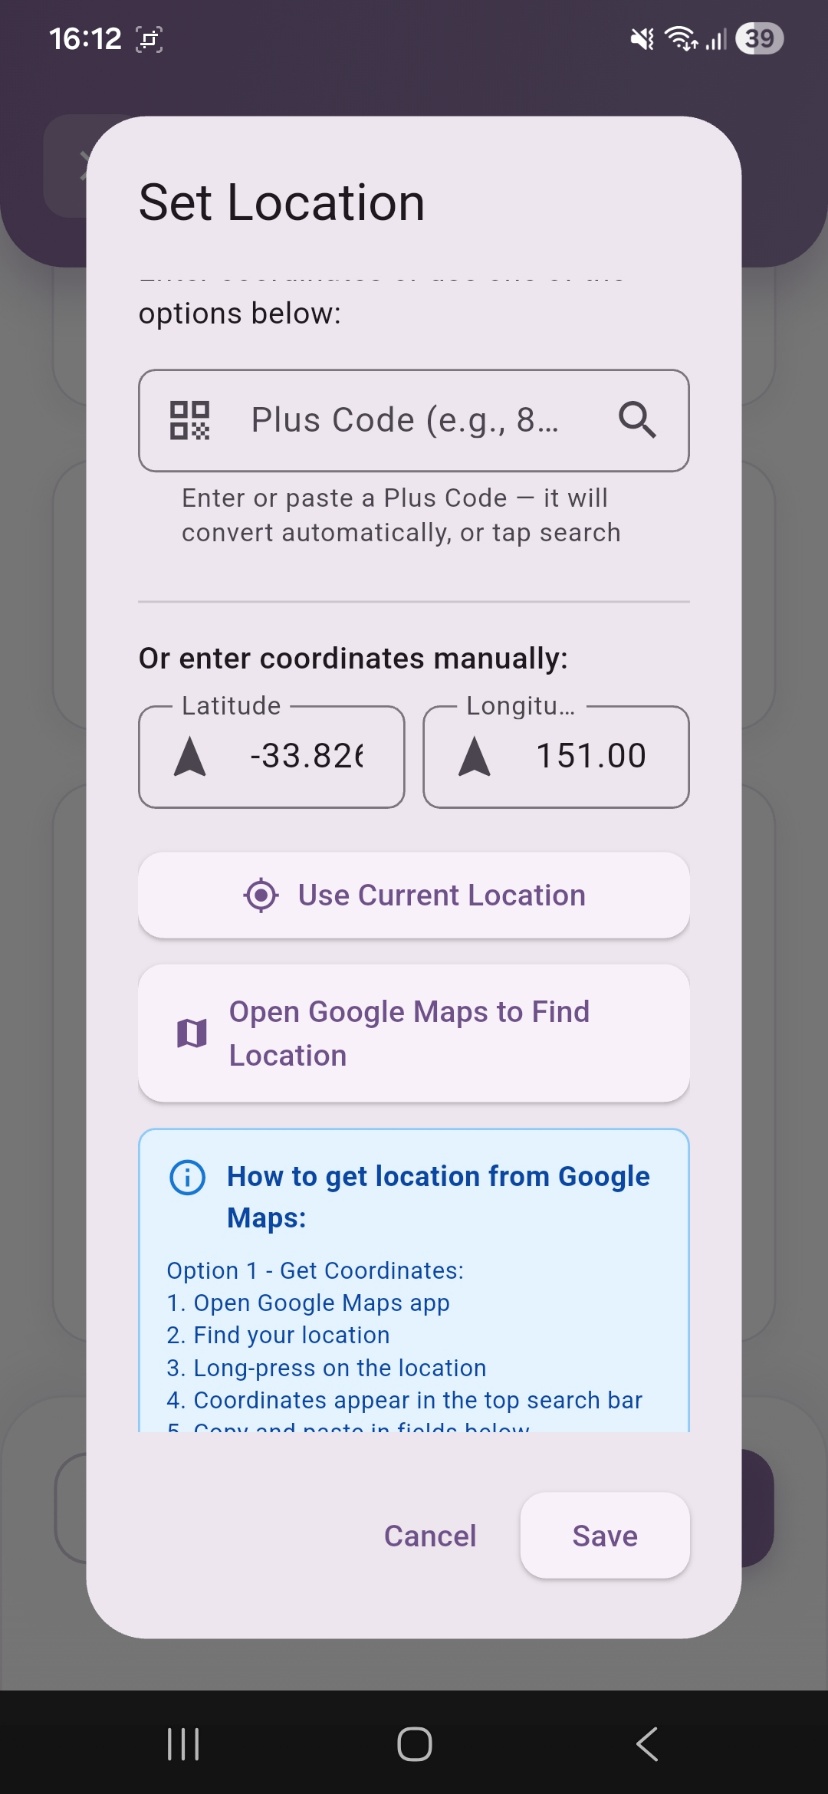
Option A - Use Current Location
If your device's GPS is enabled and you are physically at your business location, tap Use Current Location. The app will automatically retrieve and fill in your latitude and longitude. This is the quickest and most accurate method.
Option B - Open Google Maps:
- Tap Open Google Maps to Find Location. Google Maps will open.
- Search for or navigate to your business address in Google Maps.
- Long-press (tap and hold) on your exact business location on the map.
- Your coordinates will appear in the search bar at the top of the screen in the format:
-33.8267, 151.2093. - Copy these coordinates, return to the KeepMyBooking app, and paste them into the Latitude and Longitude fields.
Option C - Plus Code:
- Open Google Maps and find your business location.
- Tap on your location. A panel will appear at the bottom of the screen.
- Scroll down in the panel to find the Plus Code (a short alphanumeric code such as
4RRG+52). - Copy the Plus Code and paste it into the Plus Code field in the KeepMyBooking Set Location screen. The app will convert it to coordinates automatically.
Once you have entered your coordinates using any of the above methods, tap Save to confirm your location. Then tap Next to proceed to Step 4.
Why coordinates matter
Accurate GPS coordinates ensure that customers who tap 'Get Directions' on your profile are taken to the exact location of your business in Google Maps. If the coordinates are inaccurate, customers may be directed to the wrong address, which can result in missed appointments and negative reviews.
Step 4 is the final stage of the business setup process. Before your profile is submitted for review, the app presents a full summary of all the information you have entered across Steps 1 to 3. Review each section carefully before submitting.
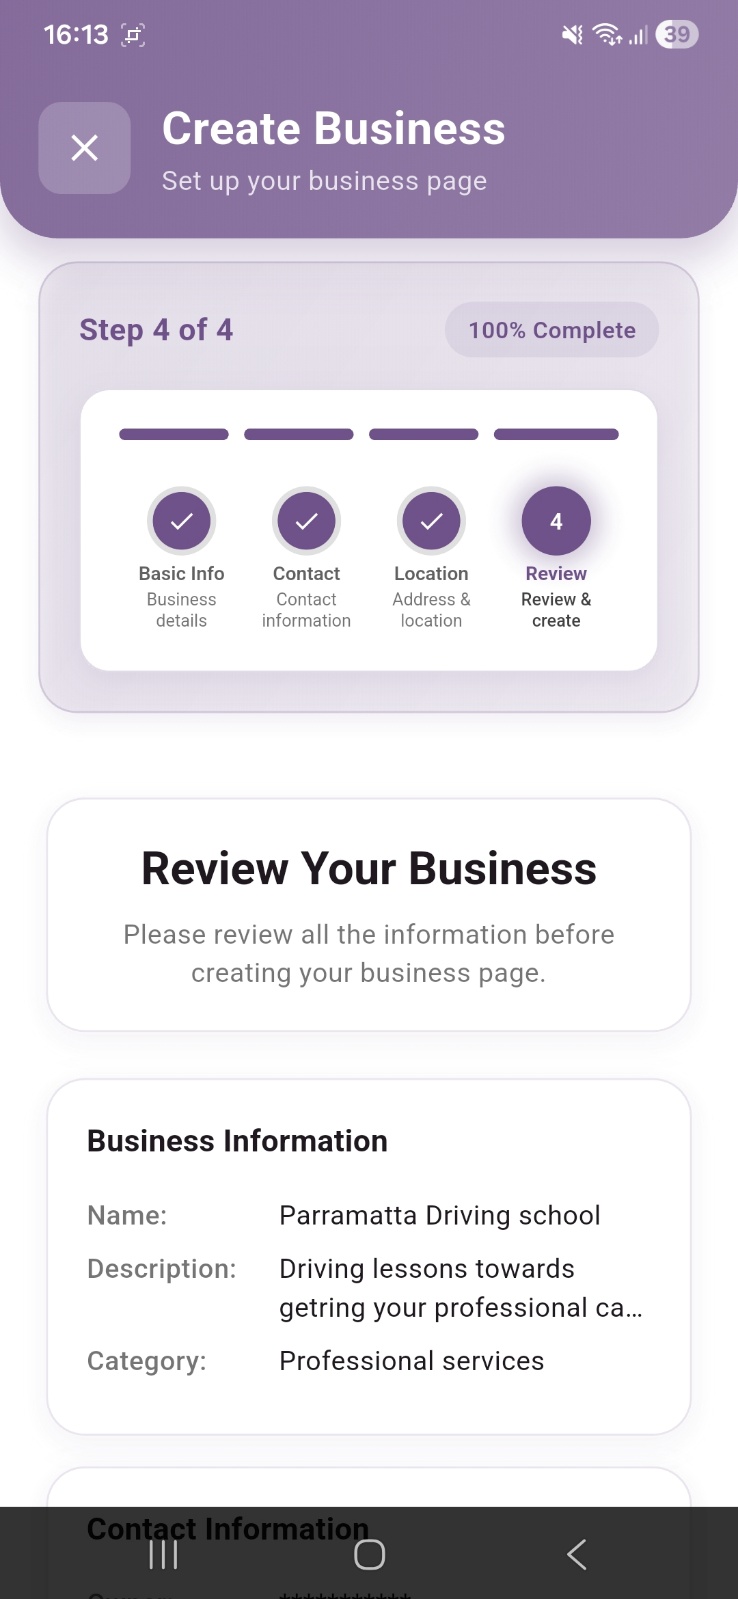
What to check on this screen
- Business Information: confirm that your business name, description, and category are correct and accurately represent your business.
- Contact Information: verify that your owner name, phone number, email address, and registration number (ABN) are correct.
- Location: confirm that your address and GPS coordinates are accurate.
Making corrections before submitting
If you spot an error on the review screen, tap the Previous button to navigate back to the relevant step and make corrections. You can move back and forth between steps as many times as needed before submitting.
Submitting your business page
Once you are satisfied that all details are accurate, tap the Create / Submit button at the bottom of the review screen. Your business page will be created and you will gain access to the business setup page.
Troubleshooting
| Issue | What to do |
|---|---|
| The Next button is greyed out and I cannot proceed. | One or more required fields have not been filled in. Scroll up to check all fields are completed. All required fields must be filled before the Next button becomes active. |
| The app cannot detect my current location. | Check that location permissions are enabled for the KeepMyBooking app in your device settings (Settings > Apps > KeepMyBooking > Permissions > Location). Also ensure your device's GPS or Location Services are turned on. |
| I entered my coordinates but they appear incorrect on the map. | Double-check that you have entered latitude and longitude in the correct fields. Latitude is the first number (e.g., -33.8267 for Sydney) and longitude is the second (e.g., 151.2093). Swapping them will place your pin in the wrong location. |
| My ABN is not being accepted. | Ensure you are entering your ABN as 11 digits with no spaces or hyphens. Check that the ABN you are entering is active and matches the business name registered with the Australian Business Register (ABR). |
| I need to change information after submitting. | Once submitted, you can still access and edit your profile from the Business Management section of the app. Material changes will require re-approval. |
Getting Help
If you experience an issue that is not covered by this guide, the KeepMyBooking support team is available to assist you.
Email: [email protected]
Website: keepmybooking.com
Available Mon–Fri, 9am–6pm AEST
Phone: +61 405 098 818
Access help articles and FAQs directly within the app by tapping the Help or Support option in your account menu.
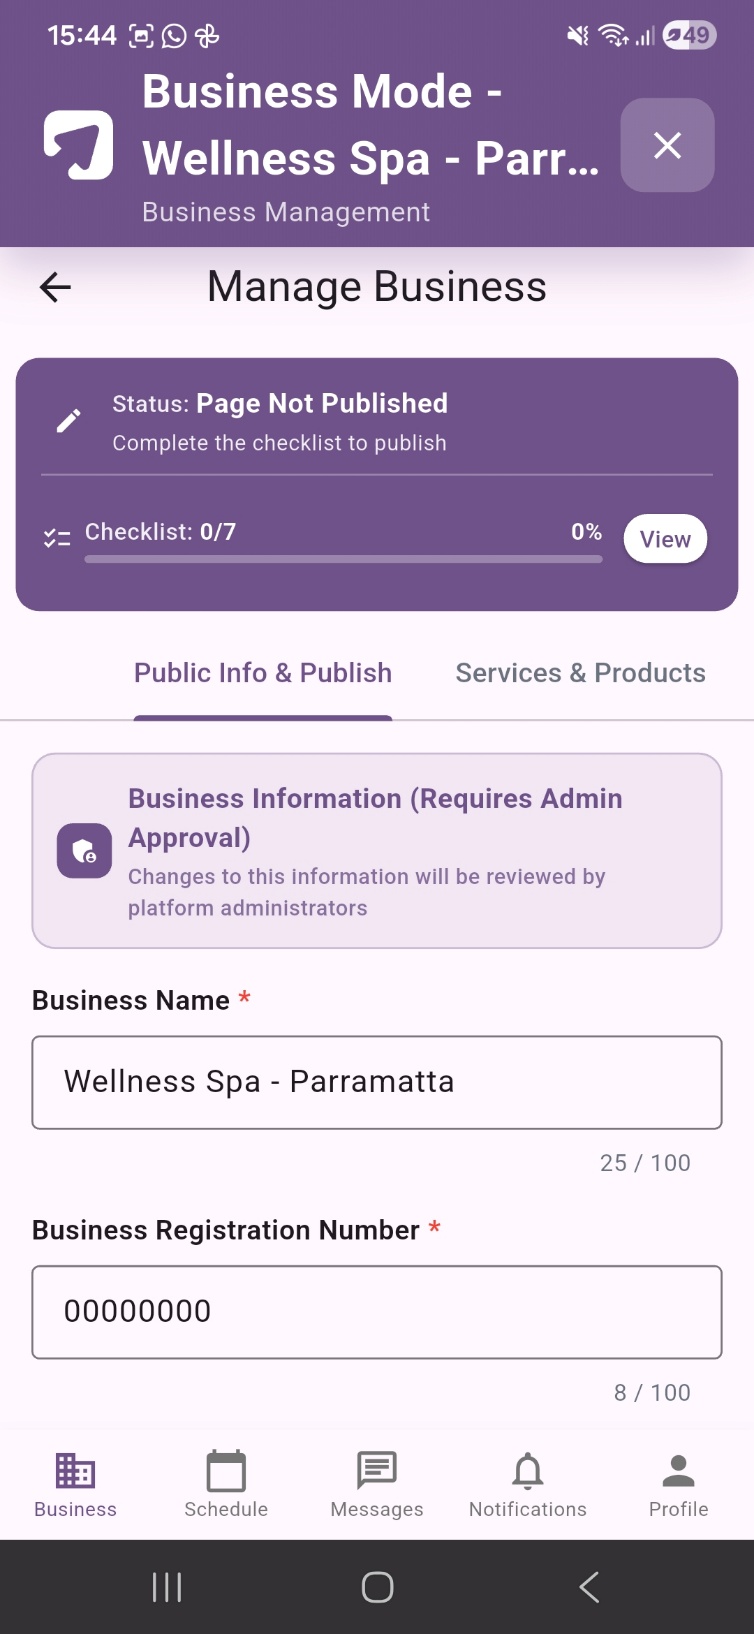
Once your initial business page has been created using the four-step setup process, you will be taken to your Business Mode home screen. From here, you can access the Manage Business section to complete your profile and work through the seven requirements that must be fulfilled before your page can be submitted for publication and admin review.
Your business page will not be visible to customers until all seven checklist requirements are completed and you tap the Publish button.
The Business Mode home screen
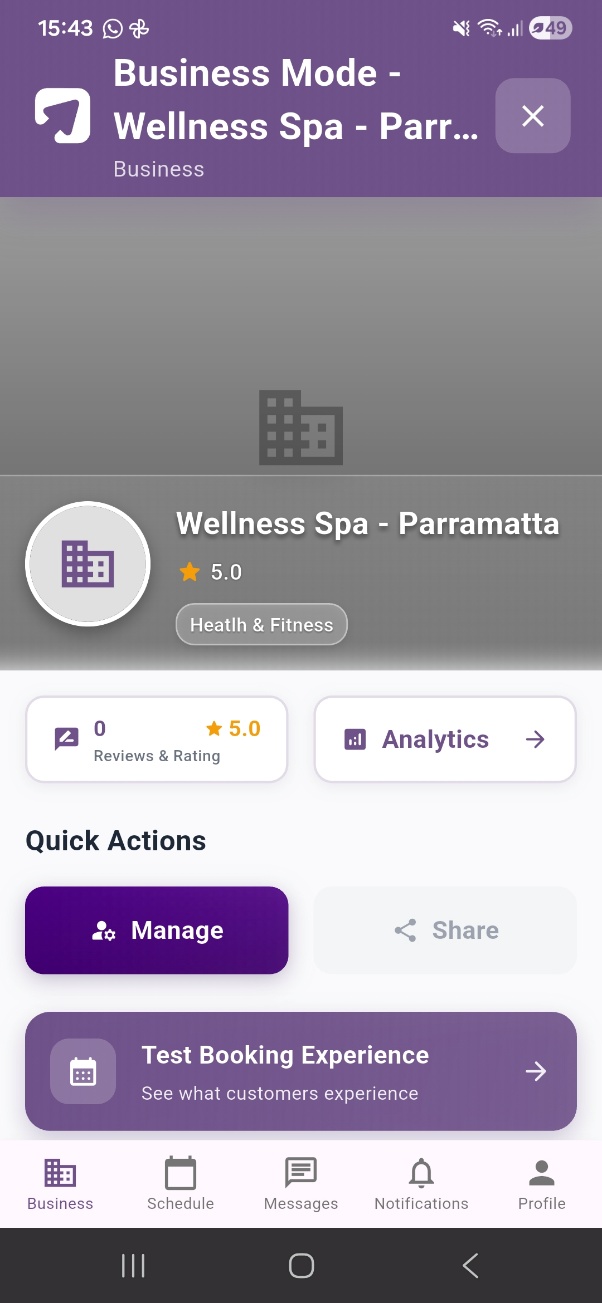
After completing the initial setup, you will see the Business Mode home screen for your business. This screen provides a summary of your business status and quick access to the key areas of the platform:
- Reviews & Rating - displays your current star rating and number of customer reviews.
- Analytics - access your business performance dashboard (Premium Analytics subscription required).
- Manage - takes you into the full Manage Business section to complete your profile setup.
- Share - share your business profile link with customers.
- Test Booking Experience - preview your public profile and booking flow as a customer would see it.
- Bottom navigation - switch between Business, Schedule, Messages, Notifications, and Profile.
Premium Analytics - A$10.00/month
Tapping Analytics will display the Premium Analytics subscription prompt (A$10.00/month, cancel anytime). This is an optional paid add-on. You can tap Maybe Later to skip this and return to it at any time. Your business can operate fully without the analytics subscription.
The 7-Item Publication Checklist
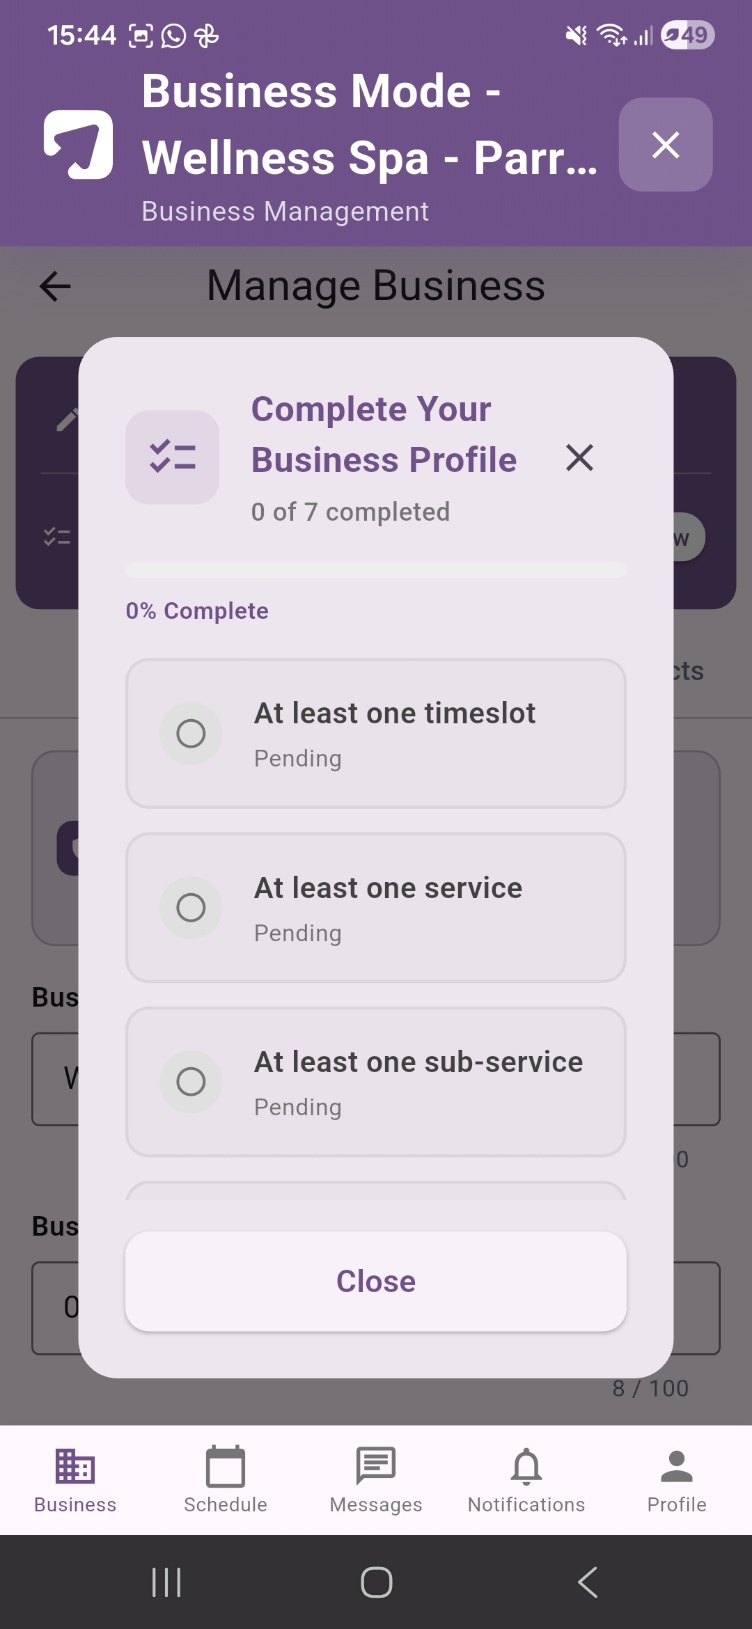
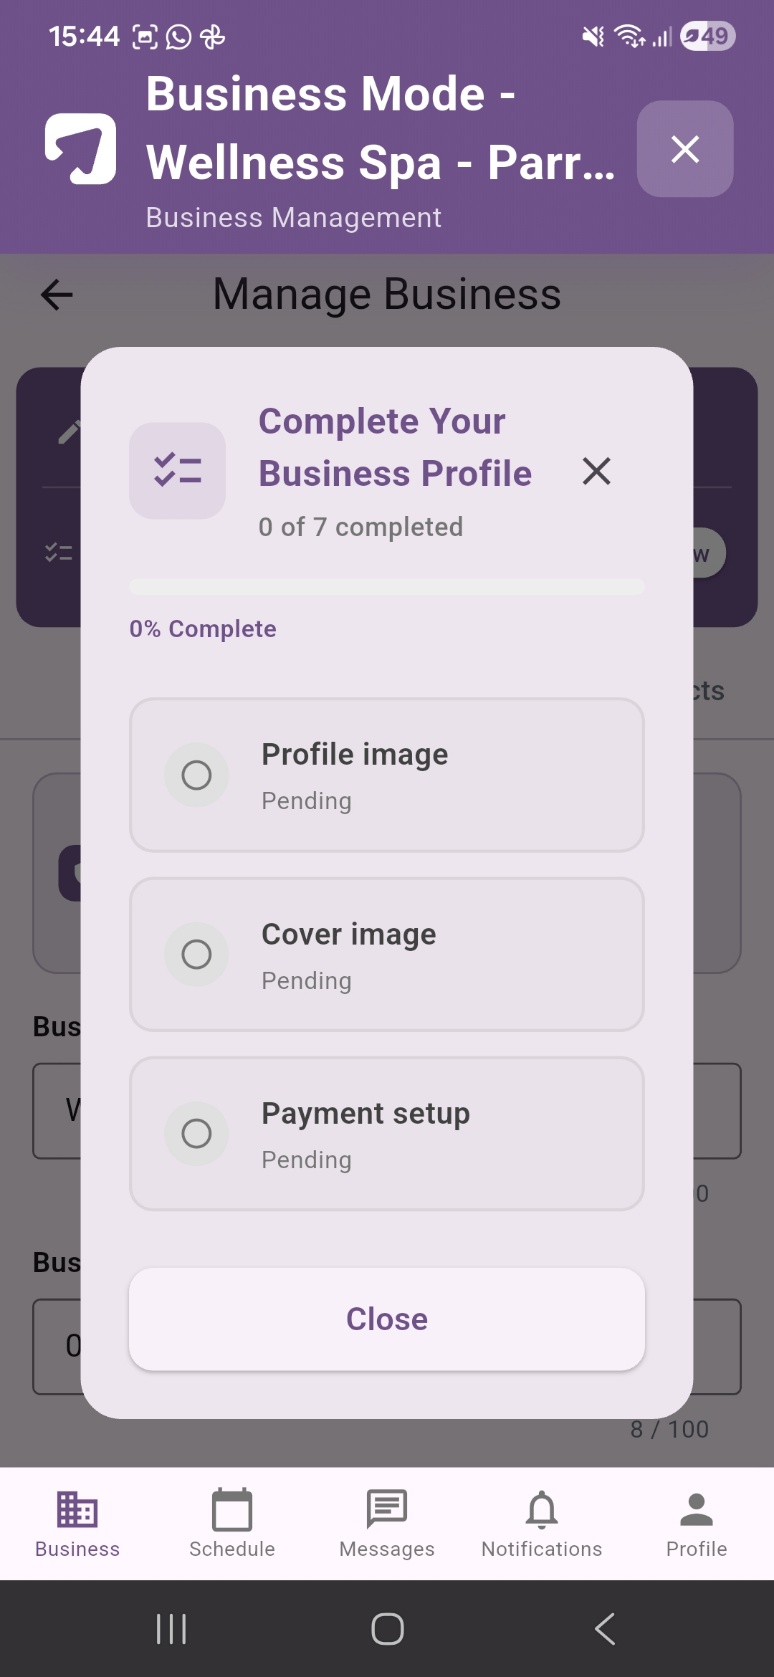
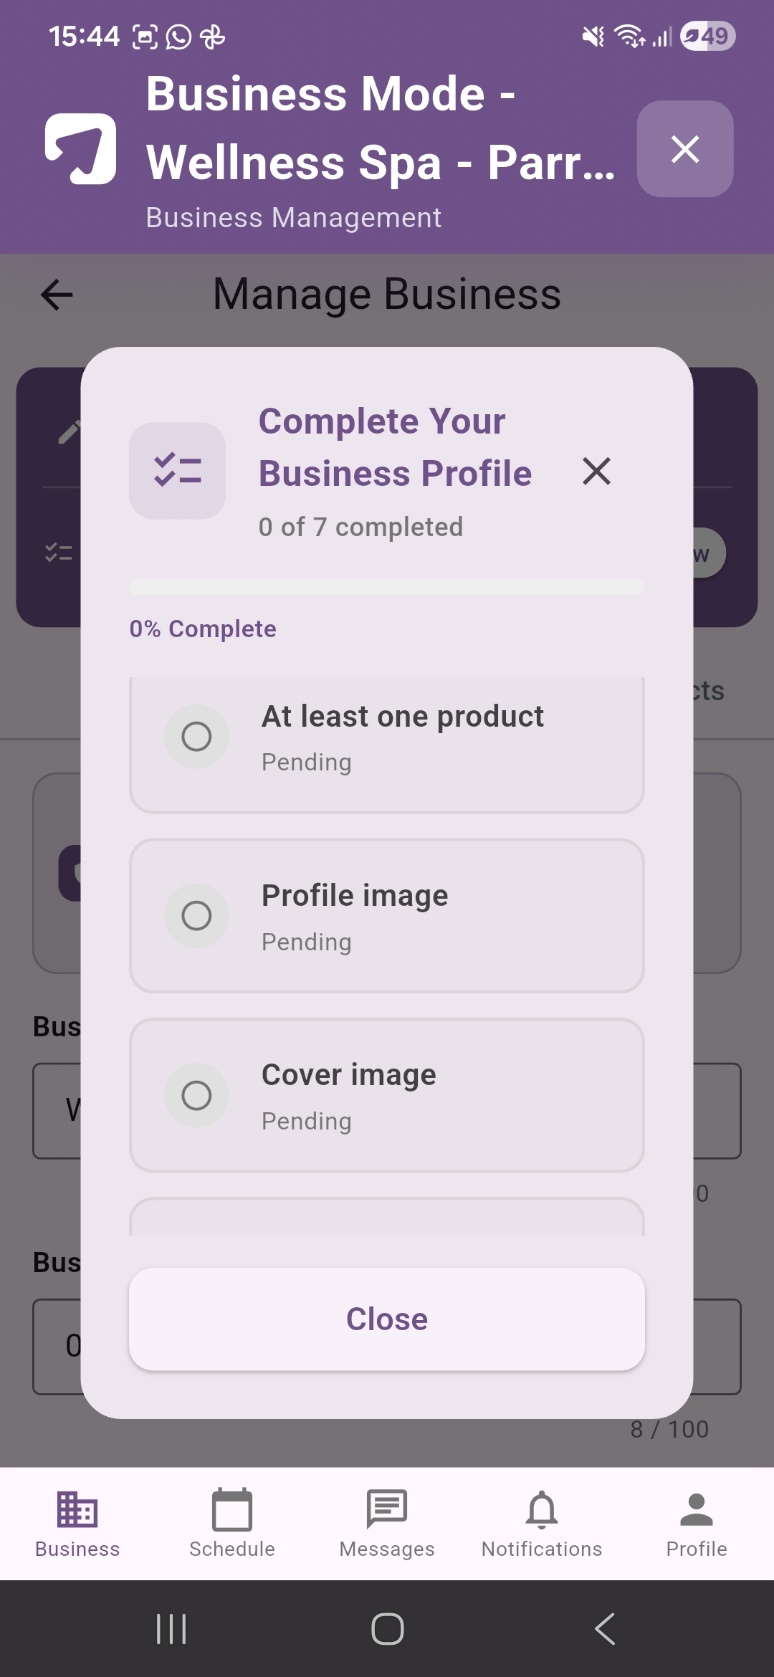
Before your business page can be submitted for admin review and published to the KeepMyBooking marketplace, you must complete all seven items in the publication checklist. The checklist is visible in the Manage Business screen and shows your current progress.
Checklist overview
| # | Requirement | Purpose |
|---|---|---|
| 1 | At least one timeslot | Create a timeslot to suit your services. Can be either number-based or time-based depending on your business type. |
| 2 | At least one service | Create your service categories (e.g., Massage, Facial) |
| 3 | At least one sub-service | Add bookable sub-services under each service (e.g., 60-min Massage) |
| 4 | At least one product | Create a product with pricing under a sub-service. The three levels make it easy to differentiate a range of offerings. |
| 5 | Profile image | Upload your business logo or profile photo |
| 6 | Cover image | Upload a banner/cover image for your business page |
| 7 | Payment setup | Connect your Stripe account to receive payments |
How to access the checklist
From the Business Mode home screen, tap the purple Manage button. On the Manage Business screen, tap the View button next to the Checklist progress bar to see the full list of requirements and their current status. Each item shows either Pending (not yet completed) or a tick (completed). Tap Close to dismiss the checklist and begin working through the items.
The Manage Business screen has two tabs
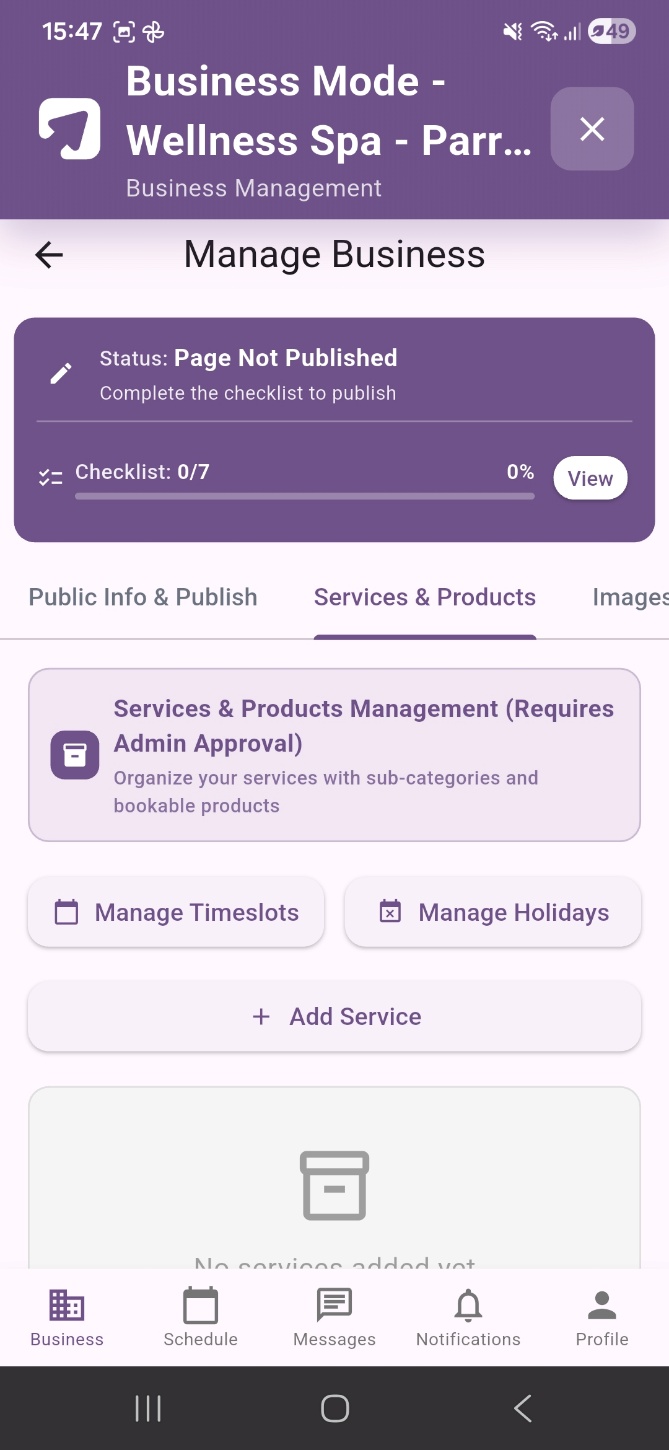
The Manage Business screen is divided into two tabs: Public Info & Publish (for your business information, contact details, location, images, and the Publish button) and Services & Products (for timeslots, services, sub-services, and products). Tap each tab to navigate between them.
A timeslot defines when your business is available to accept bookings. You must add at least one timeslot before your page can be published. Timeslots control the days, hours, duration, and capacity of appointments available to customers.
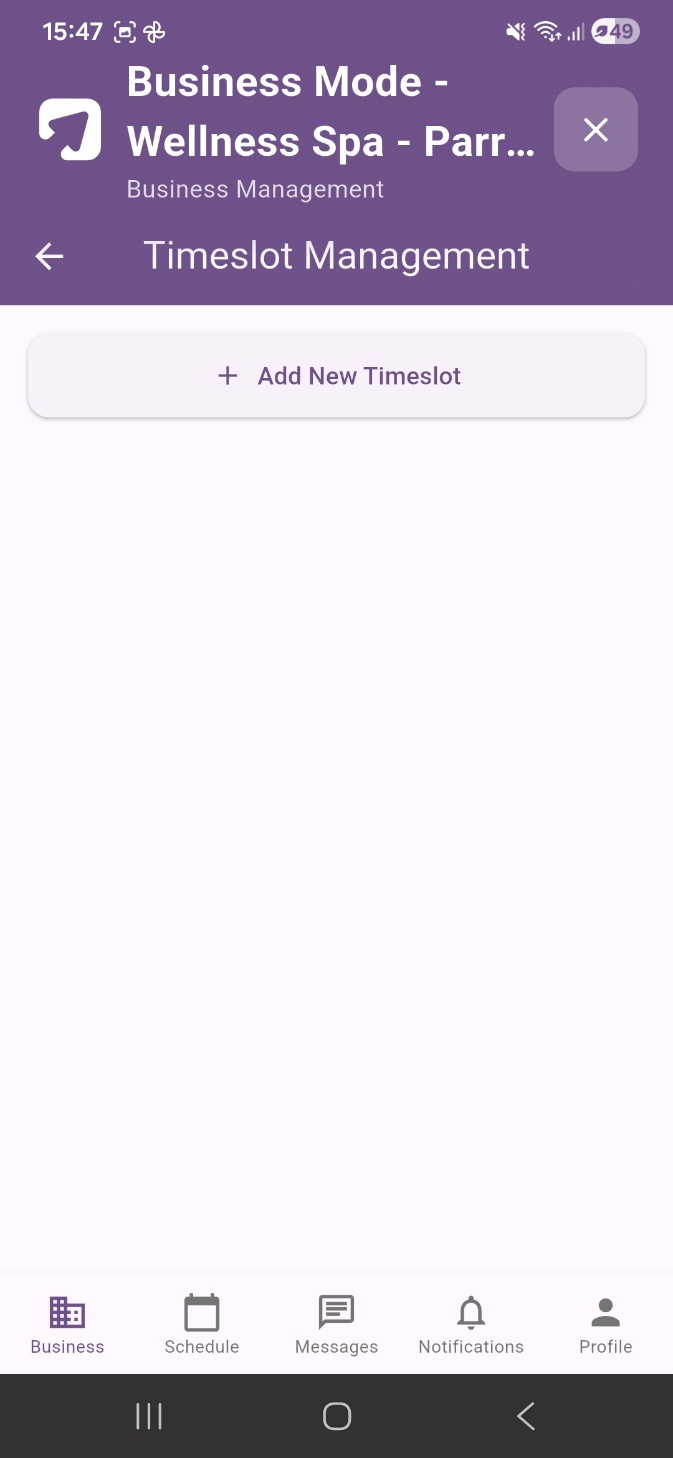
To access Timeslot Management, tap the Services & Products tab in Manage Business, then tap Manage Timeslots.
Creating a timeslot
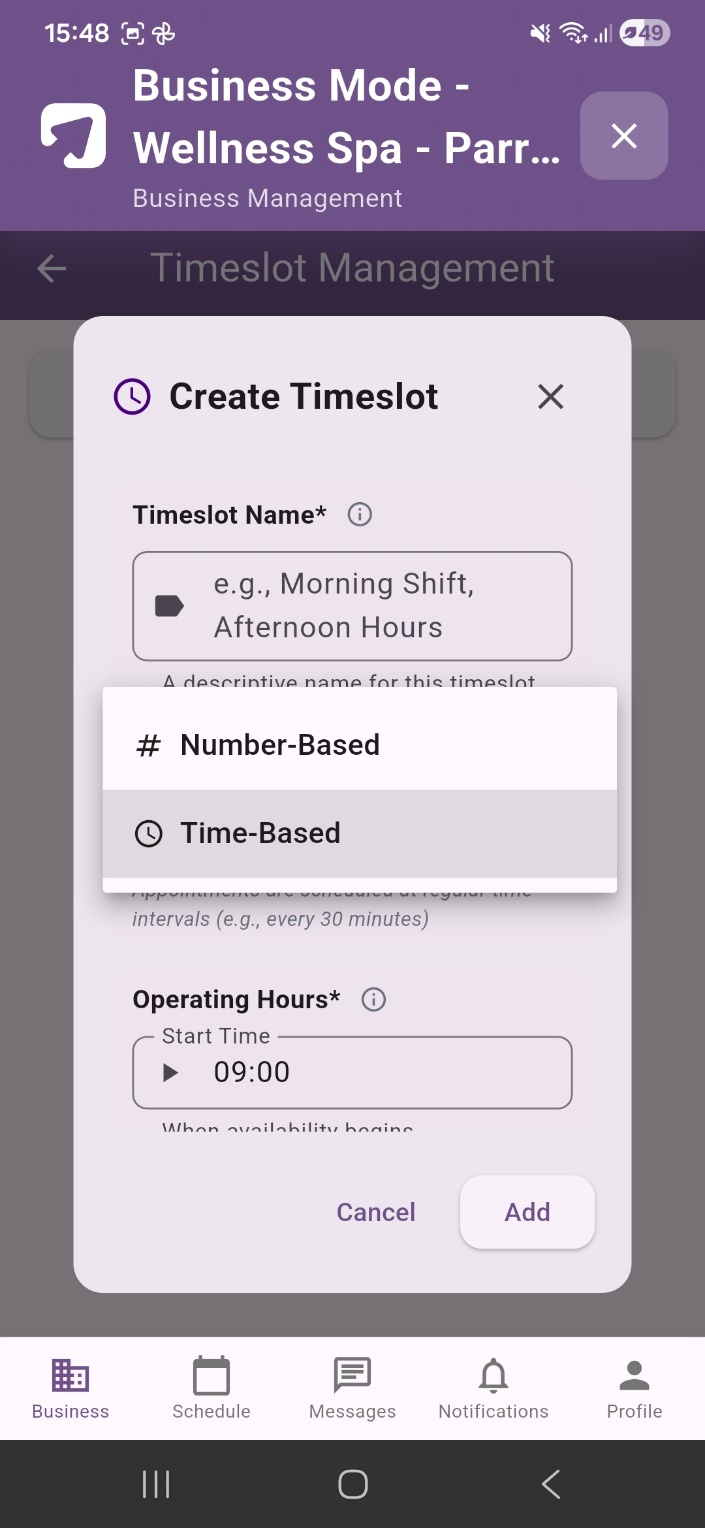
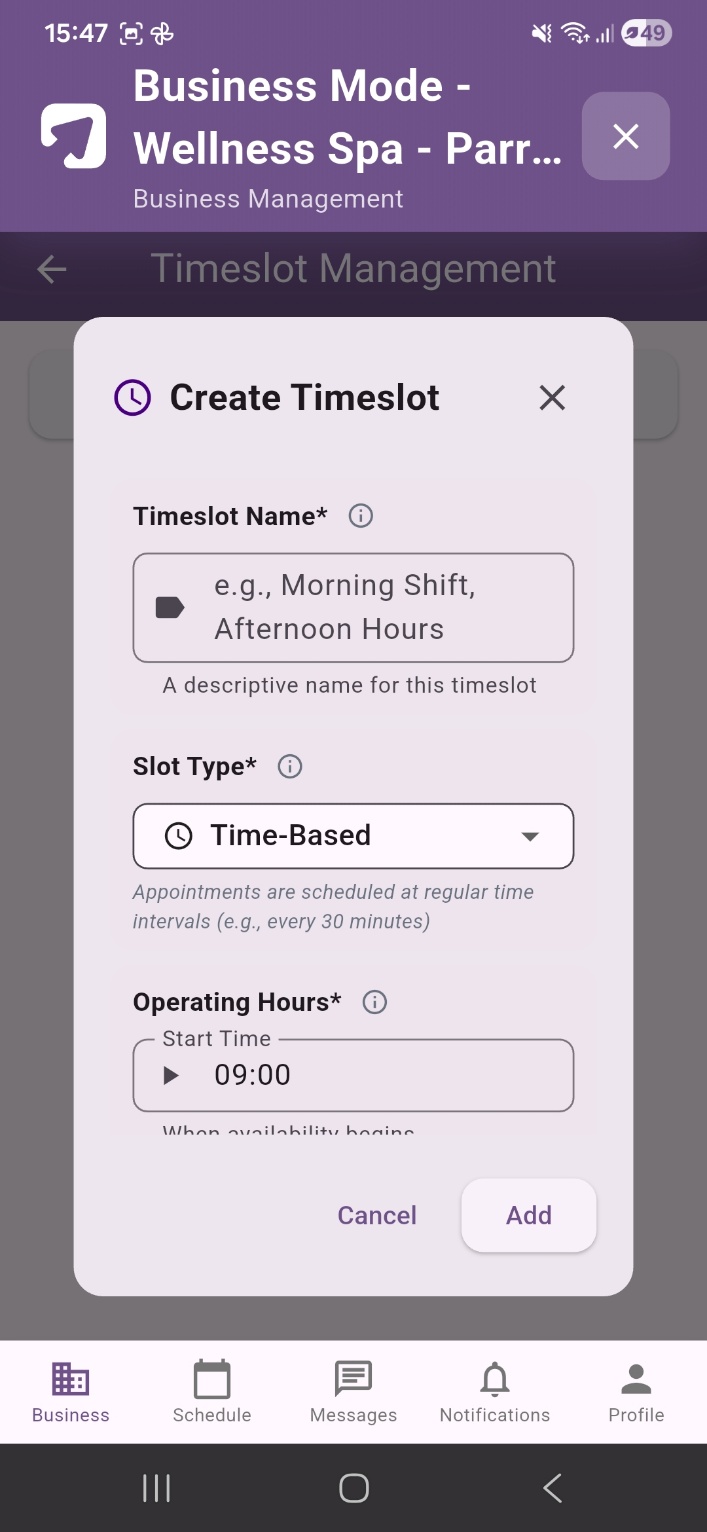
Tap the + Add New Timeslot button to open the Create Timeslot form. Complete all required fields as described below.
Timeslot fields - Part 1: Name and type
| Field | Required | What to enter |
|---|---|---|
| Timeslot Name | Yes | A descriptive internal name for this timeslot (e.g., Morning Shift, Weekday Hours, Saturday Session). This name is for your reference only - not displayed to customers. |
| Slot Type | Yes | Choose how appointments are scheduled. Time-Based: appointments at fixed intervals (e.g., every 60 minutes). Number-Based: queue-based bookings with no fixed time. |
Time-Based vs Number-Based - which should you choose?
| Time-Based | Number-Based | |
|---|---|---|
| How it works | Appointments scheduled at fixed time intervals (e.g., every 30 or 60 minutes) | Customers are assigned a queue number. No fixed appointment time - served in order of arrival or booking. |
| Best for | Services with predictable durations - massage, physio, haircuts, consultations | Walk-in style businesses - barbers, mechanics, high-volume service counters |
| Example | 9:00am, 10:00am, 11:00am slots - customer picks one | Booking #1, #2, #3 - customer served when their number is reached |
| Slot Duration | Set in minutes (e.g., 60 minutes per appointment) | Not applicable - queue-based, not time-based |
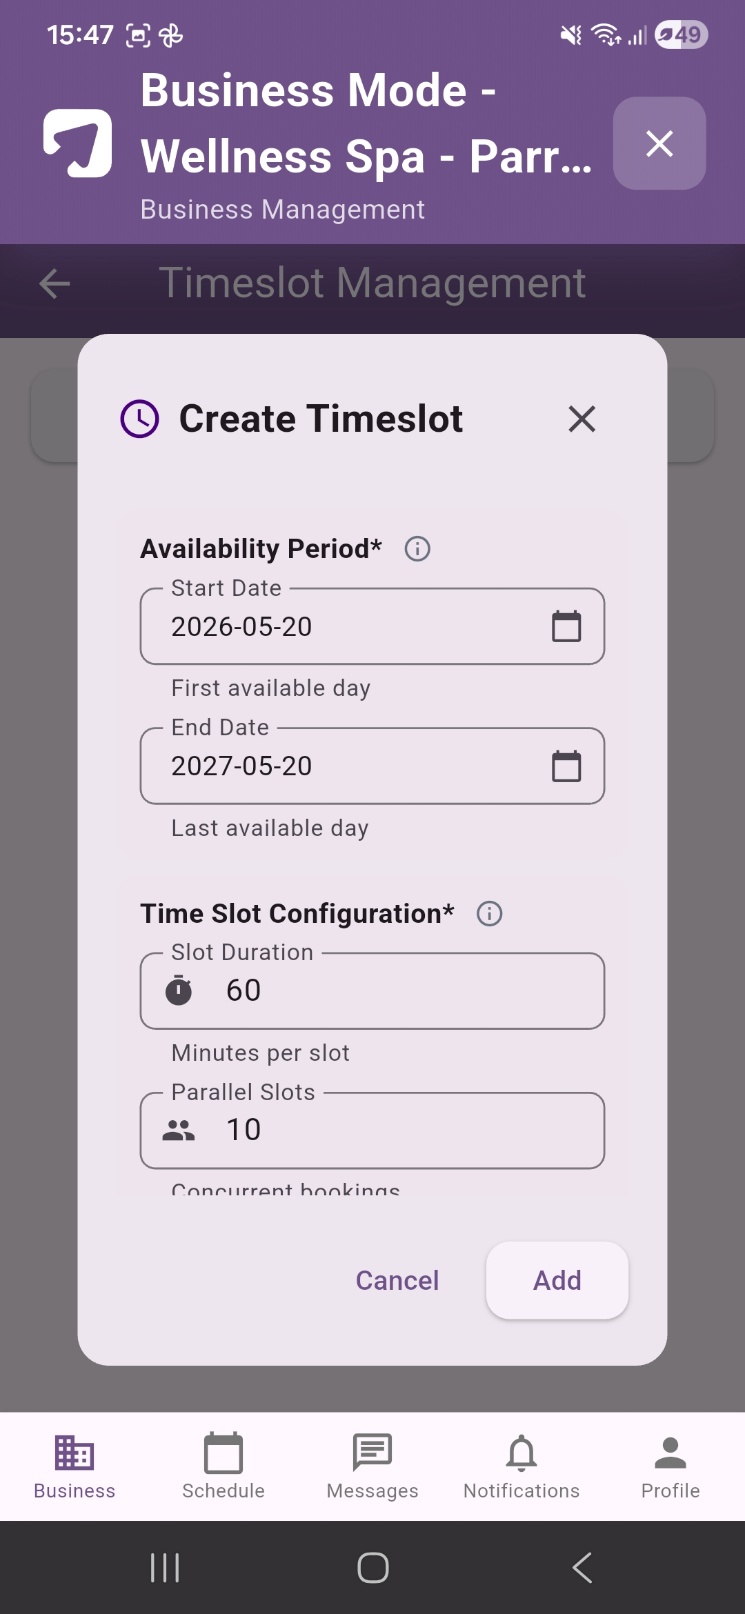
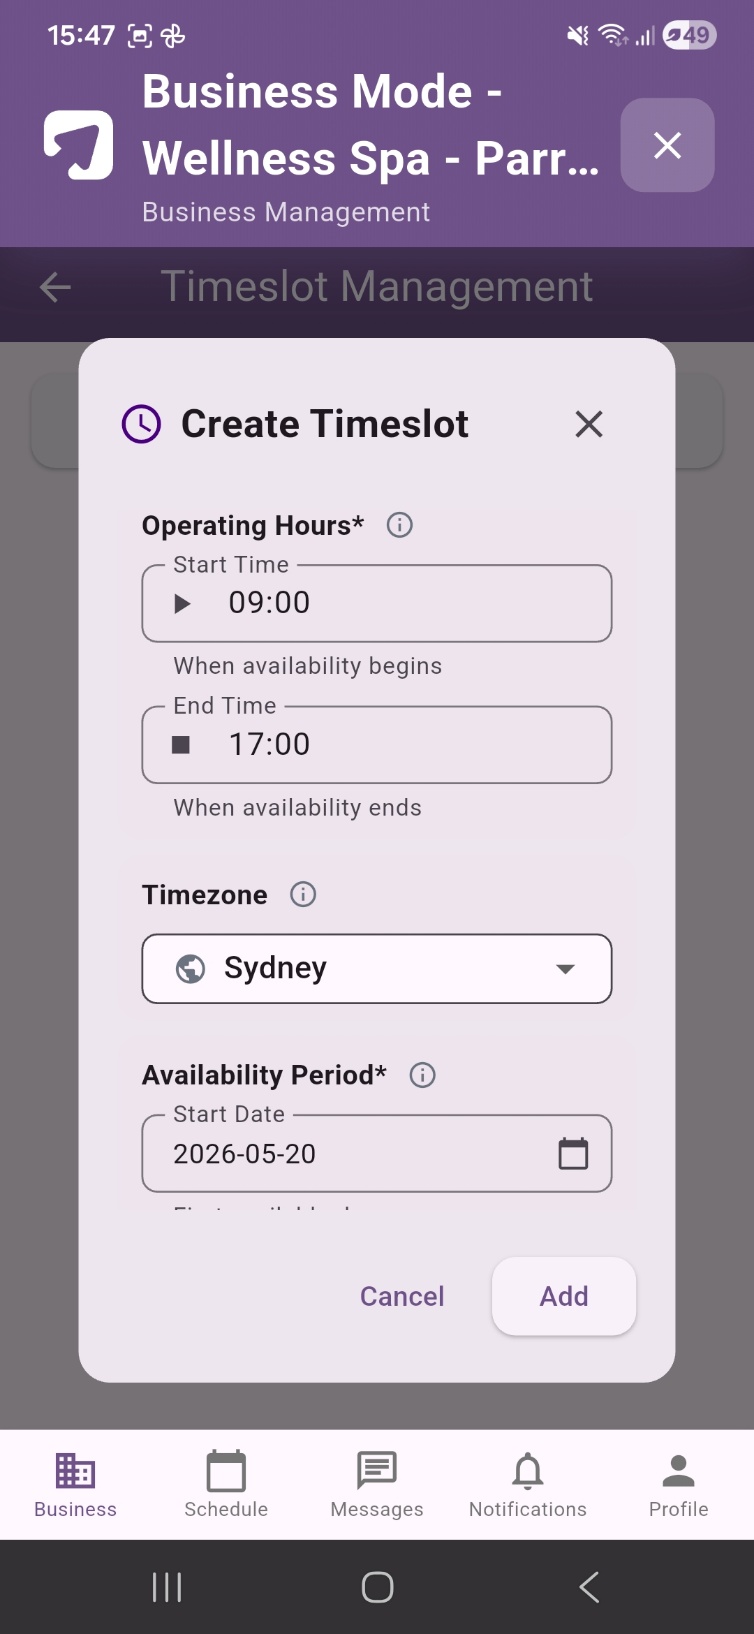
Timeslot fields - Part 2: Operating hours and availability
| Field | Required | What to enter |
|---|---|---|
| Start Time | Yes | The time your availability begins (e.g., 09:00). The earliest time a customer can book an appointment in this timeslot. |
| End Time | Yes | The time your availability ends (e.g., 17:00). No new appointment slots will be offered after this time. |
| Timezone | No | Your local timezone. Defaults to Sydney (AEST/AEDT). Change this if your business is in a different timezone. |
| Availability Period - Start Date | Yes | The first date this timeslot is active and accepting bookings. Defaults to today's date. |
| Availability Period - End Date | Yes | The last date this timeslot is active. Set this to a date in the future (e.g., one year from today). You can always extend it later. |
| Slot Duration | Yes | How long each appointment runs, in minutes (e.g., 60 for a one-hour appointment). Only applies to Time-Based slots. |
| Parallel Slots | Yes | How many bookings can occur simultaneously in the same time window (e.g., 10 means up to 10 customers can book the same time slot concurrently). Set to 1 if only one customer is served at a time. |
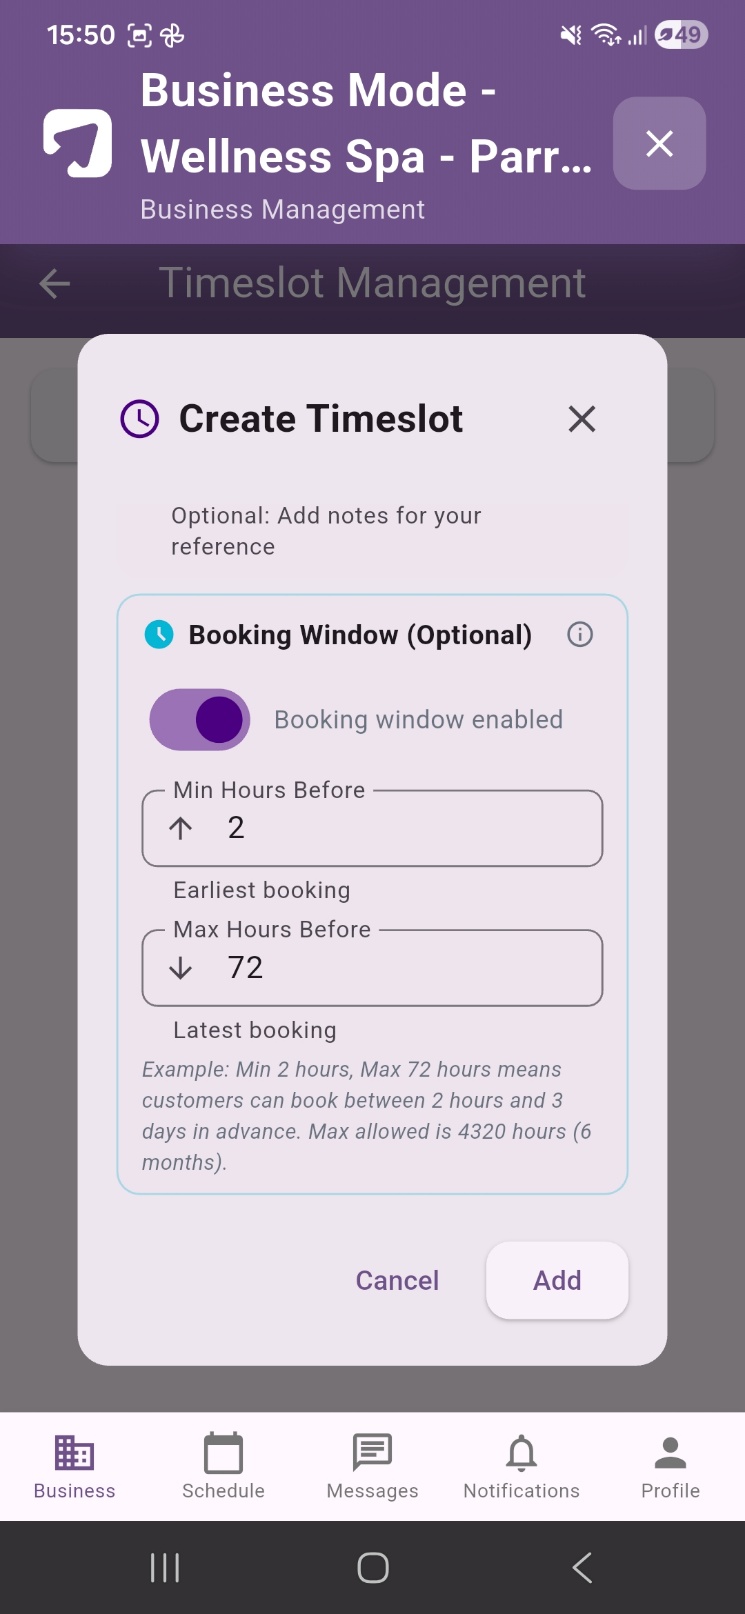
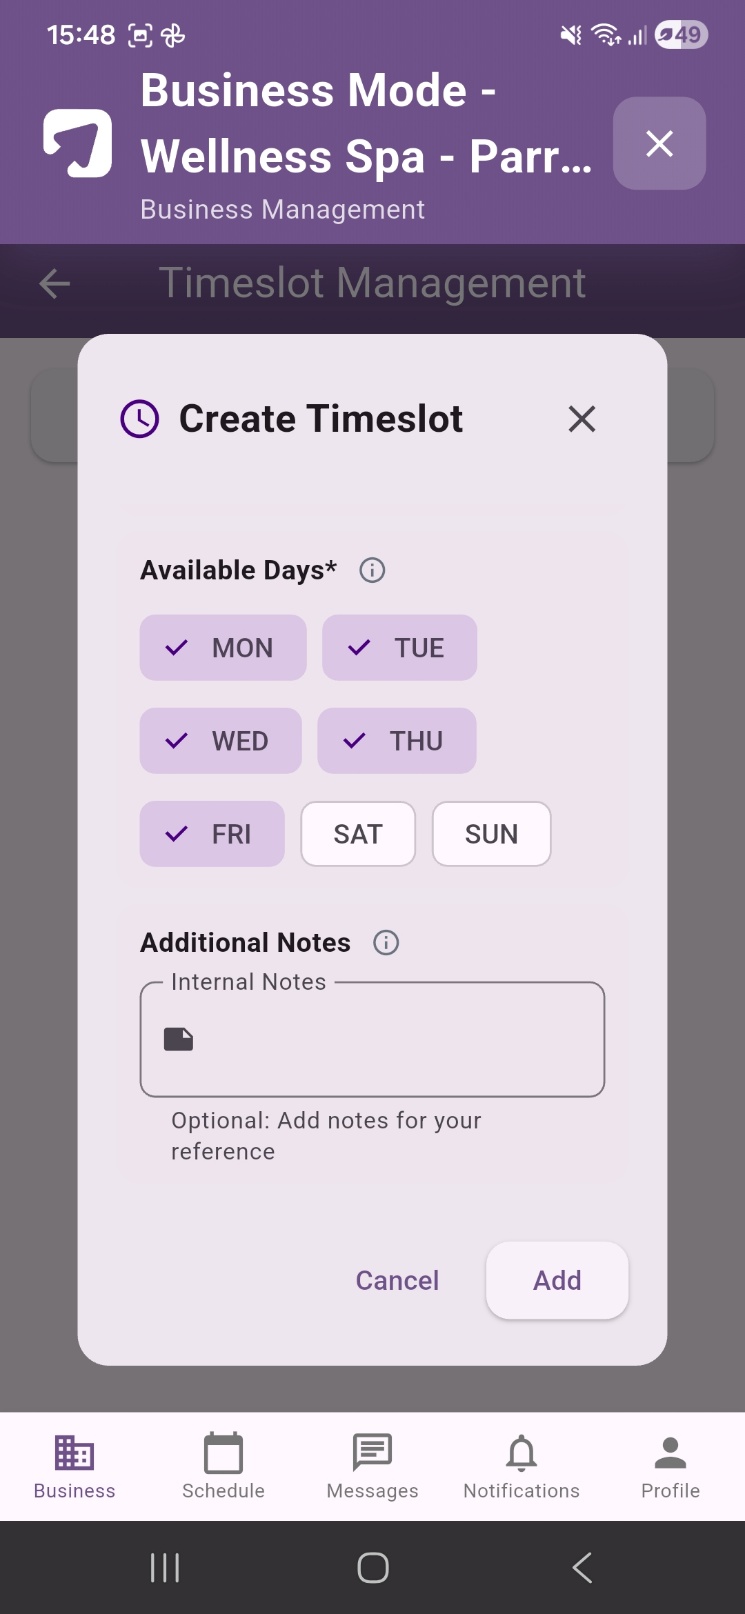
Timeslot fields - Part 3: Days and booking window
| Field | Required | What to enter |
|---|---|---|
| Available Days | Yes | Select which days of the week this timeslot operates. Tap each day button to toggle it on (purple, with tick) or off (white). Example: Mon–Fri for a standard business week. |
| Additional Notes | No | An optional internal note about this timeslot for your reference only. Not visible to customers. |
| Booking Window | No | An optional setting to control how far in advance customers can book. Toggle it on to configure: Min Hours Before sets the earliest a customer can book. Max Hours Before sets the furthest in advance (maximum 4,320 hours / 6 months). |
Booking window example
If you set Min Hours Before to 2 and Max Hours Before to 72, customers can book appointments between 2 hours and 3 days in advance. This prevents same-hour surprise bookings while also stopping customers from booking too far into the future.
Once all fields are complete, tap the Add button to save your timeslot. You can add multiple timeslots for different days or shifts.
Managing Holidays and Closures
The Manage Holidays feature allows you to block out specific dates or date ranges when your business is closed. Customers will not be able to make bookings during these periods.
Adding a holiday or closure
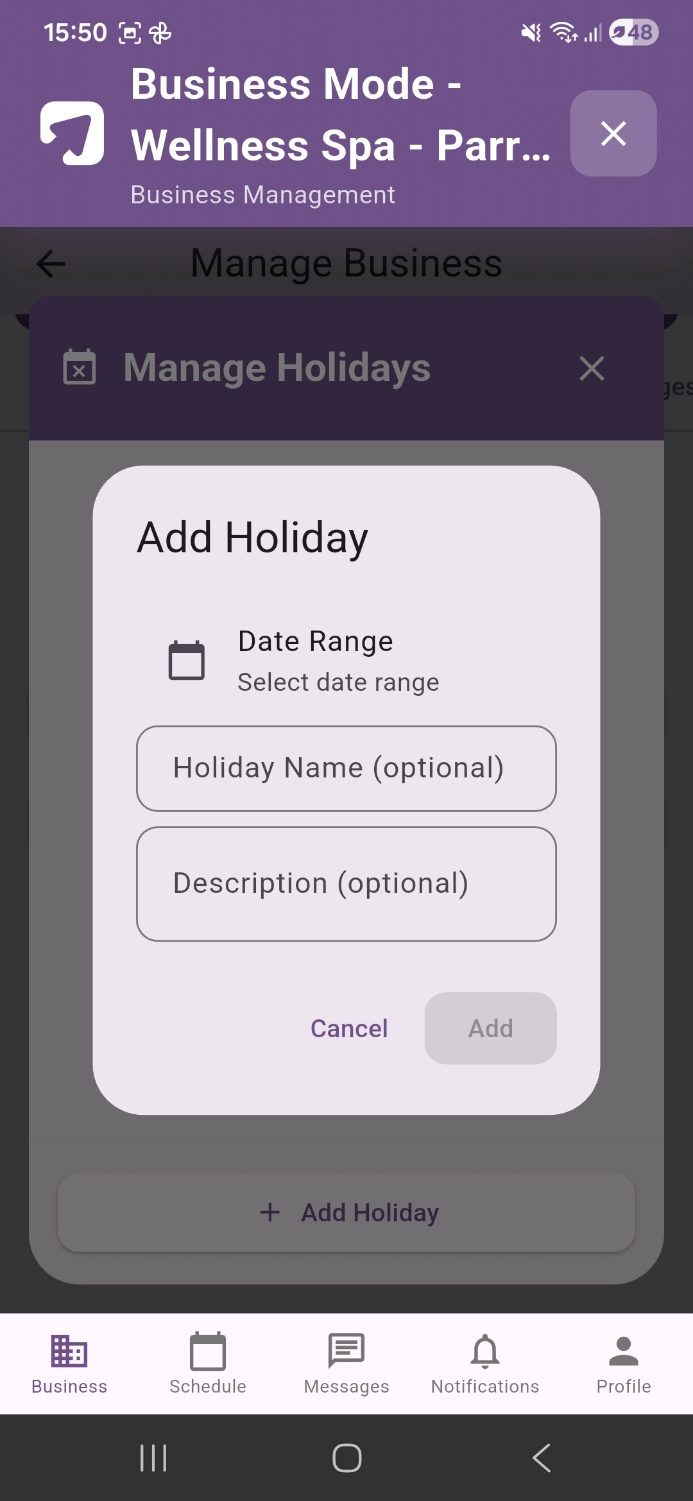
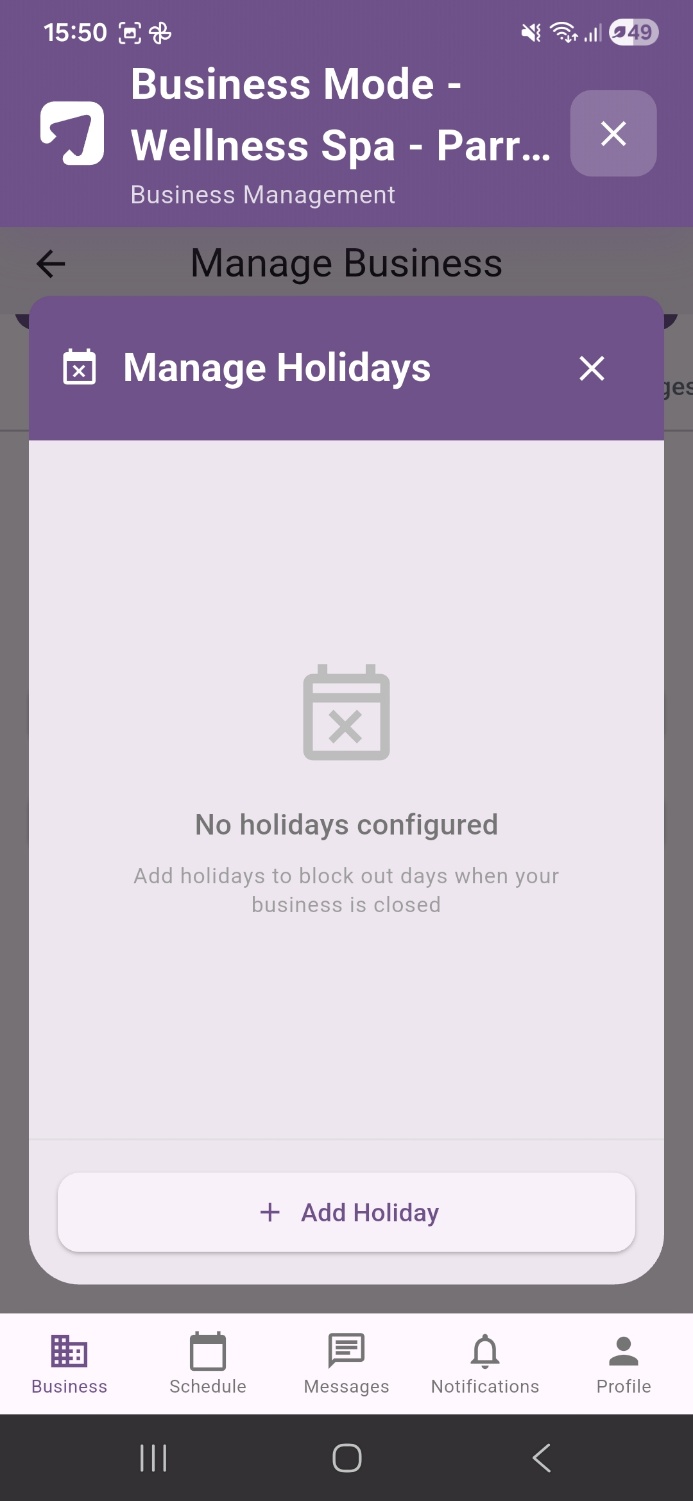
- From the Services & Products tab in Manage Business, tap the Manage Holidays button.
- The Manage Holidays panel will appear. If no holidays have been added yet, the screen will show No holidays configured.
- Tap the + Add Holiday button at the bottom of the panel.
- Tap Date Range and select the start and end date of the closure. For a single-day closure, set the start and end date to the same day.
- Optionally enter a Holiday Name (e.g., Christmas Day, Annual Leave) and a Description for your internal reference.
- Tap Add to save the holiday. The blocked dates will no longer be available for customer bookings.
Plan ahead with holidays
Add your known public holidays and planned closures as early as possible. If a customer attempts to book during a blocked period, the dates will simply appear as unavailable in the booking calendar - they will not see a specific reason for the unavailability.
Holidays do not affect existing bookings
Adding a holiday closure will not automatically cancel any confirmed bookings that have already been made for those dates. If you add a closure that affects existing bookings, you must contact affected customers individually and manage any cancellations or rescheduling through the Platform's normal booking management tools.
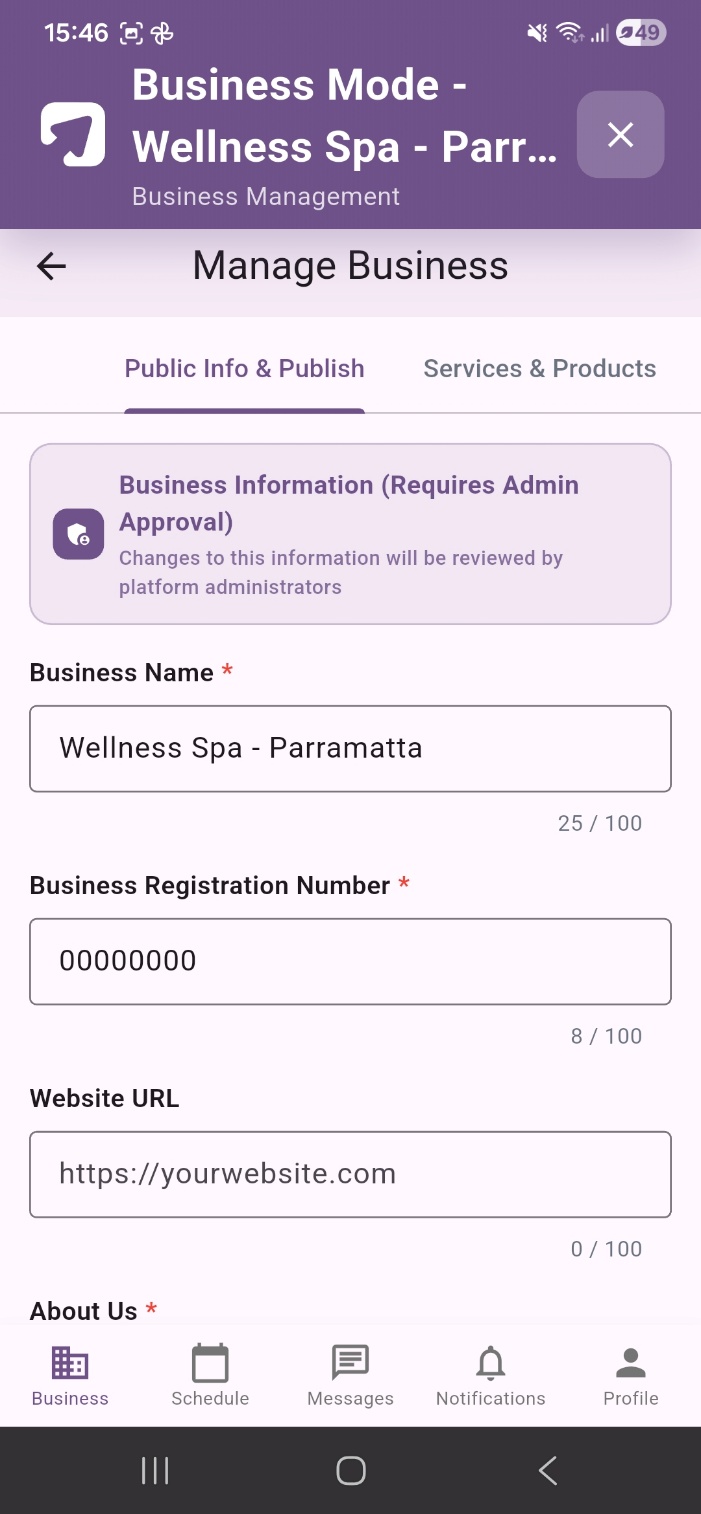
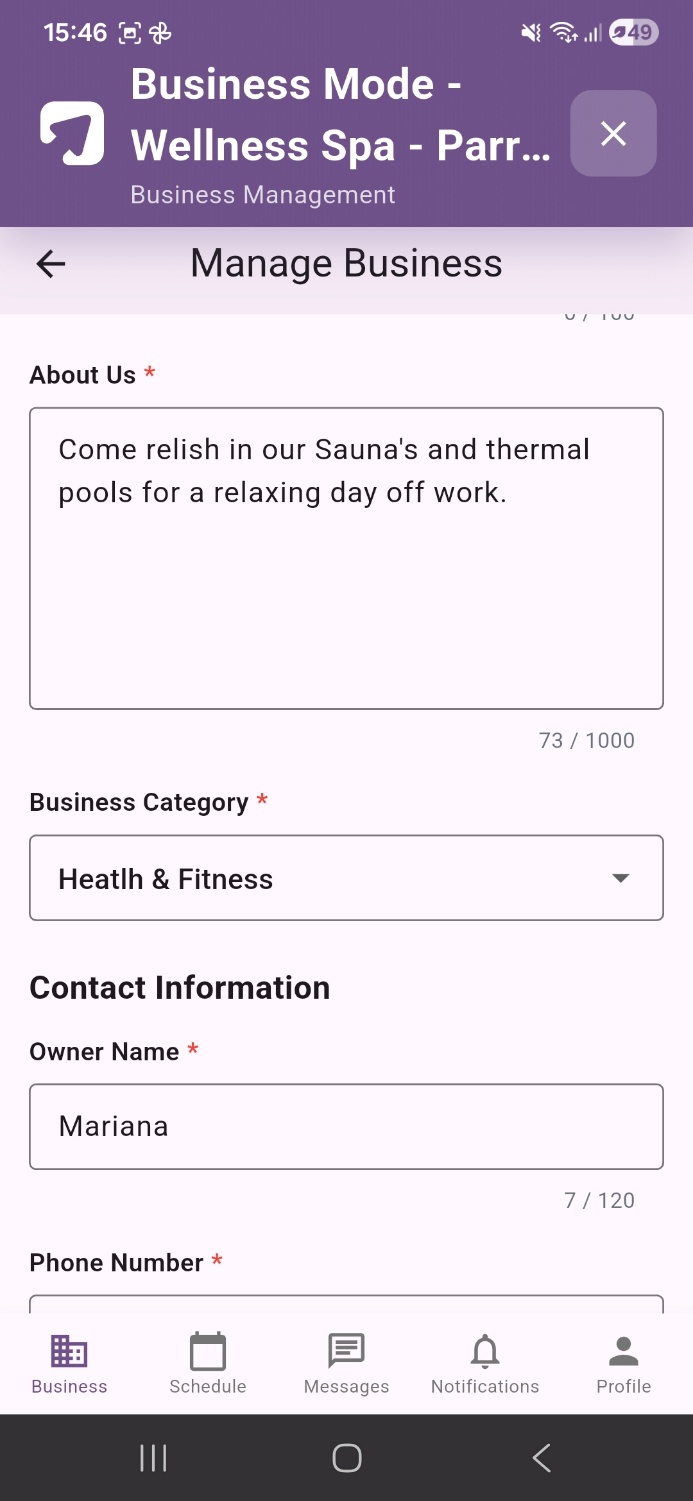
The Public Info & Publish tab in the Manage Business screen allows you to update and maintain all of your core business information after the initial setup. Changes made here require admin re-approval before they are reflected on your live public profile.
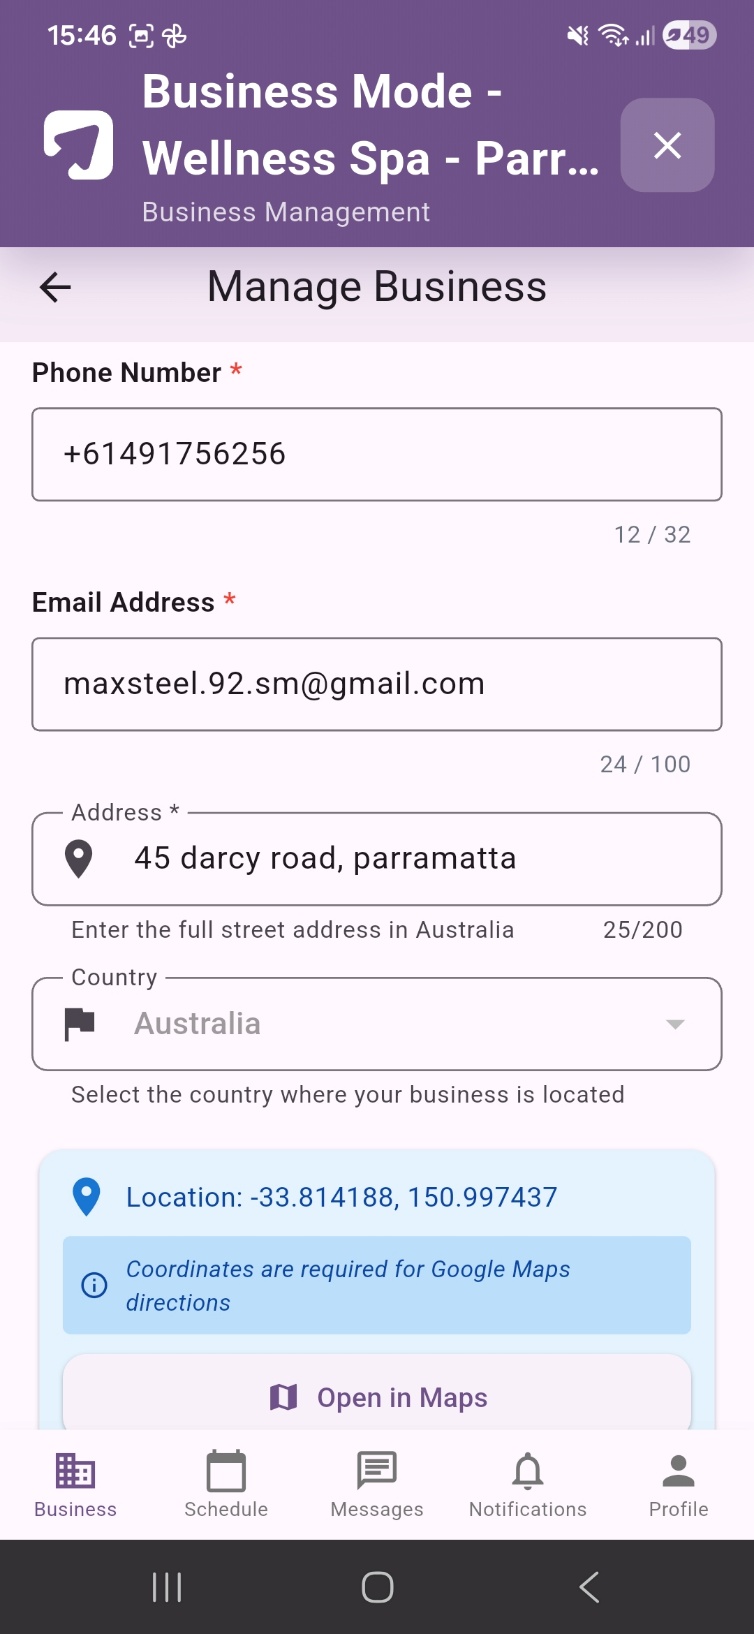
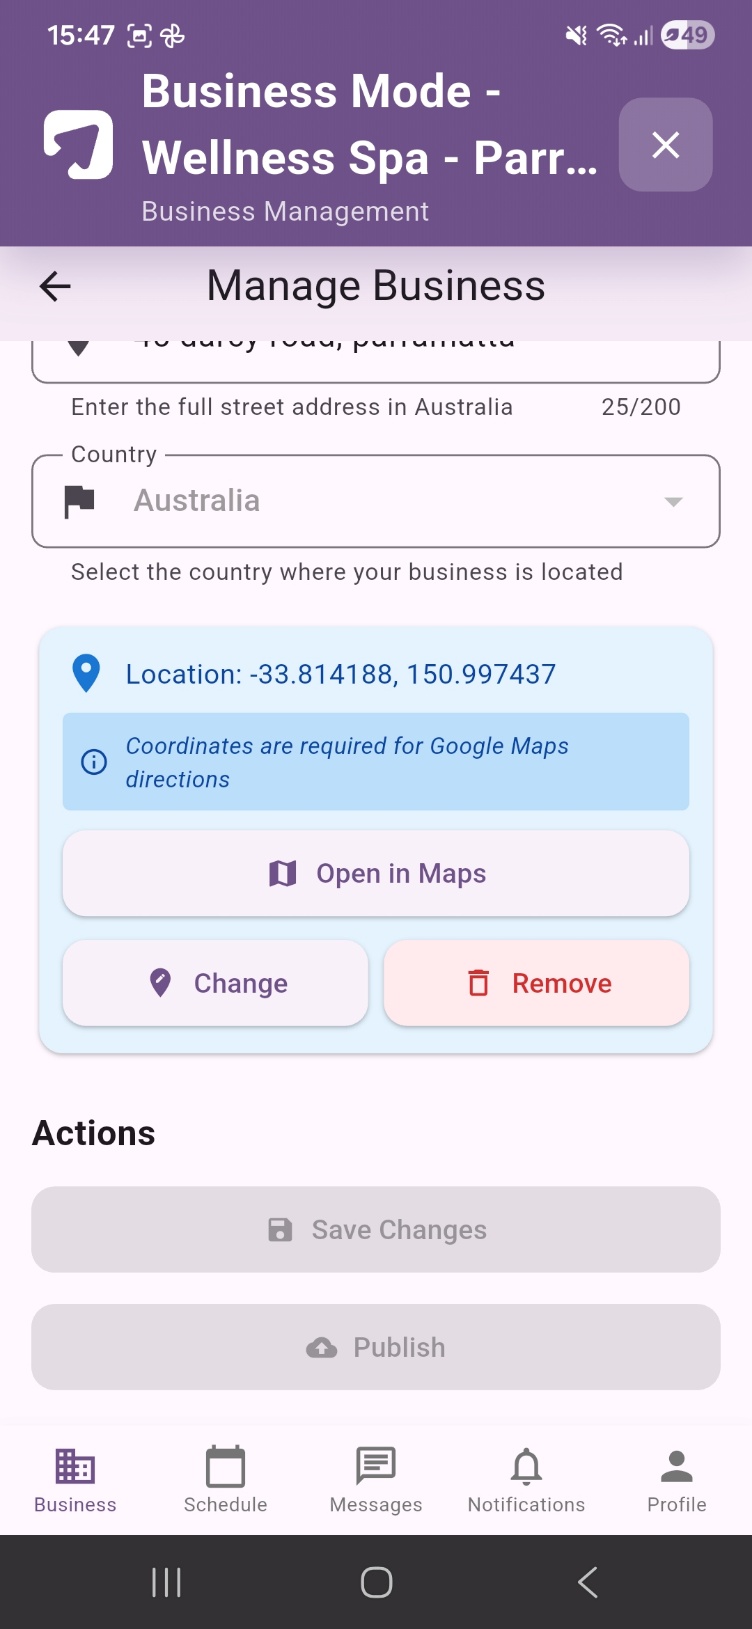
Admin approval required for these fields
All fields in the Business Information section are marked Requires Admin Approval. Any changes you save will be sent to the KeepMyBooking administration team for review before they appear on your live public profile. Your existing live profile remains visible while the update is under review.
| Field | Required | What to enter |
|---|---|---|
| Business Name | Yes | Your official trading name. Maximum 100 characters. |
| Business Registration Number | Yes | Your ABN (Australian businesses) or equivalent registration number. Maximum 100 characters. |
| Website URL | No | Your business website address. Optional but recommended. Maximum 100 characters. |
| About Us | Yes | Your full business description displayed on your public profile. Maximum 1,000 characters. |
| Business Category | Yes | The primary service category for your business. Select from the dropdown. |
| Owner Name | Yes | Full name of the business owner or primary account holder. Used for verification. Maximum 120 characters. |
| Phone Number | Yes | Business phone number including country code (e.g., +61491756256). Maximum 32 characters. |
| Email Address | Yes | Business email address for customer and platform communications. Maximum 100 characters. |
| Address | Yes | Full street address of your business. Maximum 200 characters. Include street number, name, suburb, state, and postcode. |
| Country | Yes | Country where your business is located. Defaults to Australia. |
| Location Coordinates | Yes | GPS latitude and longitude for Google Maps directions. Once set, you can tap Open in Maps to verify, Change to update, or Remove to delete the coordinates. |
Saving changes and publishing
At the bottom of the Public Info & Publish tab you will find two action buttons:
- Save Changes - saves your current edits to the platform. Changes to admin-approval fields are submitted for review.
- Publish - submits your business page for admin review and publication. This button only becomes active once all 7 checklist requirements are completed.
Save Changes vs Publish - important distinction
Tapping Save Changes saves your edits but does not publish your page. Your page remains unpublished until you tap Publish. Make sure you have completed all 7 checklist items and saved your changes before tapping Publish.
A service is a top-level category that groups related bookable products together. For example, a spa might have a service called Thermal Pool which contains individual bookable products. You must create at least one service before you can add sub-services or products.
To add a service, tap the Services & Products tab in Manage Business, then tap the + Add Service button.
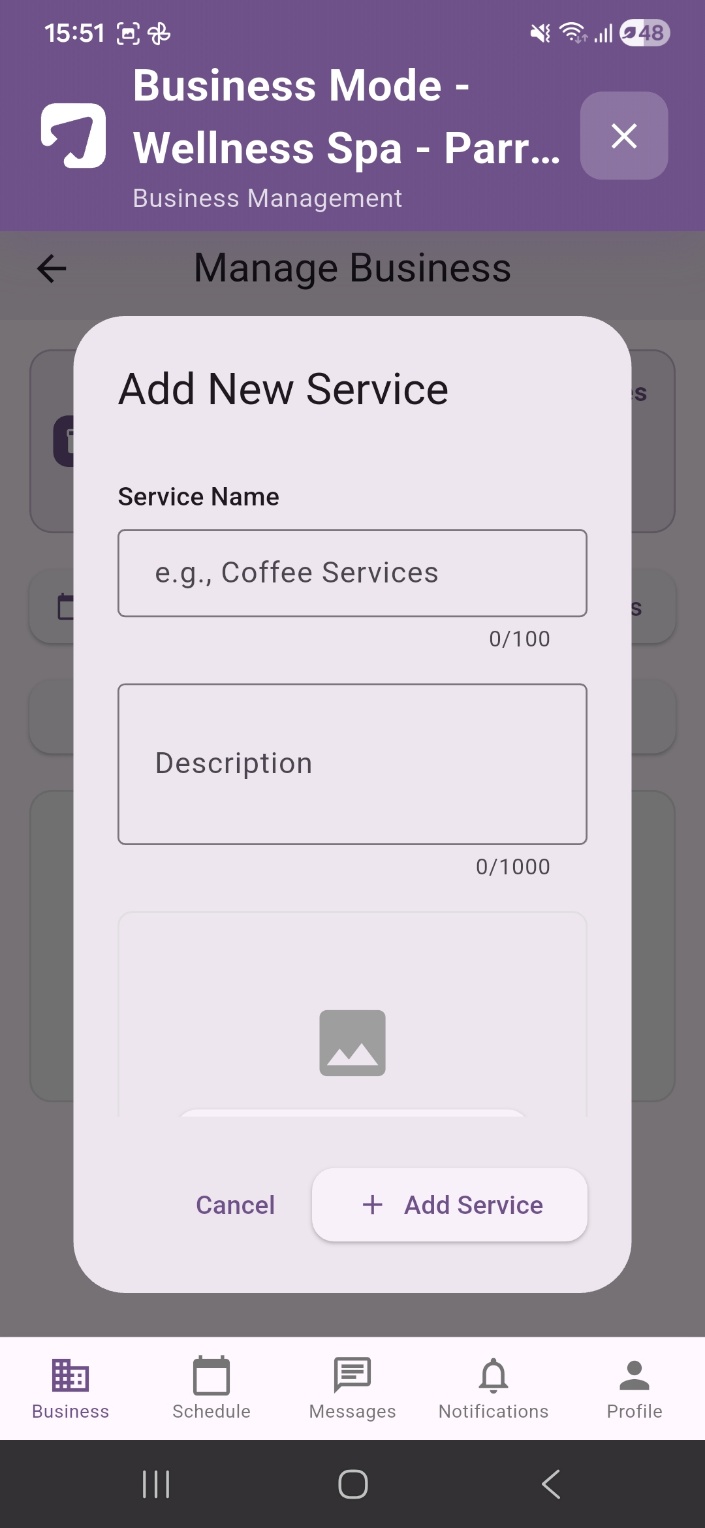
Service fields
| Field | Required | What to enter |
|---|---|---|
| Service Name | Yes | A clear, customer-facing name for this service category (e.g., Thermal Pool, Massage, Personal Training). Maximum 100 characters. |
| Description | No | An optional description of this service category. Displayed to customers on your profile. Maximum 1,000 characters. |
| Service Image | No | An optional image representing this service. Tap the image area to upload a photo from your device. Displayed as the banner for this service category on your profile. |
Once all fields are complete, tap + Add Service to save. The service will appear in your Services & Products list.
Admin approval required for services
All service and product content requires admin re-approval before changes are visible on your live public profile. New services added here will be reviewed by the KeepMyBooking administration team.
A sub-service is a specific named offering that sits under a service category. Sub-services group bookable products and give customers a more detailed view of what is available. For example, under the Thermal Pool service, you might add Private Thermal Pool as a sub-service.
Once you have created a service, it will appear in the Services & Products list. Expand the service by tapping it, then tap + Add Sub-Service to create the first sub-service under it.
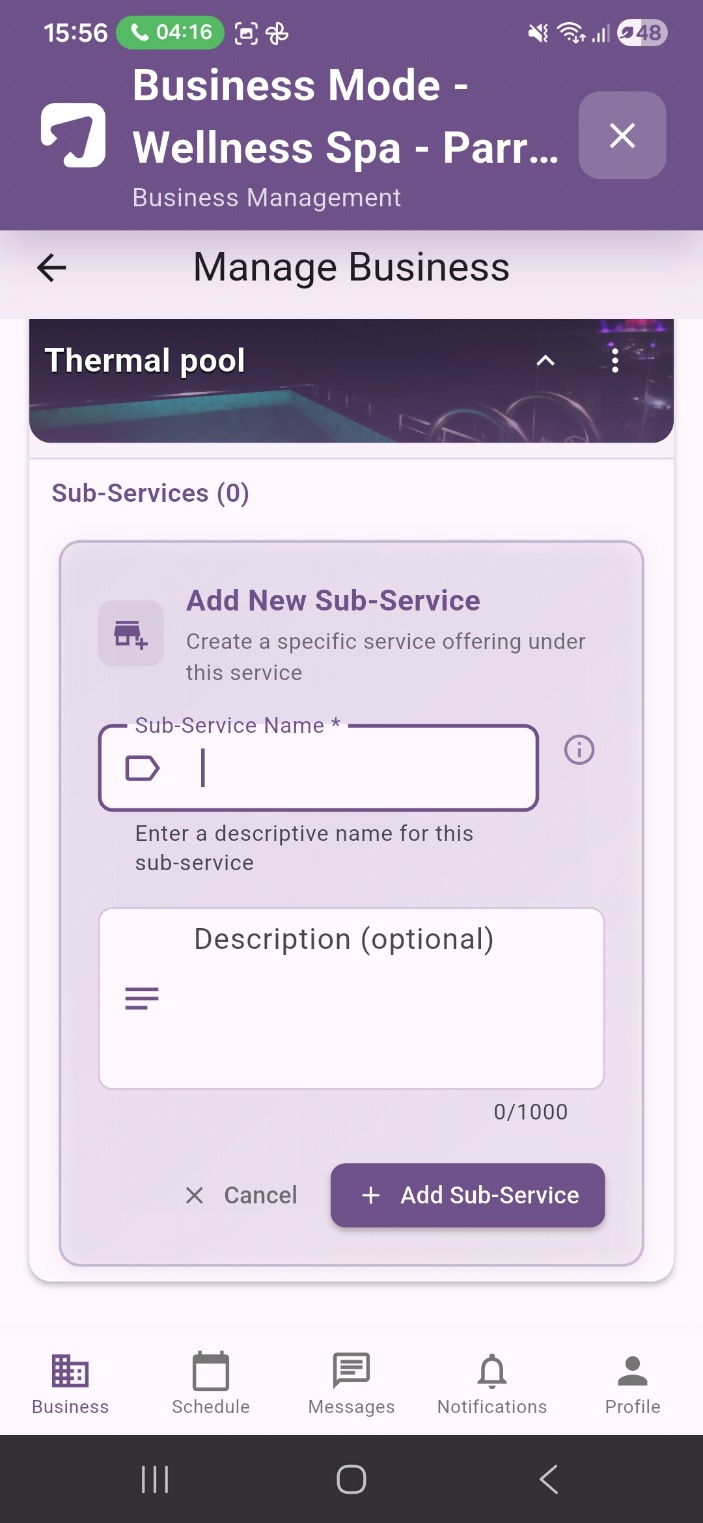
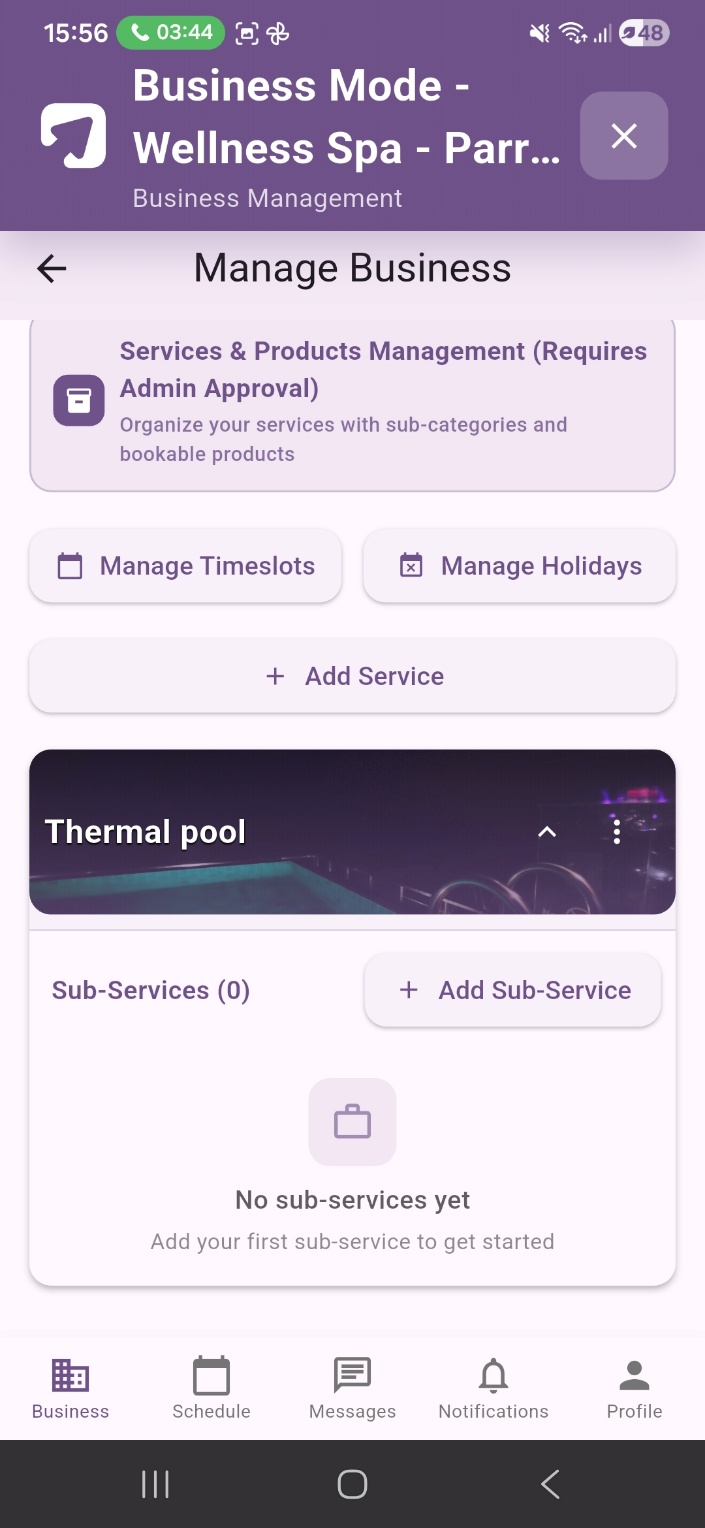
Sub-service fields
| Field | Required | What to enter |
|---|---|---|
| Sub-Service Name | Yes | A descriptive name for this specific offering (e.g., Private Thermal Pool, Group Sauna Session). Customer-facing - appears on your booking profile. Maximum 100 characters. |
| Description | No | An optional description of this sub-service. Displayed to customers to explain what this particular offering includes. Maximum 1,000 characters. |
Tap + Add Sub-Service to save. The sub-service will appear nested under the parent service in the list. You can add multiple sub-services under a single service.
How services, sub-services, and products relate
Think of it as three levels: Service (top category, e.g., Thermal Pool) → Sub-Service (specific offering, e.g., Private Thermal Pool) → Product (the bookable item with price and timeslot, e.g., Private Thermal Pool - 60 min, $100). Customers browse by service, select a sub-service, then book a product.
A product is the actual bookable item that a customer selects and pays for. Products sit under a sub-service and contain the pricing, the associated timeslot, a display colour for the calendar, and the appointment location. You must add at least one product to complete this checklist requirement.
To add a product, locate the sub-service in the Services & Products list, tap the three-dot menu (⋮) on the sub-service, and select Add Product from the menu.
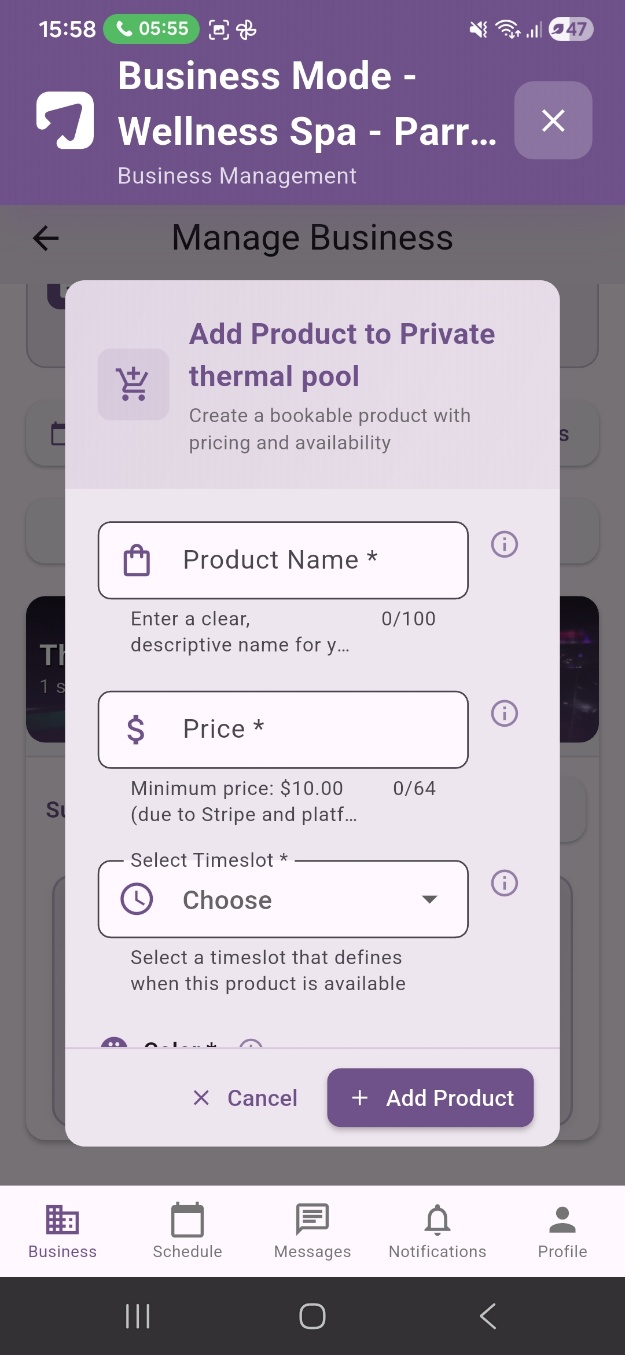
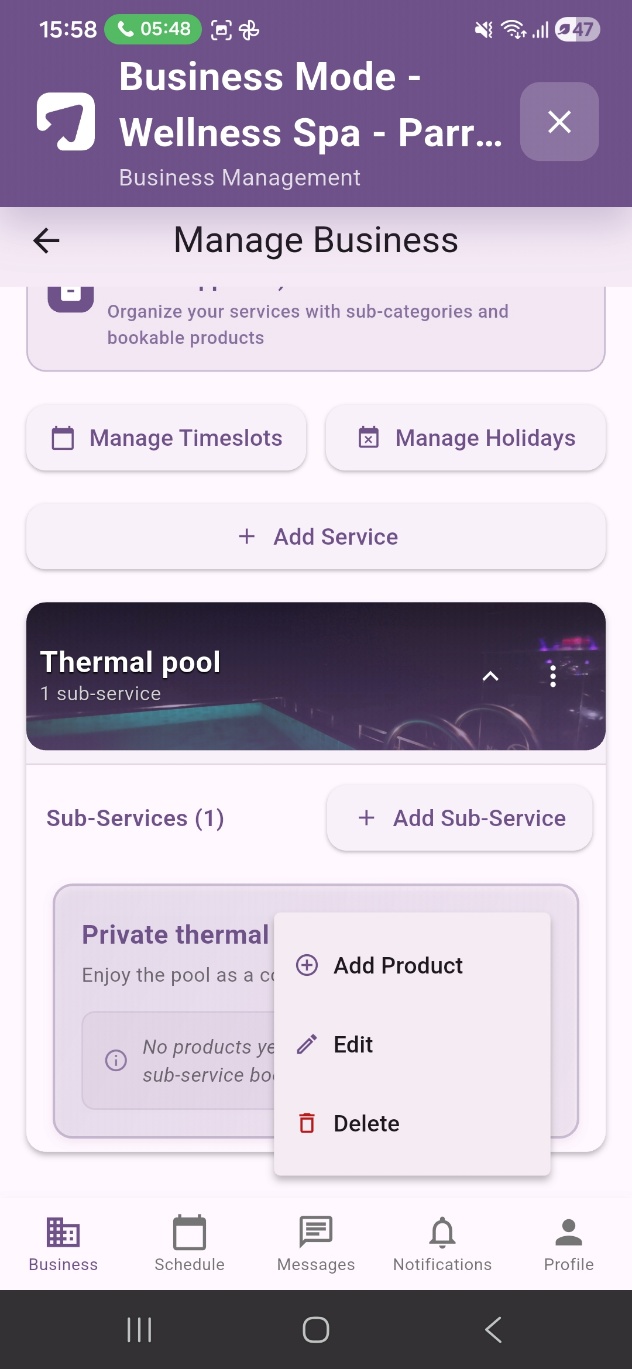
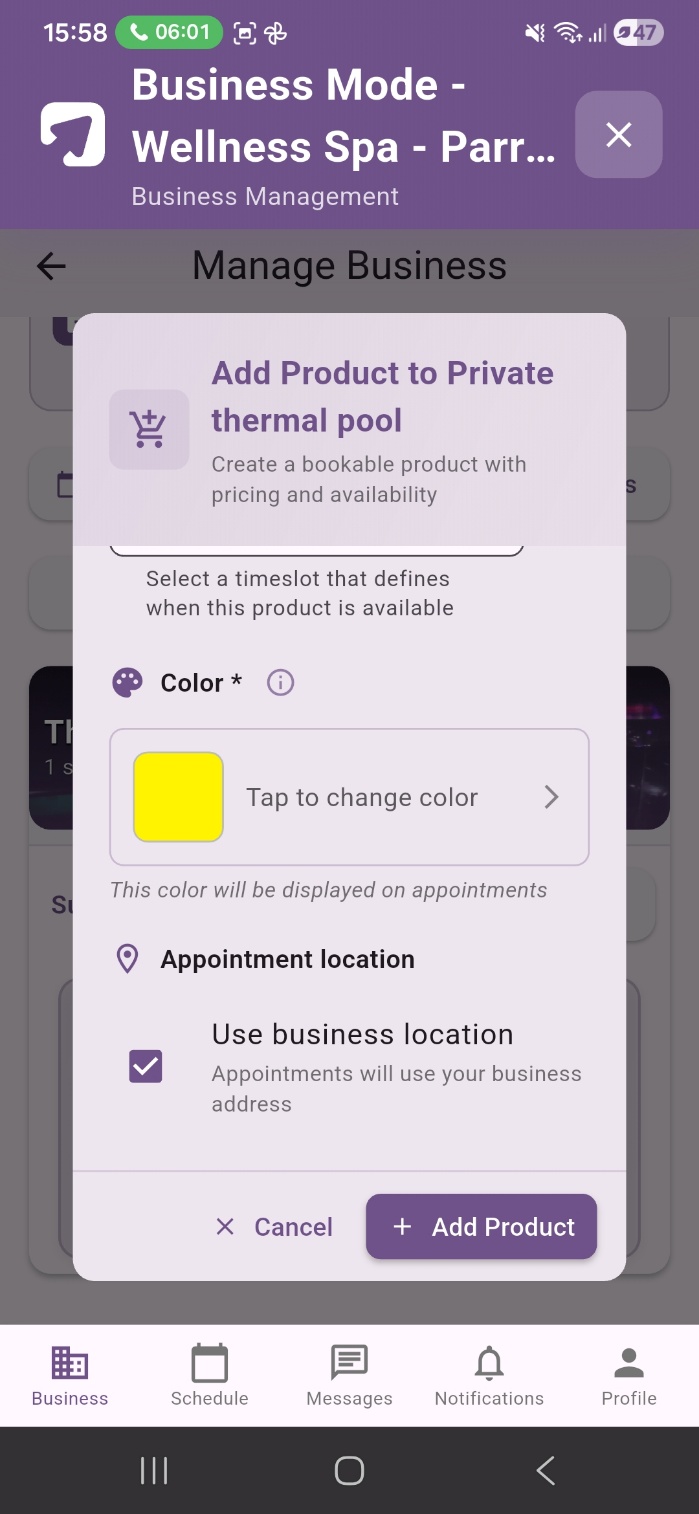
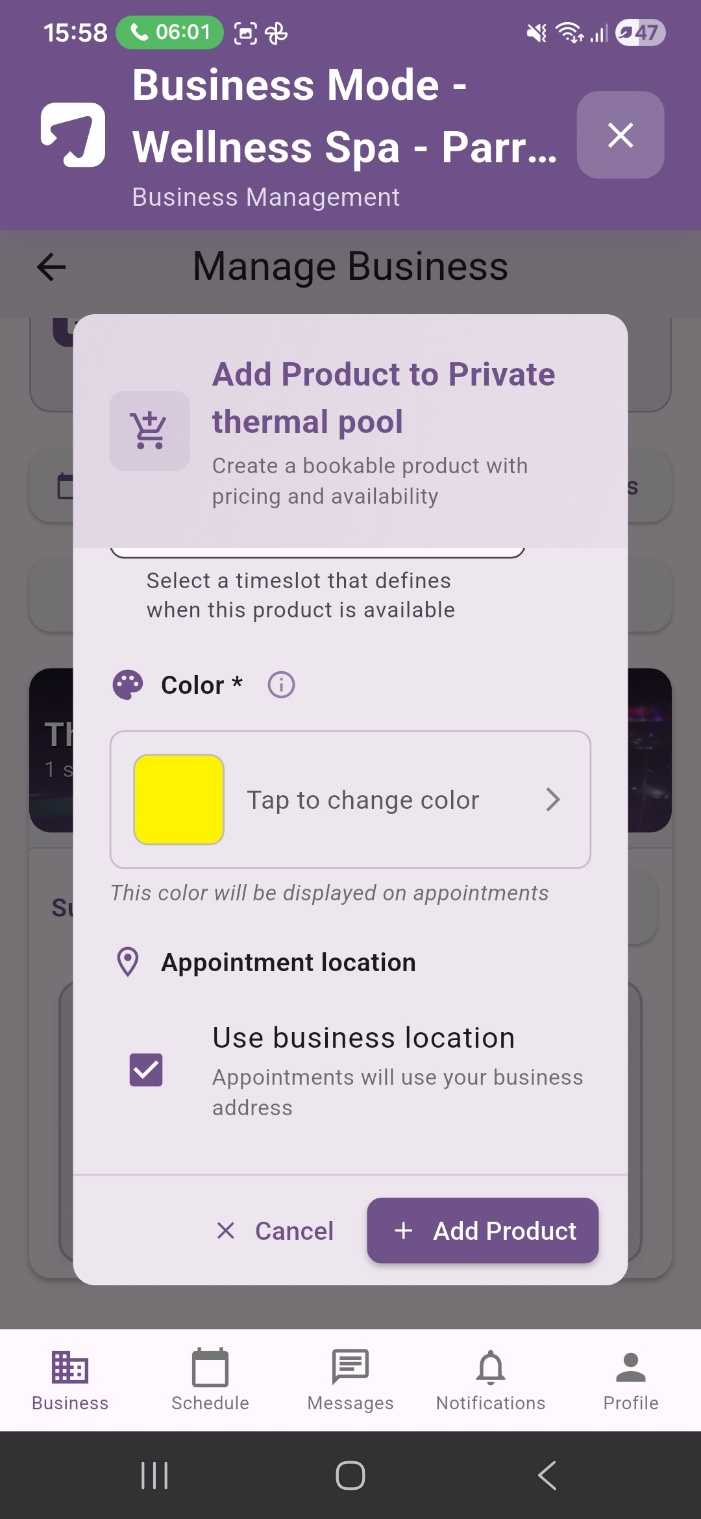
Product fields
| Field | Required | What to enter |
|---|---|---|
| Product Name | Yes | A clear, customer-facing name for this bookable item (e.g., Private Thermal Pool - 60 min). Maximum 100 characters. |
| Price | Yes | The price customers will pay to book this product. The typical minimum is $10.00, though some businesses may have a different platform minimum. Enter the amount in dollars (e.g., 100 for $100.00). |
| Select Timeslot | Yes | Choose which timeslot this product uses from the dropdown. You must have at least one timeslot created before you can add a product. |
| Color | Yes | Choose a display colour for this product. Shown on the booking calendar to help you visually distinguish between different products. |
| Appointment Location | No | Tick Use business location to have appointments default to your business address. Leave unticked if this product takes place at a different location. |
Typical minimum price is $10.00
The typical minimum bookable price is $10.00. Some businesses may have a different platform minimum. This exists due to the combined Stripe payment processing fee (approximately ~1.7% + A$0.30, variable) and the KeepMyBooking platform commission (currently 2.5%, as notified on the Platform). Products priced below your business minimum cannot be added.
Requirements 5 and 6 both relate to business imagery and are managed from the Images tab in Manage Business. Both images are required before your page can be published and will be reviewed by the KeepMyBooking administration team before appearing on your live profile.
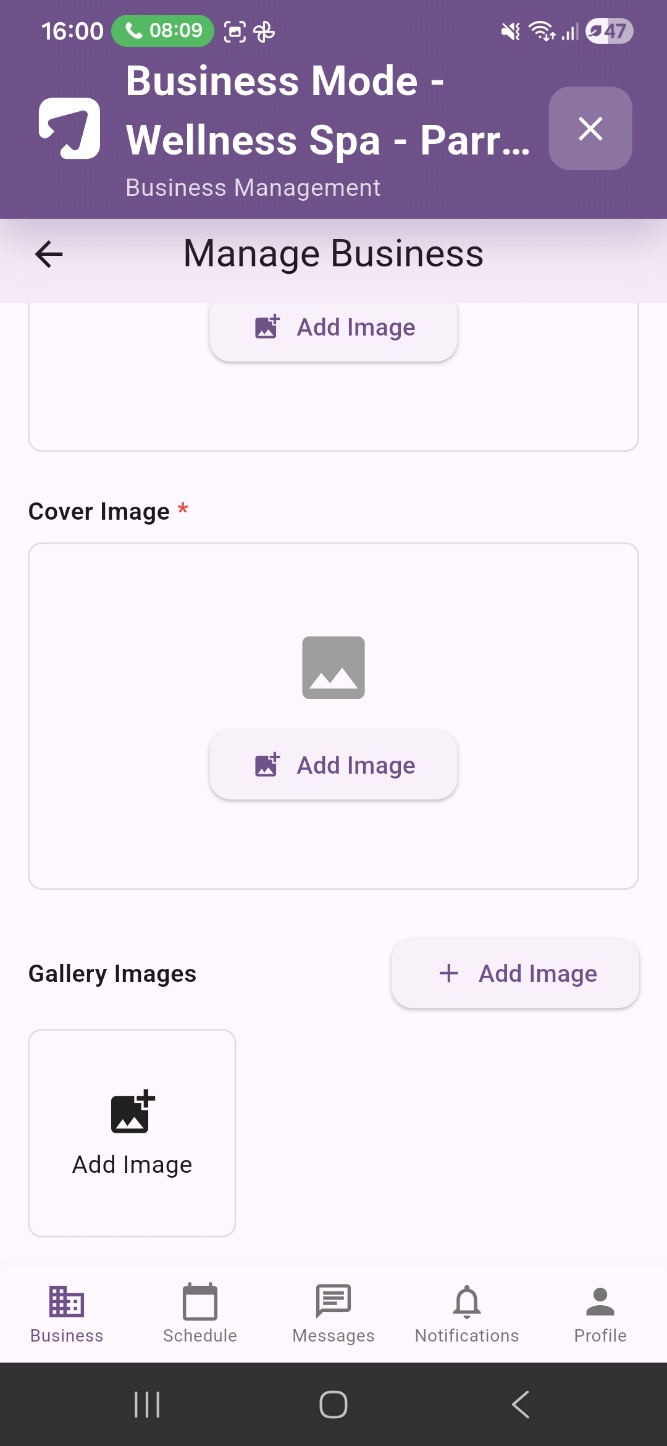
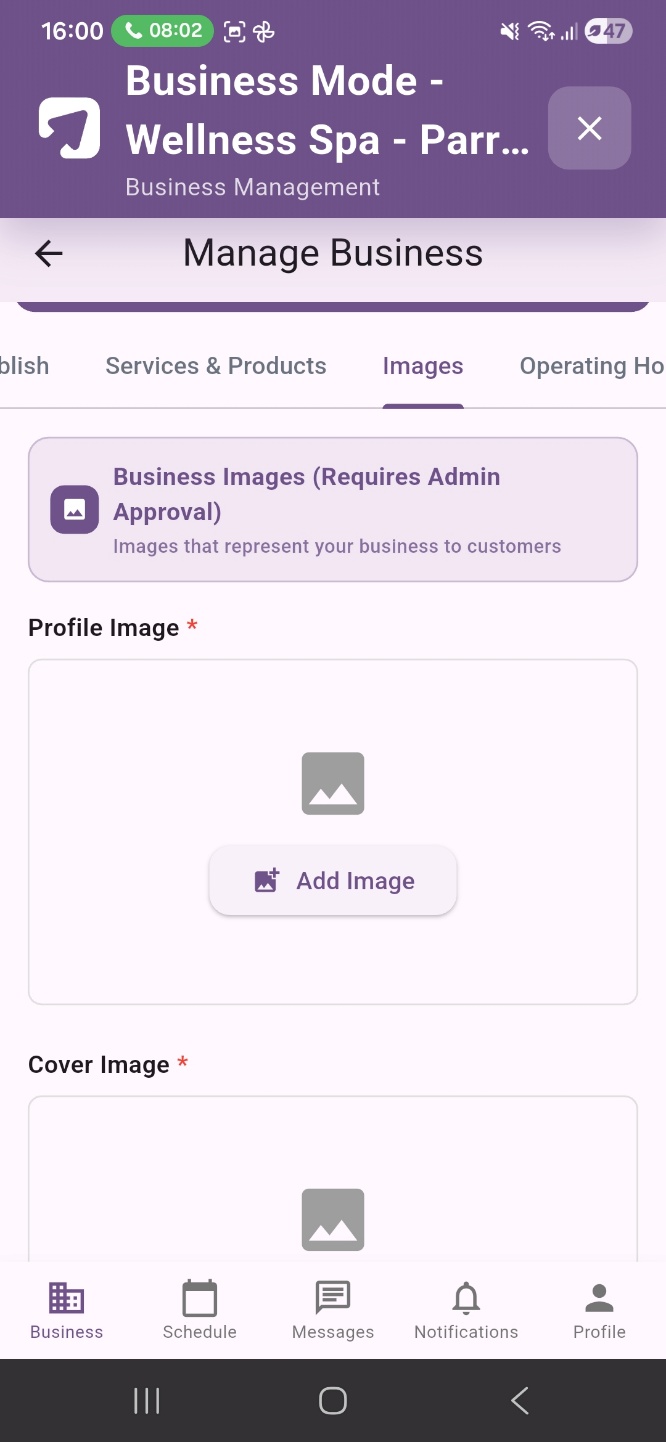
Image types
| Field | Required | What to enter |
|---|---|---|
| Profile Image | Yes | Your business logo or a representative photo. Displayed as the circular profile icon on your listing in search results and at the top of your business profile. Recommended: square format, minimum 400×400px. |
| Cover Image | Yes | A wide banner image displayed at the top of your business profile page. The first visual customers see when they open your profile. Recommended: landscape format, minimum 1200×400px. |
| Gallery Images | No | Additional photos of your business, venue, services, or team. Appear in a gallery on your profile page. Recommended: landscape format, high resolution. |
How to upload images
- Tap the Images tab in the Manage Business screen.
- Tap the Add Image button in the Profile Image section. Your device's photo library or camera will open.
- Select or capture the image you want to use and confirm.
- Repeat the process for the Cover Image section.
- Optionally, tap + Add Image in the Gallery Images section to add additional photos.
- Tap Save Changes at the bottom of the Public Info & Publish tab to submit your images for admin review.
Image tips for maximum impact
Profile image: use your logo on a clean white or light background for clarity in search results. Cover image: use a high-quality wide photo of your venue or a lifestyle shot that represents your brand. Avoid text-heavy images or images with very dark backgrounds.
Images require admin approval
Both the profile image and cover image are subject to admin review before they appear on your live profile. Images that are low resolution, irrelevant to your business, or in breach of platform content standards will be rejected. Appropriate images of a professional standard will typically be approved within 1–3 business days.
The Operating Hours tab is separate from the booking timeslots you configured in Requirement 1. Operating hours represent the general opening hours displayed on your public profile - the hours customers can see your business is open. Timeslots control when customers can book; operating hours tell customers when your doors are open.
Changes to operating hours save automatically - no Save Changes button is required.
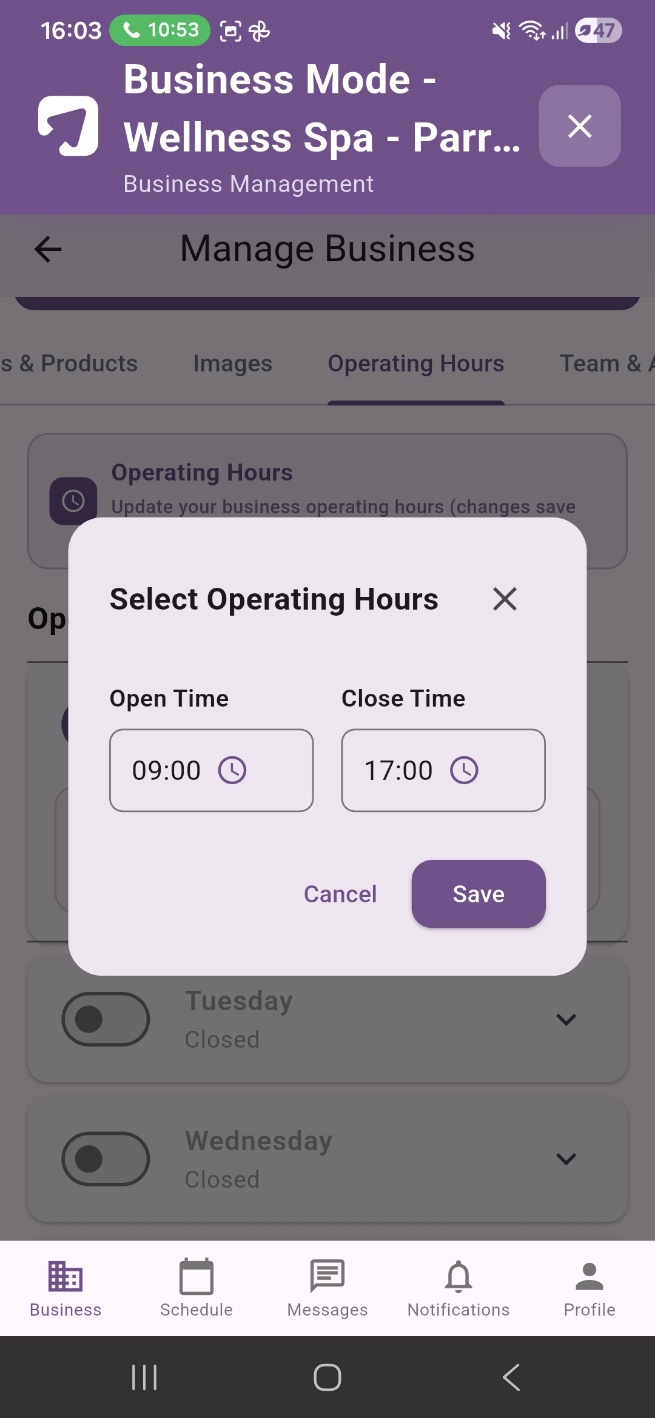
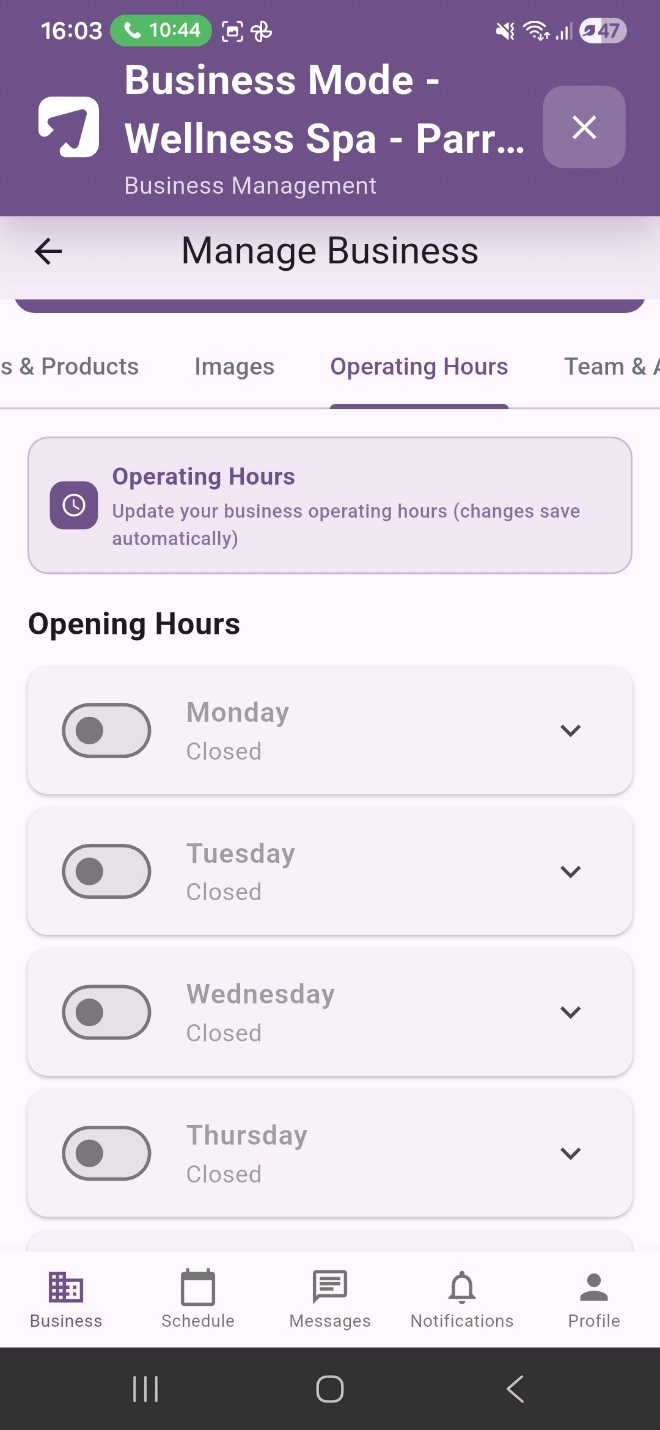
Setting your operating hours
- Tap the Operating Hours tab in the Manage Business screen.
- Each day of the week is listed with a toggle switch (grey = Closed, purple = Open).
- Tap the toggle next to any day to switch it from Closed to Open. A Select Operating Hours dialog will appear.
- Set the Open Time (when your business opens) and Close Time (when your business closes) for that day.
- Tap Save to confirm the hours for that day. The day will now show your set hours instead of Closed.
- Repeat for each day of the week your business operates.
Operating hours vs timeslots - key difference
Operating hours are informational only - they tell customers when you are generally open. Booking timeslots control the actual available appointment windows. A customer cannot book outside your configured timeslots even if your operating hours show you are open.
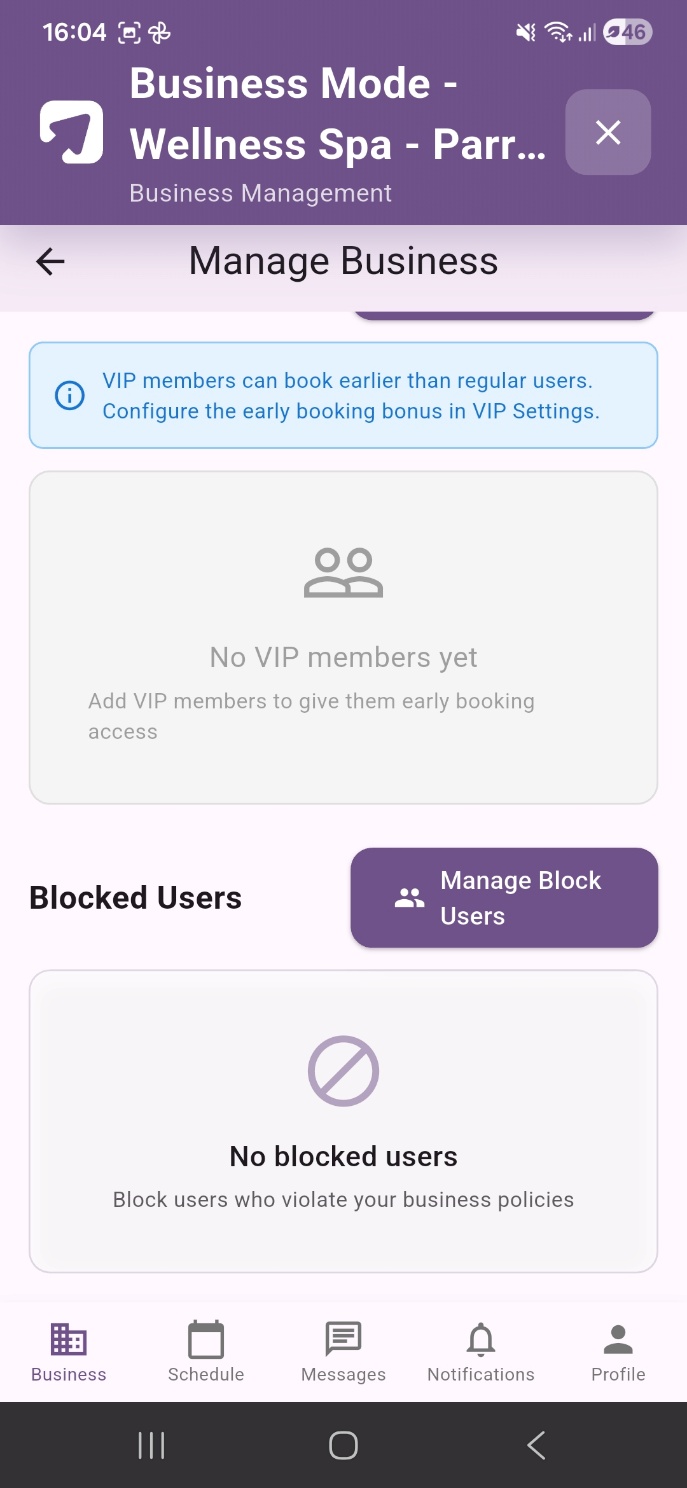
The Team & Access tab allows you to add staff or business partners as team members with controlled levels of access. It also contains VIP Access Management and Blocked Users management.
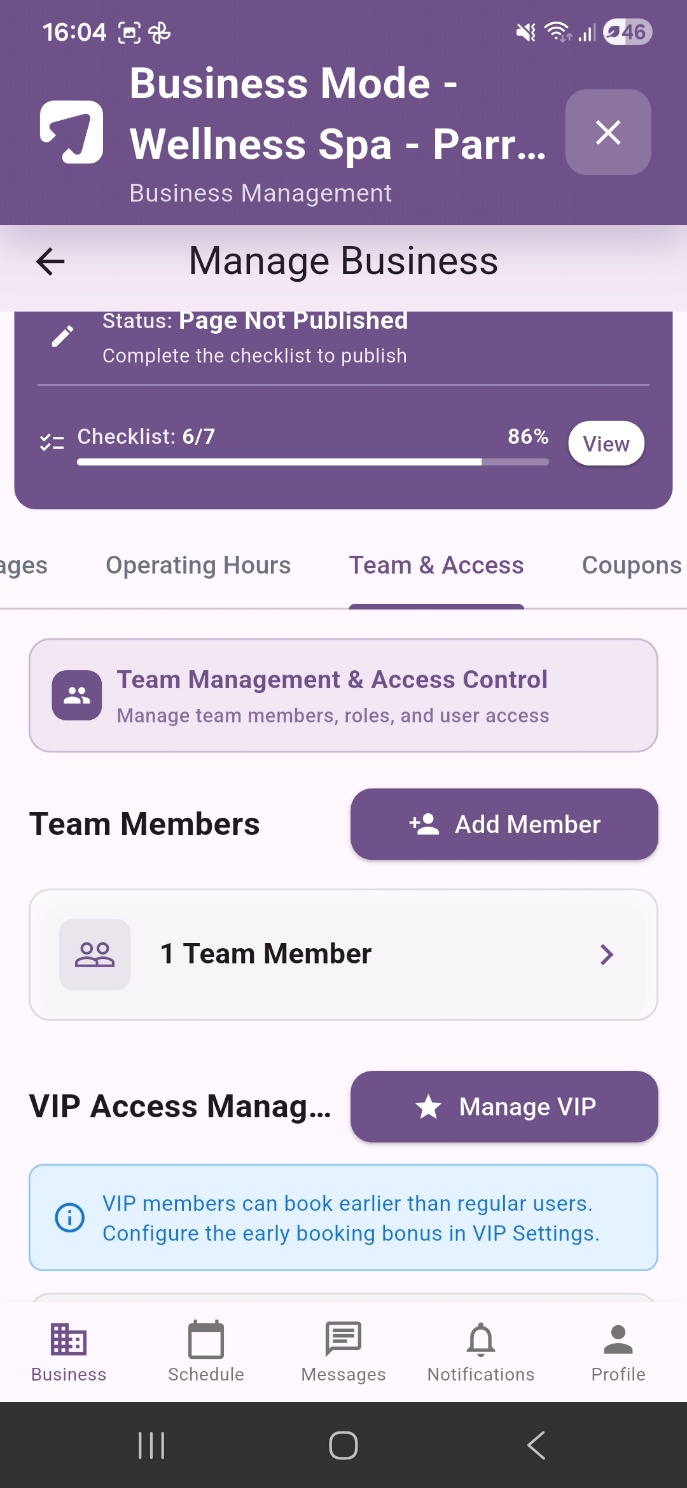
Team Members
You can add multiple team members to your business account and control their level of access using role-based permissions. Each team member must have a KeepMyBooking account registered with their email address before they can be added.
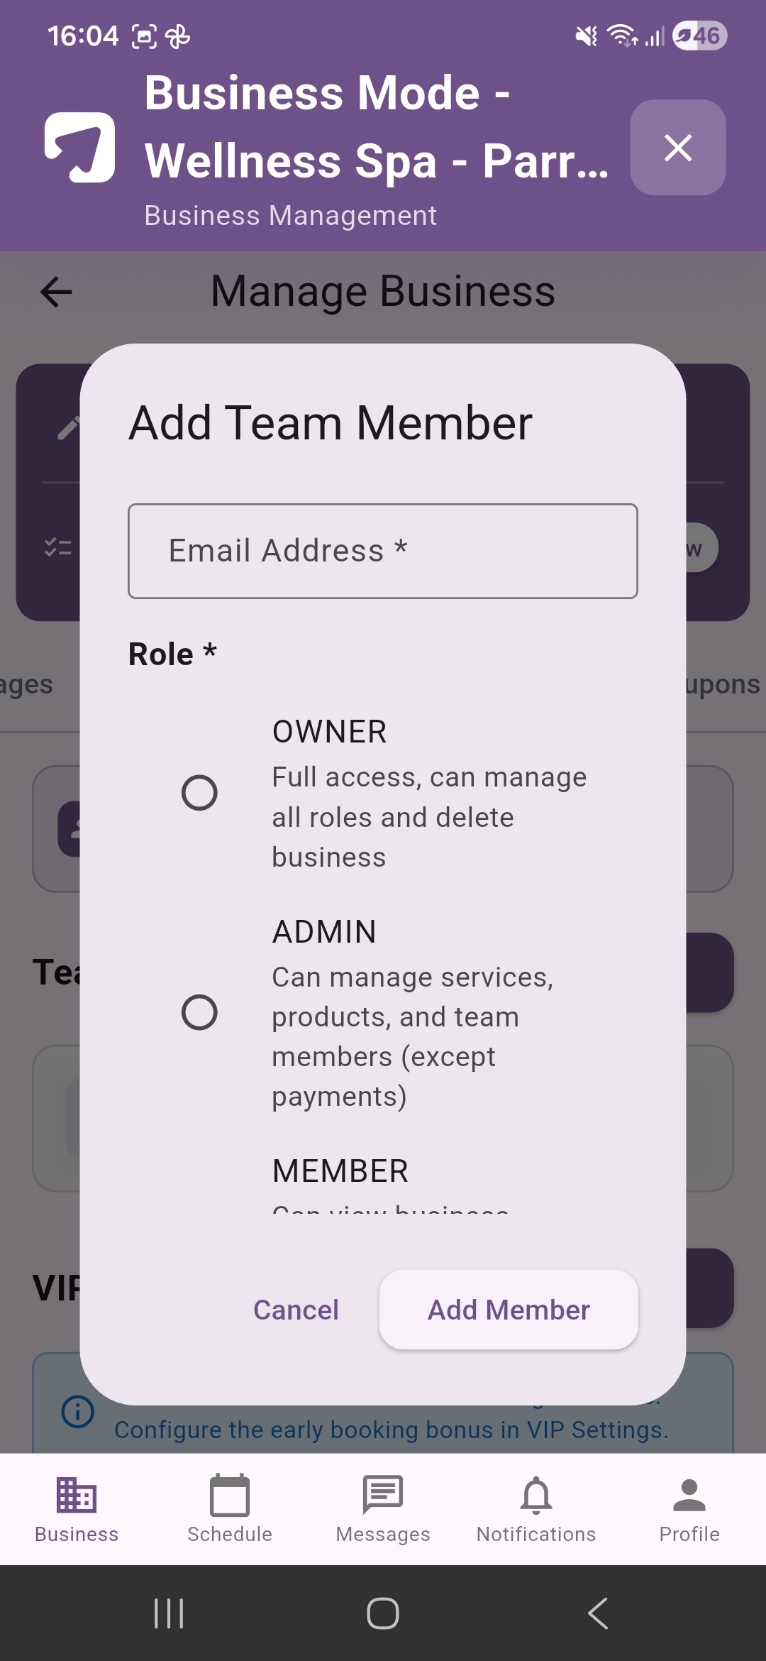
Team member roles
| Role | Access Level | Permissions |
|---|---|---|
| OWNER | Full access | Can manage all roles, settings, and delete the business. Assign only to the primary business owner. |
| ADMIN | Manage services & team | Can manage services, products, timeslots, and team members. Cannot access payment settings. |
| MEMBER | View access | Can view business information and booking data. No editing rights. |
How to add a team member
- From the Team & Access tab, tap the + Add Member button.
- Enter the email address of the team member you want to add. They must already have a KeepMyBooking account registered under this email.
- Select their role (Owner, Admin, or Member) using the radio buttons.
- Tap Add Member to send the invitation.
Team member email requirement
The person you are adding must already have an active KeepMyBooking account. If they do not have one, they will need to register, in the app or in a browser, before you can add them as a team member.
VIP Access Management
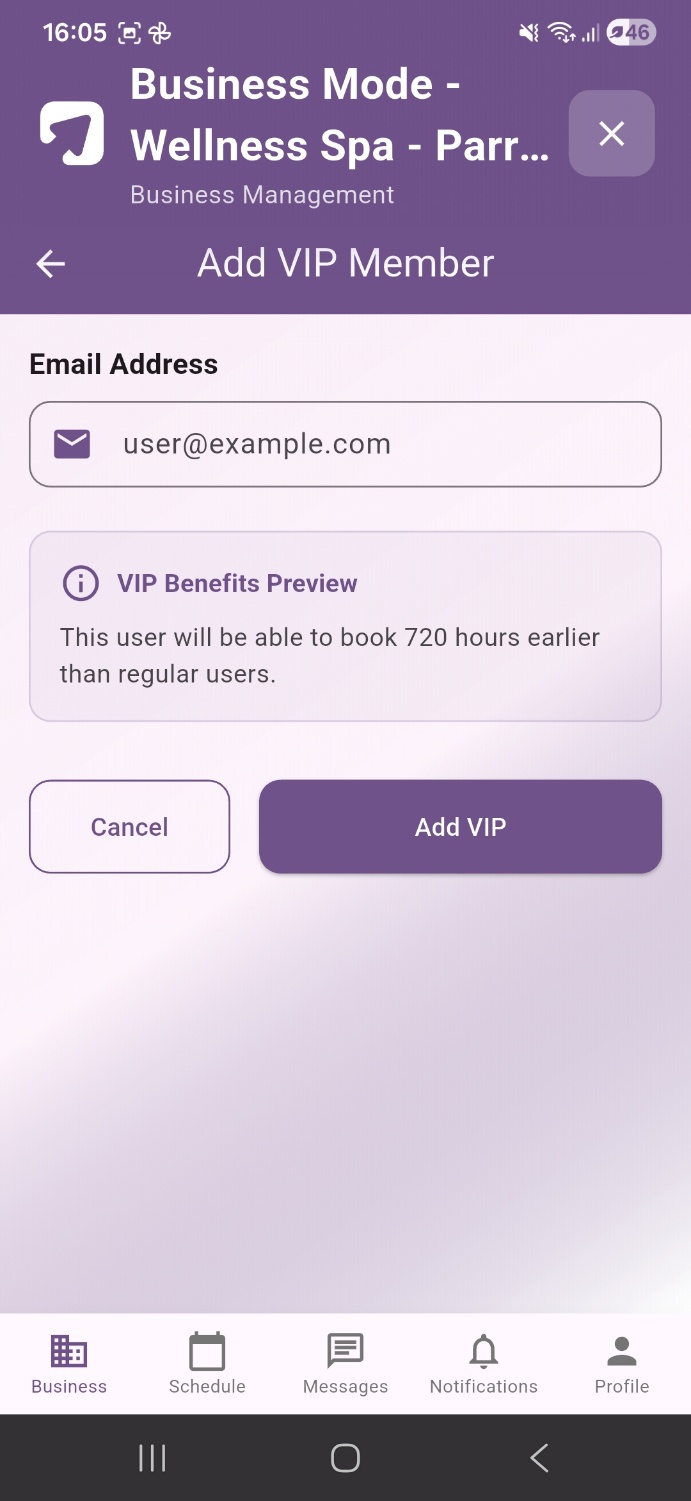
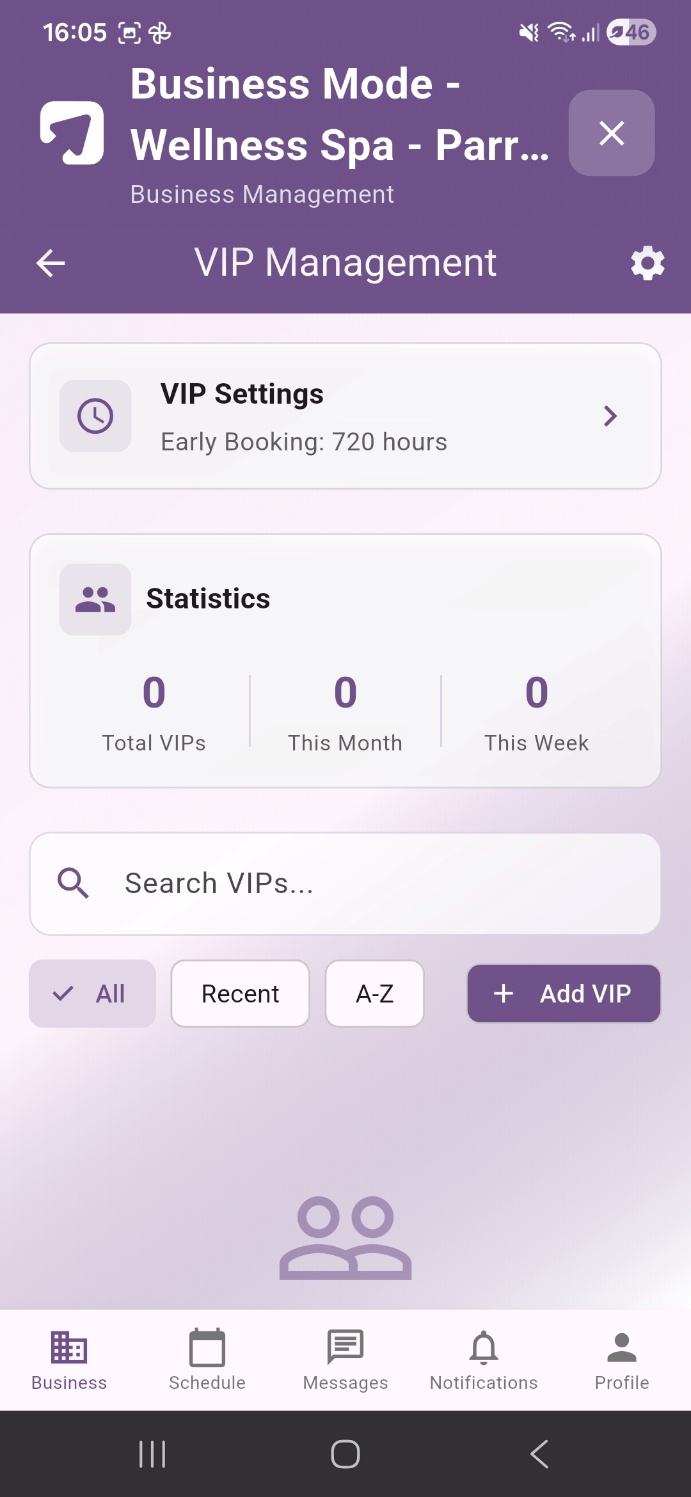
VIP members are designated customers who receive early booking access - they can book appointments earlier in advance than regular customers. By default, VIP members can book 720 hours (30 days) earlier than regular users. You can adjust this window in VIP Settings.
How to add a VIP member
- From the Team & Access tab, tap the Manage VIP button.
- On the VIP Management screen, tap + Add VIP.
- Enter the email address of the customer you want to designate as a VIP member. They must have an active KeepMyBooking account.
- The VIP Benefits Preview shows exactly what advantage this member will receive.
- Tap Add VIP to confirm.
Adjusting the VIP early booking window
Tap VIP Settings on the VIP Management screen to change how many hours in advance VIP members can book compared to regular users. The default is 720 hours (30 days).
Blocked Users
The Blocked Users section at the bottom of the Team & Access tab allows you to block specific customers from booking with your business. Tap Manage Block Users to view or manage your blocked list. Blocks must not be applied on the basis of characteristics protected under anti-discrimination law.
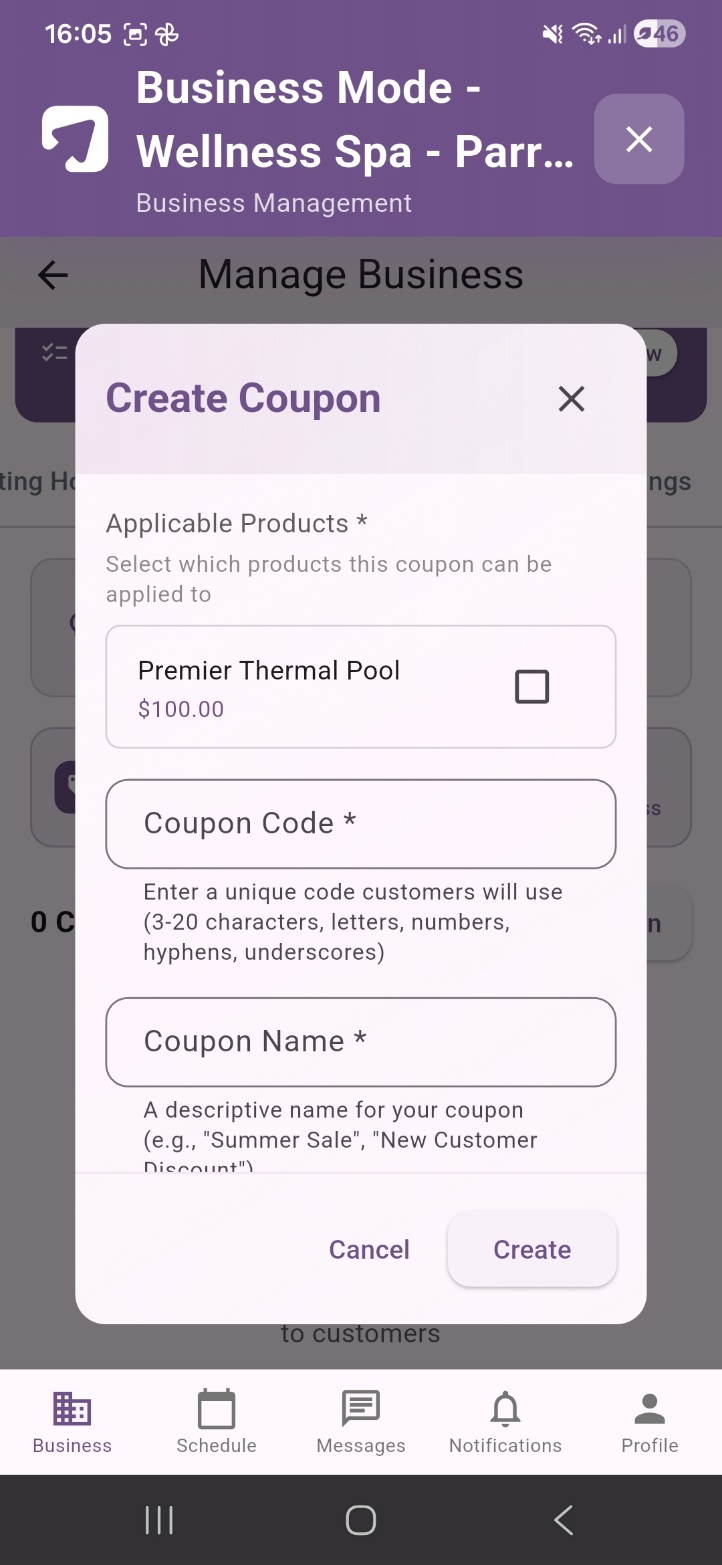
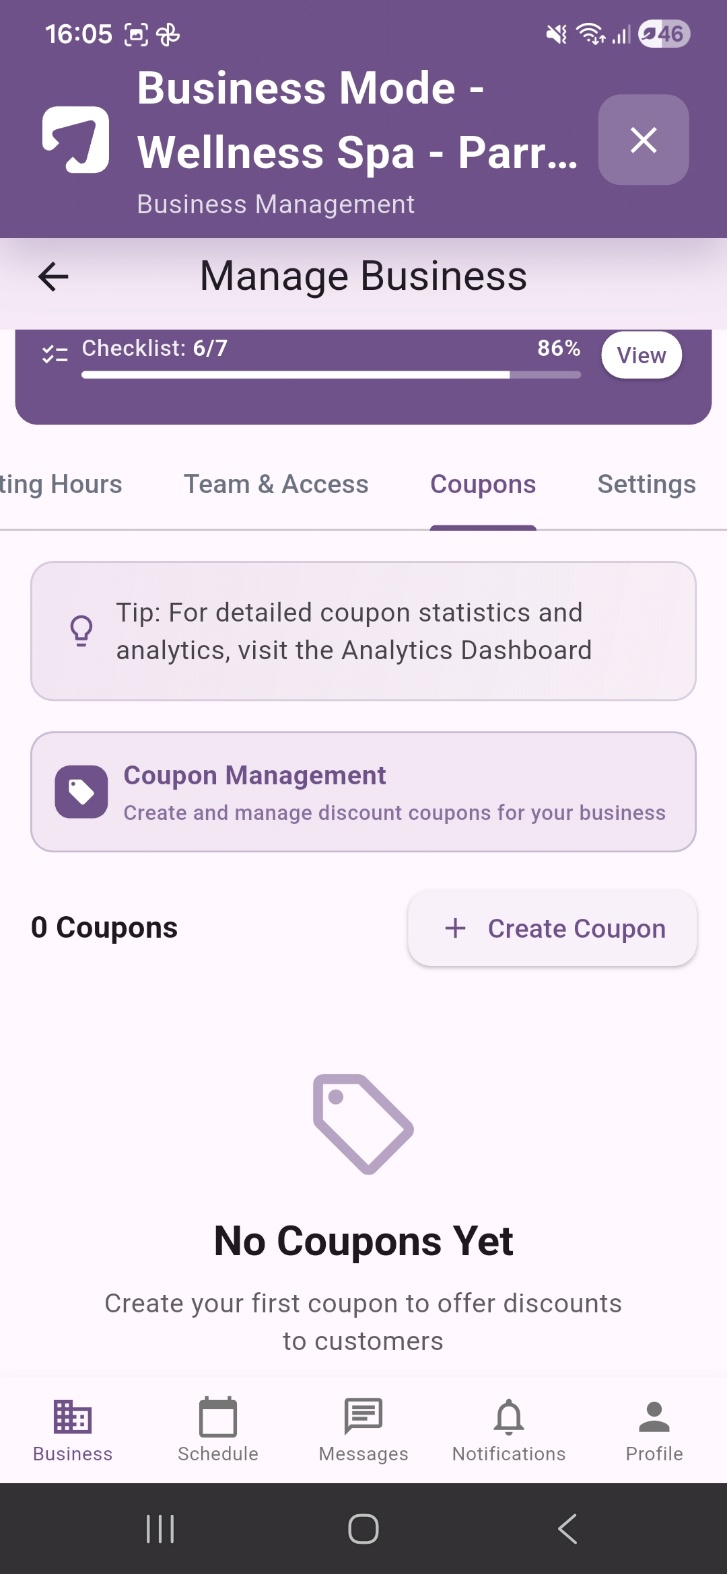
The Coupons tab allows you to create and manage promotional discount codes that customers can apply at the time of booking. Coupons are optional and not required for publication, but are a useful tool for attracting new customers and rewarding loyalty.
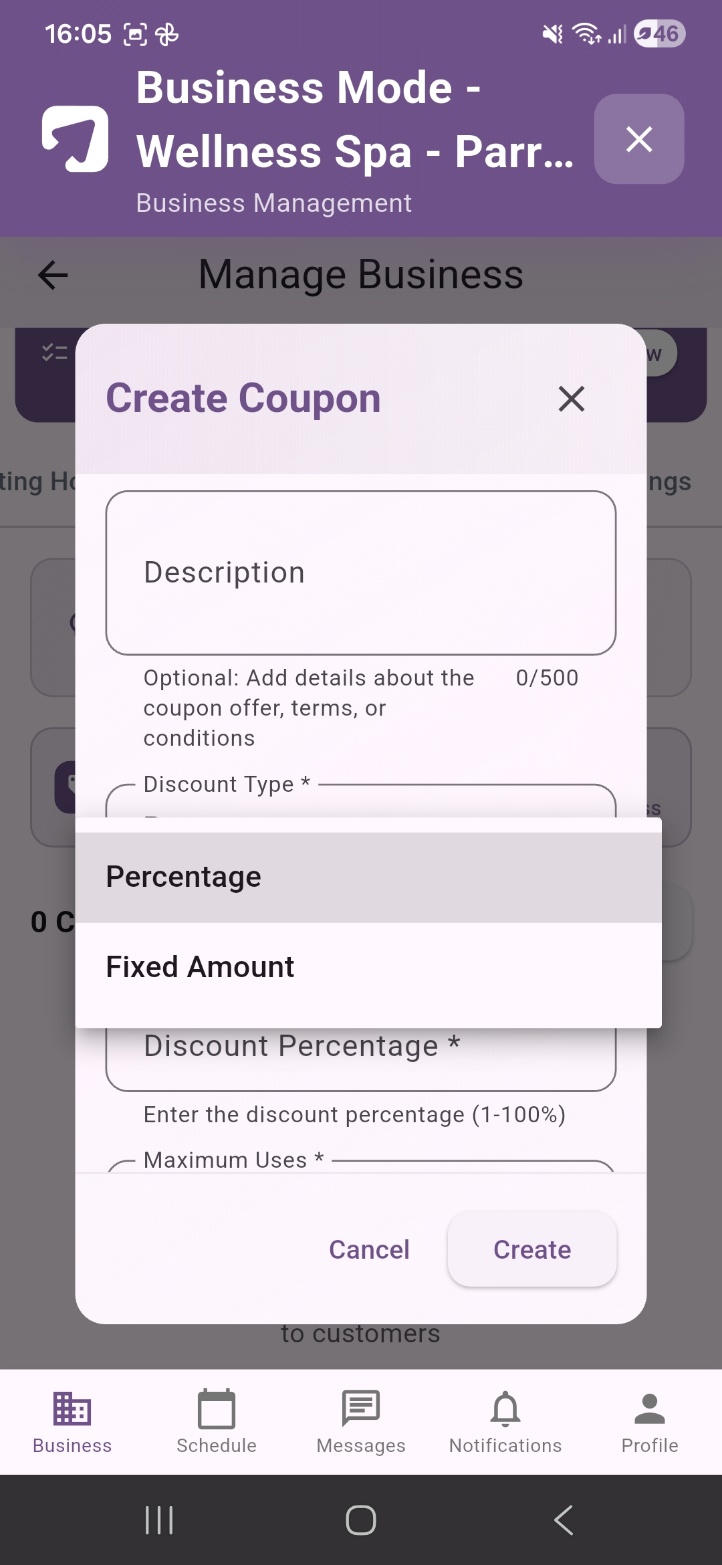
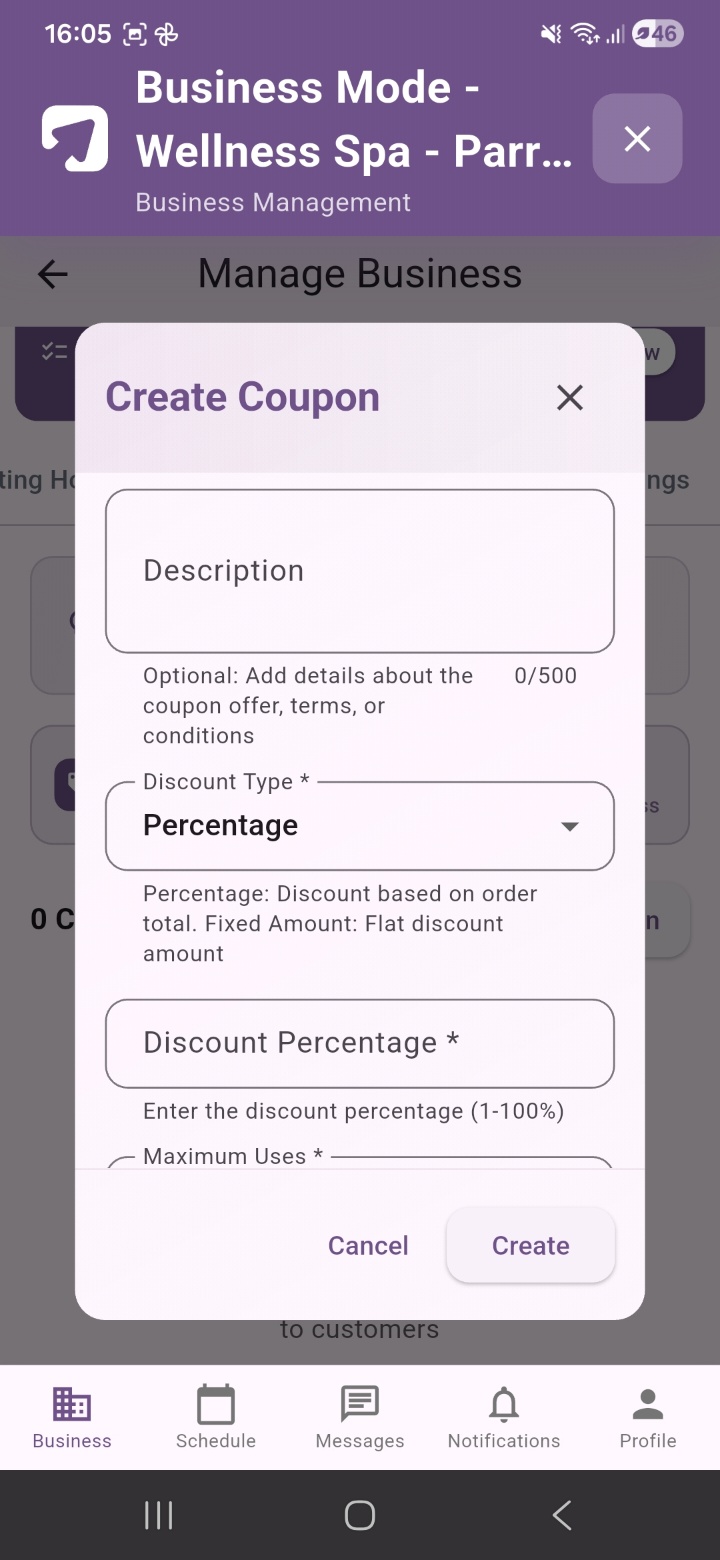
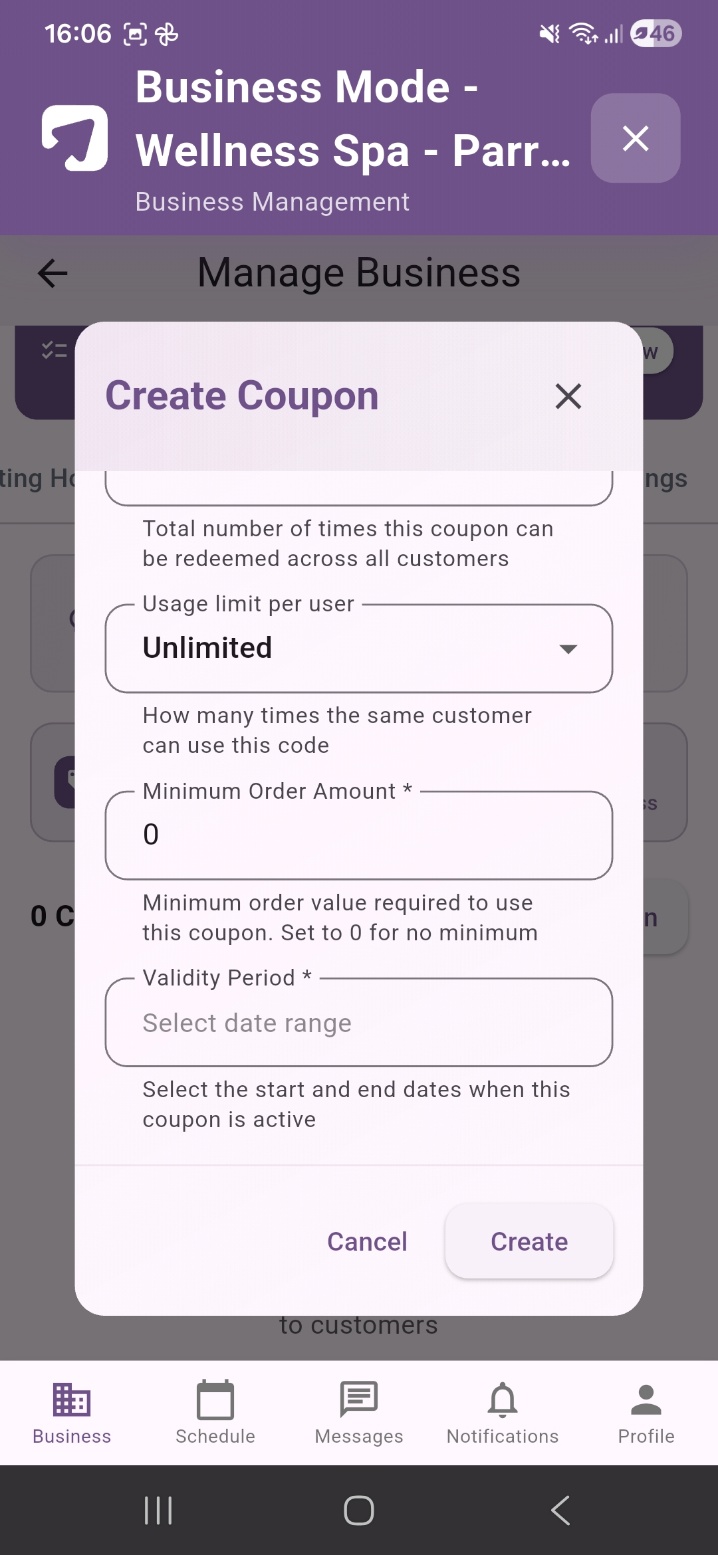
Coupon fields
| Field | Required | What to enter |
|---|---|---|
| Applicable Products | Yes | Select which of your products this coupon applies to. Tick the checkbox next to each product. A coupon can apply to one or multiple products. |
| Coupon Code | Yes | The unique code customers will enter at checkout (e.g., SPA20, SUMMER2025). 3–20 characters. Letters, numbers, hyphens, and underscores only. |
| Coupon Name | Yes | A descriptive internal name for this coupon (e.g., Summer Sale, New Customer Discount). Displayed to customers when the code is applied. |
| Description | No | Optional detail about the offer, terms, or conditions. Displayed to customers when they apply the code. Maximum 500 characters. |
| Discount Type | Yes | Choose Percentage (a % off the order total) or Fixed Amount (a flat dollar discount regardless of order value). |
| Discount Percentage / Amount | Yes | Enter the discount value. For Percentage: enter a number between 1 and 100. For Fixed Amount: enter the dollar amount to be deducted. |
| Maximum Uses | Yes | The total number of times this coupon can be redeemed across all customers. Once this limit is reached, the coupon is automatically deactivated. |
| Usage Limit Per User | No | How many times the same customer can use this code. Set to Unlimited for no per-customer restriction, or choose 1 or 2 to limit repeat use. |
| Minimum Order Amount | Yes | The minimum booking value required for the coupon to be valid. Set to 0 for no minimum. |
| Validity Period | Yes | The date range during which the coupon is active. Tap the field to select a start and end date. The coupon will not be usable outside this date range. |
Once all required fields are completed, tap Create to save the coupon. It will immediately be available for customers to use on applicable products within the validity period.
Coupon analytics
Detailed coupon usage statistics (redemption rates, revenue impact) are available in the Analytics Dashboard under the Premium Analytics subscription (A$10.00/month).
Checklist progress after completing Requirements 1–6
After completing Requirements 1 through 6, your checklist progress bar will show 6/7 (86%). The final requirement - connecting your Stripe payment account - is the last step before you can tap Publish and submit your page for admin review.
The Settings tab is the final tab in Manage Business and contains your most important configuration options: Stripe payment setup (Requirement 7), private business page toggle, Google Calendar integration, cancellation policies, and the Danger Zone.
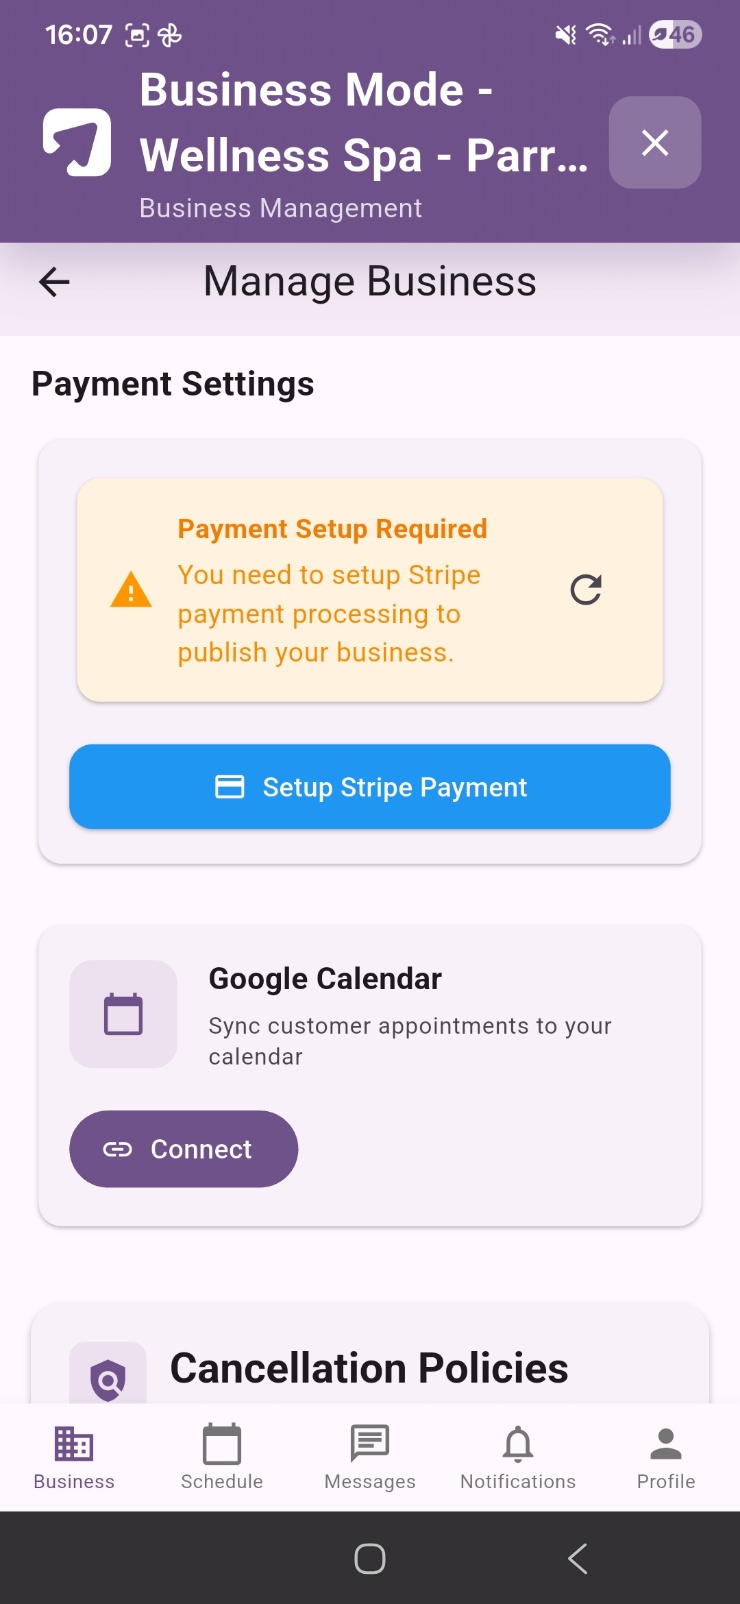
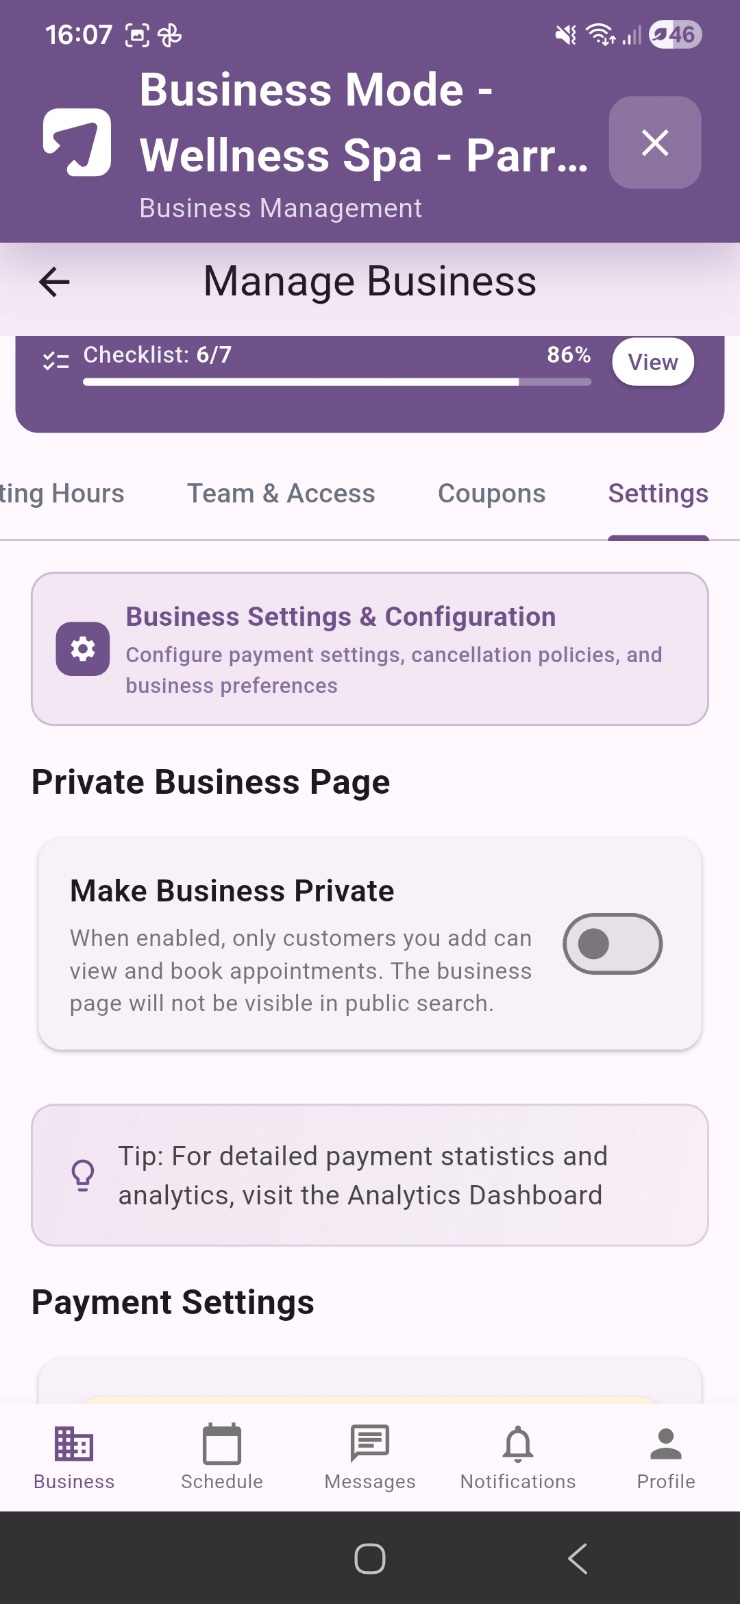
Private Business Page
The Private Business Page toggle controls whether your business profile is visible to the general public in search results, or restricted to customers you specifically invite.
Your business is publicly visible in the KeepMyBooking marketplace. Any user can find and book your services through search and discovery.
Your business page is hidden from public search. Only customers you have specifically added (e.g., via a direct invitation or link) can view and book your services.
Google Calendar Integration
The Google Calendar integration allows confirmed customer bookings to automatically sync to your Google Calendar.
- In the Settings tab, scroll to the Google Calendar section.
- Tap the Connect button.
- You will be prompted to sign in to your Google Account and grant KeepMyBooking permission to access your calendar.
- Once connected, all new confirmed bookings will automatically appear as calendar events in your Google Calendar.
Google Calendar sync is one-directional
Bookings flow from KeepMyBooking into your Google Calendar automatically. However, events you create directly in Google Calendar are not imported back into KeepMyBooking. To block time in KeepMyBooking, use the manual block/offline booking feature in the Schedule tab.
Cancellation Policies
The Cancellation Policies section allows you to configure your own cancellation terms. If no policy is configured, the Platform default applies: customers may cancel, and refunds are the amount paid less any reasonably disclosed non-refundable processing and platform fees. See our Cancellation & Refund Policy and Merchant Terms for full details.
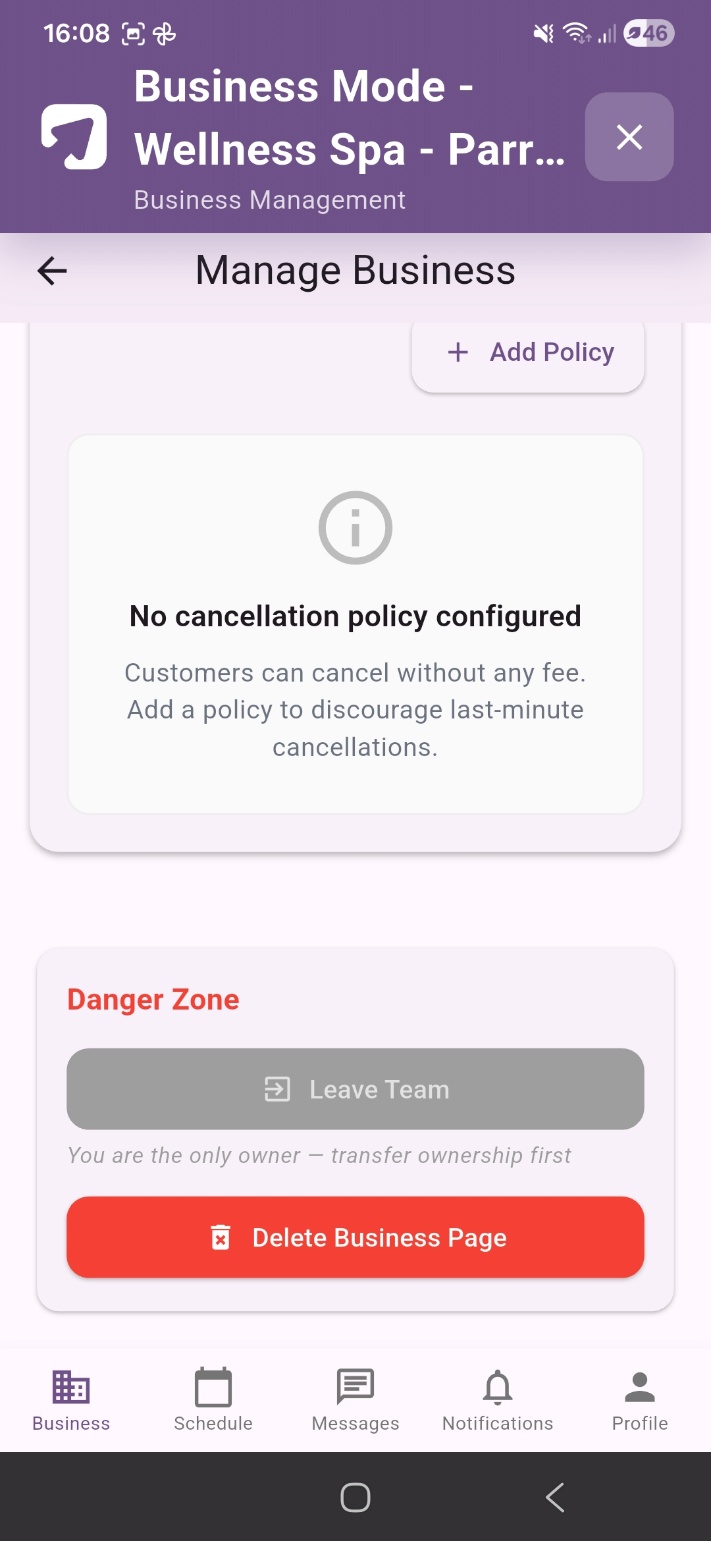
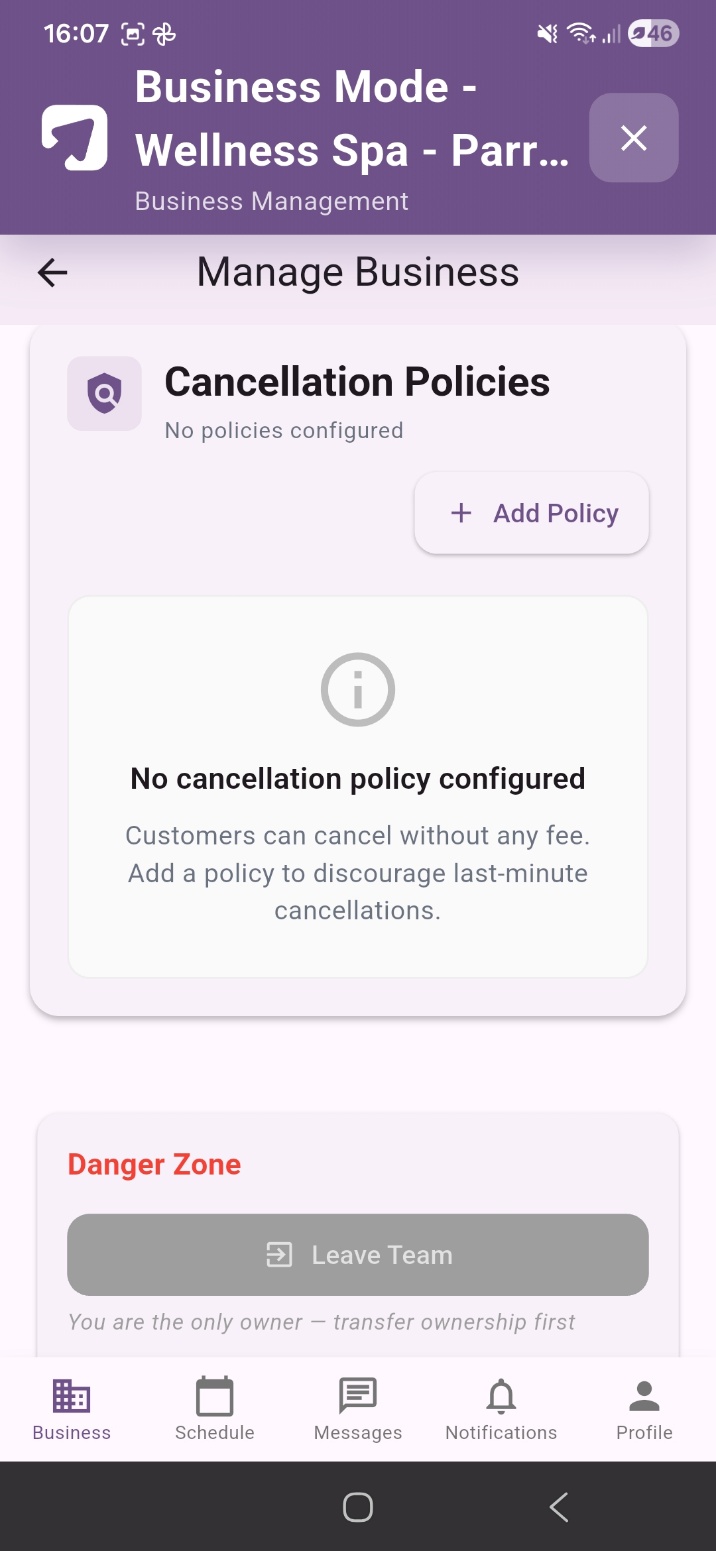
Tap + Add Policy to create a cancellation policy for your business. Your policy settings determine:
- The cancellation window - how many hours before the appointment a customer can cancel without penalty.
- The cancellation fee - a percentage of the booking value charged if the customer cancels within the window.
- No-show fee - the penalty applied when a customer fails to attend without cancelling at all.
Cancellation policy example
If you set a 24-hour window with a 50% fee, a customer who cancels more than 24 hours before their appointment receives a full refund of the service fee. A customer who cancels within 24 hours forfeits 50% of the service fee. Subject to applicable law, for customer-initiated cancellations the KeepMyBooking platform fee and third-party payment processing fees may be non-refundable and deducted from any refund, to the extent disclosed at the time of booking.
No policy = no protection
Without a configured cancellation policy, the Platform default applies: if a customer cancels before the scheduled appointment, they receive a refund of the amount paid less any reasonably disclosed and incurred processing and platform fees. Your rights under applicable consumer law (including the Australian Consumer Law and New Zealand Consumer Guarantees Act 1993) are not affected. If your business relies on confirmed bookings, we strongly recommend configuring a cancellation policy before publishing.
Danger Zone
The Danger Zone section at the bottom of the Settings tab contains two irreversible actions that should be used with extreme caution:
- Leave Team - removes you from this business account. Only available if you have transferred the Owner role to another team member first.
- Delete Business Page - permanently deletes your entire business page, including all services, products, bookings history, and settings. This action cannot be undone.
Delete Business Page is permanent
Tapping Delete Business Page will permanently and irreversibly remove your business profile from the KeepMyBooking platform. This includes all services, products, timeslots, team members, coupon configurations, and customer booking history. This action cannot be recovered. If you only need to temporarily hide your business, use the Private Business Page toggle instead.
Requirement 7 is the final and most critical step before publishing. You must connect a Stripe payment account to receive customer payments. Without a connected Stripe account, confirmed bookings cannot be processed and your page cannot be published.
Stripe is a third-party payment processor. Setting up your Stripe Connect account is a one-time process. Once connected, customer payments for bookings are deposited directly into your nominated bank account via Stripe, minus the KeepMyBooking commission and Stripe processing fees.
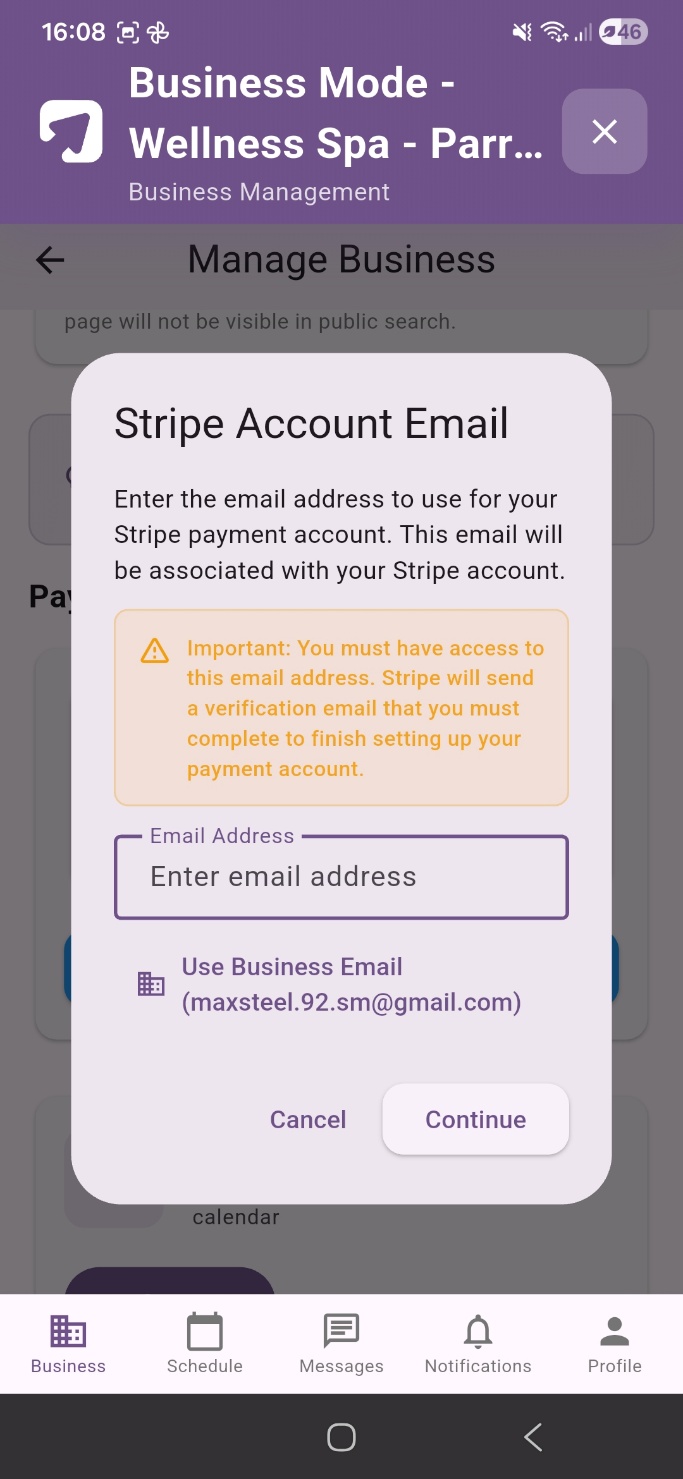
How to set up Stripe payment
- From the Settings tab, scroll to the Payment Settings section.
- You will see a Payment Setup Required warning in amber: "You need to setup Stripe payment processing to publish your business."
- Tap the blue Setup Stripe Payment button.
- The Stripe Account Email modal will appear. Enter the email address you want to use for your Stripe account.
- Alternatively, tap Use Business Email to automatically populate the field with your registered business email address.
- Tap Continue. Stripe will send a verification email to the address you entered. You must open this email and follow the verification link to complete Stripe account setup.
- Follow the on-screen instructions in the Stripe onboarding flow to provide your banking details, identity verification, and business information as required by Stripe.
- Once your Stripe account is verified and connected, return to the KeepMyBooking app. The Payment Setup Required warning will be replaced with a confirmation that your payment is connected.
- Your checklist progress will update to 7/7 - 100% complete.
You must have access to the Stripe email address
Stripe will send a verification email to the address you enter. If you do not have access to that inbox, you will not be able to complete verification. Use an email address you actively monitor.
Stripe verification may take time
Stripe's identity and banking verification process is managed entirely by Stripe and may take anywhere from a few minutes to a few business days. KeepMyBooking has no control over Stripe's verification timelines. You can continue setting up other parts of your profile while waiting for Stripe verification to complete.
Stripe Connect - how payments work
When a customer completes a booking, their payment is processed by Stripe and held in your Stripe Connect account. KeepMyBooking automatically deducts the platform commission (currently 2.5%, as notified on the Platform) and Stripe deducts its processing fee (~1.7% + A$0.30, variable by payment method, card type, and currency). The remaining net amount is paid out to your nominated bank account on Stripe's standard payout schedule. You can view your payout history in your Stripe dashboard.
All 7 Requirements Complete - Publishing Your Page
Once all seven checklist requirements are complete, your checklist progress bar will show 7/7 - 100%. The Publish button in the Public Info & Publish tab will become active. Follow these steps to submit your page for review:
- Navigate to the Public Info & Publish tab in Manage Business.
- Scroll to the bottom of the screen. Verify that the Save Changes button and the Publish button are both visible and active (not greyed out).
- If you have made any unsaved changes to your profile information, tap Save Changes first.
- Tap the Publish button.
- A confirmation prompt may appear - confirm that you want to submit your page for review.
- Your page is now submitted to the KeepMyBooking administration team for review.
Publish submits for review - it does not go live immediately
Tapping Publish does not make your business page immediately visible to customers. It submits your profile to the KeepMyBooking administration team for a manual review. The team will verify your information, check that all content meets platform standards, and approve or request amendments. You will receive an in-app notification when your page is approved and live.
Review timeframe
KeepMyBooking aims to review and respond to new business page submissions within 1–3 business days. During high-volume periods, reviews may take slightly longer. If you have not received a response after 5 business days, contact [email protected] with your registered business name and email address.
The 7 Requirements - Final Summary
| # | Requirement | What was completed | Status |
|---|---|---|---|
| 1 | At least one timeslot | Operating hours and booking availability configured | ✔ Done |
| 2 | At least one service | Service category created and approved | ✔ Done |
| 3 | At least one sub-service | Sub-service offering created under the service | ✔ Done |
| 4 | At least one product | Bookable product with price and timeslot added | ✔ Done |
| 5 | Profile image | Business logo or profile photo uploaded and approved | ✔ Done |
| 6 | Cover image | Banner image uploaded and approved | ✔ Done |
| 7 | Payment setup | Stripe Connect account connected and verified | ✔ Done |
Chapter 2 - Complete Reference Summary
This table summarises all tabs and sections available in the Manage Business screen, for quick reference.
| Tab / Section | Checklist Item? | What you can do here |
|---|---|---|
| Public Info & Publish | No | Update business name, ABN, website, About Us, category, contact details, address, and GPS coordinates. Save changes and submit for publication. |
| Services & Products - Manage Timeslots | Req 1 | Create and manage operating hour windows (time-based or number-based). Set days, hours, duration, parallel capacity, and booking windows. |
| Services & Products - Manage Holidays | No | Block out specific dates or date ranges when your business is closed. |
| Services & Products - Add Service | Req 2 | Create service categories (e.g., Thermal Pool, Massage) that group your bookable offerings. |
| Services & Products - Add Sub-Service | Req 3 | Add specific named offerings under each service (e.g., Private Thermal Pool). |
| Services & Products - Add Product | Req 4 | Create bookable items with pricing, timeslot links, colours, and appointment location. |
| Images | Reqs 5 & 6 | Upload profile image (logo), cover image (banner), and optional gallery photos. |
| Operating Hours | No | Set your displayed business opening hours per day of the week (informational, not booking-related). |
| Team & Access - Team Members | No | Add staff and collaborators with Owner, Admin, or Member roles. |
| Team & Access - VIP Access | No | Designate VIP customers with early booking privileges. Configure VIP early booking window. |
| Team & Access - Blocked Users | No | Block specific customers from booking with your business. |
| Coupons | No | Create and manage discount codes (percentage or fixed amount) with validity periods and usage limits. |
| Settings - Private Page | No | Toggle your business between public (visible in search) and private (invite-only) mode. |
| Settings - Payment Setup | Req 7 | Connect your Stripe account to enable customer payment processing. |
| Settings - Google Calendar | No | Connect your Google Calendar for automatic booking sync to calendar events. |
| Settings - Cancellation Policies | No | Configure your cancellation window, late cancellation fee, and no-show fee. |
| Settings - Danger Zone | No | Leave the team (requires ownership transfer) or permanently delete the business page. |